Akutan Zero

The Akutan Zero, also known as Koga's Zero and the Aleutian Zero, was a type 0 model 21 Mitsubishi A6M Zero Japanese fighter aircraft that crash-landed on Akutan Island, Alaska Territory, during World War II. It was found intact by the Americans in July 1942 and became the first flyable Zero acquired by the United States during the war.[1][2] It was repaired and flown by American test pilots. As a result of information gained from these tests, American tacticians were able to devise ways to defeat the Zero, which was the Imperial Japanese Navy's primary fighter plane throughout the war.
The Akutan Zero has been described as "a prize almost beyond value to the United States",[3] and "probably one of the greatest prizes of the Pacific War".[4] Japanese historian Masatake Okumiya stated that the acquisition of the Akutan Zero "was no less serious" than the Japanese defeat at the Battle of Midway, and that it "did much to hasten Japan's final defeat".[5] On the other hand, John Lundstrom is among those who challenge "the contention that it took dissection of Koga's Zero to create tactics that beat the fabled airplane".
The Akutan Zero was destroyed in a training accident in 1945. Parts of it are preserved in several museums in the United States.
Mitsubishi A6M Zero fighter

The Second Sino-Japanese War began in 1937. Attacks by Chinese fighter planes on Japanese bombers caused the Japanese to develop the concept of fighter escorts. The limited range of the Mitsubishi A5M "Claude" fighter used to escort the bombers caused the Japanese Navy Air staff to commission the Mitsubishi A6M Zero as a long-range land- and carrier-based fighter.[6]
The Zero, which first flew in 1939, was exceedingly agile and lightweight, with maneuverability and range superior to any other fighter in the world at that time.[7] The Zero was superior to any Allied fighter it would encounter for the first two years of the war.[8] To achieve this, however, Japanese engineers had traded off durability. The Zero was very lightly built; it had no armor and no self-sealing fuel tanks. According to American author Jim Rearden, "The Zero was probably the easiest fighter of any in World War II to bring down when hit ... The Japanese ... were not prepared to or weren't capable of building more advanced fighters in the numbers needed to cope with increasing numbers and quality of American fighters".[6][9] The Zero was the primary Japanese Navy fighter throughout the war. During the war, the Japanese manufactured roughly 10,500 Zeros.[10]
In 1940 Claire Lee Chennault, leader of the Flying Tigers, wrote a report on the Zero's performance. However, United States Department of War analysts rejected it as "arrant nonsense" and concluded the performance attributed to the Zero was an aerodynamic impossibility.[11] According to American flying ace William N. Leonard, "In these early encounters and on our own we were learning the folly of dogfighting with the Zero".[12]
During the attack on Pearl Harbor, nine Zeros were shot down.[13] From these wrecks, the Allies learned that the Zero lacked armor and self-sealing fuel tanks, but little else about its capabilities.[14] The Zero's flight performance characteristics—crucial to devising tactics and machinery to combat it—remained a mystery.
Prior to recovery of the Akutan Zero, technical information from three other downed Zeros was available to the Allies. One Zero (serial number 5349), piloted by Hajime Toyoshima, crashed on Melville Island in Australia following the bombing of Darwin. The Zero was heavily damaged, and Toyoshima became Australia's first Japanese prisoner of the Pacific war. Another Zero, piloted by Yoshimitsu Maeda, crashed near Cape Rodney, New Guinea. The team sent to recover the plane erred when they chopped off the wings, severing the wing spars and rendering the hulk unflyable.[15] The third came from China, where Gerhard Neumann was able to reconstruct a working Zero.[2] He used a partly intact Zero (serial number 3372) that had landed in Chinese territory, repaired with salvaged pieces from other downed Zeros. However, bad conditions and the long delivery time from China prevented Neumann's Zero from reaching the United States for testing until after the recovery of the Akutan Zero.[16]
Petty Officer Koga's final mission
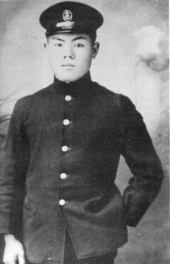
In June 1942, as part of the Japanese Midway operation, the Japanese attacked the Aleutian islands, off the south coast of Alaska. A Japanese task force led by Admiral Kakuji Kakuta bombed Dutch Harbor on Unalaska Island twice, once on June 3 and again the following day.
Tadayoshi Koga, a 19-year-old flight petty officer first class, was launched from the Japanese aircraft carrier Ryūjō as part of the June 4 raid. Koga was part of a three-plane section; his wingmen were Chief Petty Officer Makoto Endo and Petty Officer Tsuguo Shikada. Koga and his comrades attacked Dutch Harbor, shooting down an American PBY-5A Catalina flying boat piloted by Bud Mitchell and strafing its survivors in the water. In the process, Koga's plane (serial number 4593) was damaged by small arms fire.[17]
Tsuguo Shikada, one of Koga's wingmen, published an account in 1984 in which he claimed the damage to Koga's plane occurred while his section was making an attack against two American Catalinas anchored in the bay. This account omits any mention of shooting down Mitchell's PBY. Both American and Japanese records contradict his claims; there were no PBYs in the bay that day. However, his claims do match American records from the attack against Dutch Harbor the previous day (June 3). Rearden noted, "It seems likely that in the near half-century after the event Shikada's memory confused the raids of June 3 and June 4 ... It also seems likely that in his interview, Shikada employed selective memory in not mentioning shooting down Mitchell's PBY and then machine-gunning the crew on the water".[17]
It is not known who fired the shot that brought down Koga's plane, though numerous individuals have claimed credit. Photographic evidence strongly suggests it was hit by ground fire. Members of the 206th Coast Artillery Regiment, which had both 3-inch anti-aircraft guns and .50 caliber machine guns in position defending Dutch Harbor, claimed credit, in addition to claims made by United States Navy ships that were present.[18] Physical inspection of the plane revealed it was hit with small arms fire — .50 caliber bullet holes and smaller, from both above and below.[19][20]
Crash
The fatal shot severed the return oil line, and Koga's plane immediately began trailing oil. Koga reduced speed to keep the engine from seizing as long as possible.[21]
The three Zeros flew to Akutan Island, 25 miles east of Dutch Harbor, which had been designated for emergency landings. Waiting near the island was a Japanese submarine assigned to pick up downed pilots. At Akutan, the three Zeros circled a grassy flat half a mile inland from Broad Bight. Shikada thought the ground was firm beneath the grass, but in his second pass he noticed water glistening. He suddenly realized Koga should make a belly landing. But by then Koga had lowered his landing gear and was almost down.[22]
The plane's landing gear mired in the water and mud, causing the plane to flip upside down and skid to a stop. Although the aircraft survived the landing nearly intact, Petty Officer Koga died instantly on impact, probably from a broken neck or a blunt-force blow to his head. Koga's wingmen, circling above, had orders to destroy any Zeros that crash-landed in enemy territory, but as they did not know if Koga was still alive, they could not bring themselves to strafe his plane. They decided to leave without firing on it. The Japanese submarine stationed off Akutan Island to pick up pilots searched for Koga in vain before being driven off by the destroyer USS Williamson.[22]
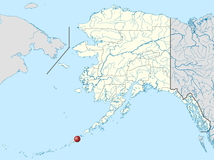 Location of Akutan in Alaska
 The Zero trailing oil over Dutch Harbor, moments after being hit.
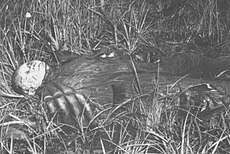 The body of pilot, Tadayoshi Koga, after being pulled from the wrecked plane.
Recovery
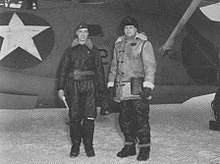
The crash site, which was out of sight of standard flight lanes and not visible by ship, remained undetected and undisturbed for over a month. On July 10, 1942, an American PBY Catalina piloted by Lieutenant William "Bill" Thies spotted the wreckage. Thies's Catalina had been patrolling by dead reckoning and had become lost. On spotting the Shumagin Islands, he reoriented his plane and began to return to Dutch Harbor by the most direct course—over Akutan Island. Machinist Mate Albert Knack, who was the plane captain (note: the term "plane captain" in US Navy usage refers to an aircraft's assigned maintenance crew chief, not the pilot-in-command), spotted Koga's wreck. Thies's plane circled the crash site for several minutes, noted its position on the map, and returned to Dutch Harbor to report it. Thies convinced his commanding officer, Paul Foley, to let him return with a salvage team. The next day (July 11), the team flew out to inspect the wreck. Navy photographer's mate Arthur W. Bauman took pictures as they worked.[23]
Thies's team extracted Koga's body from the plane by having Knack (the smallest crew member) crawl up inside the plane and cut his safety harness with a knife. They searched it for anything with intelligence value, and buried Koga in a shallow grave near the crash site. Thies returned with his team to Dutch Harbor, where he reported the plane as salvageable. The next day (July 12), a salvage team under Lieutenant Robert Kirmse was dispatched to Akutan. This team gave Koga a Christian burial in a nearby knoll and set about recovering the plane, but the lack of heavy equipment (which they had been unable to unload after the delivery ship lost two anchors) meant their efforts failed. On July 15, a third recovery team was dispatched. This time, with proper heavy equipment, the team was able to free the Zero from the mud and hauled it overland to a nearby barge, without further damaging it. The Zero was taken to Dutch Harbor, turned right-side up, and cleaned.[24]
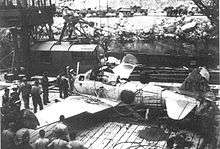
The Akutan Zero was loaded into the USS St. Mihiel and transported to Seattle, arriving on August 1. From there, it was transported by barge to Naval Air Station North Island near San Diego where repairs were carefully carried out. These repairs "consisted mostly of straightening the vertical stabilizer, rudder, wing tips, flaps, and canopy. The sheared-off landing struts needed more extensive work. The three-blade Sumitomo propeller was dressed and re-used."[25] The Zero's red Hinomaru roundel was repainted with the American blue circle-white star insignia. The whole time, the plane was kept under 24-hour military police guard in order to deter would-be souvenir hunters from damaging the plane. The Zero was fit to fly again on September 20.[26]
Analysis

Data from the captured Zero had been transmitted to the U.S. Navy's Bureau of Aeronautics (BuAer) and Grumman Aircraft. After careful study, Roy Grumman decided that he could match or surpass the Zero in most respects, except in range, without sacrificing pilot armor, self-sealing tanks and fuselage structure. The new F6F Hellcat would compensate for the extra weight with additional power.[27][28]
On September 20, 1942, two months after the Zero's capture, Lieutenant Commander Eddie R. Sanders took the Akutan Zero up for its first test flight. He would make 24 test flights between September 20 and October 15. According to Sanders' report:
These flights covered performance tests such as we do on planes undergoing Navy tests. The very first flight exposed weaknesses of the Zero which our pilots could exploit with proper tactics ... immediately apparent was the fact that the ailerons froze up at speeds above 200 knots so that rolling maneuvers at those speeds were slow and required much force on the control stick. It rolled to the left much easier than to the right. Also, its engine cut out under negative acceleration due to its float-type carburetor. We now had the answer for our pilots who were being outmaneuvered and unable to escape a pursuing Zero: Go into a vertical power dive, using negative acceleration if possible to open the range while the Zero's engine was stopped by the acceleration. At about 200 knots, roll hard right before the Zero pilot could get his sights lined up.[29]
In later test flights, Anacostia Naval Air Station director of flight testing Frederick M. Trapnell flew the Akutan Zero in performance while Sanders simultaneously flew American planes performing identical maneuvers, simulating aerial combat. Following these, USN test pilot Lieutenant Melvin C. "Boogey" Hoffman conducted more dogfighting tests between himself flying the Akutan Zero and recently commissioned USN pilots flying newer Navy aircraft.
Following its tests by the Navy, the Zero was transferred from Naval Air Station North Island to Anacostia Naval Air Station in 1943. The aircraft painted in U.S. Navy blue with star insignia was displayed at Washington National Airport as a war prize.[30] In 1944, it was recalled to North Island for use as a training plane for rookie pilots being sent to the Pacific. A model 52 Zero, captured during the liberation of Guam, was later used as well.[31]
Data and conclusions from these tests were published in Informational Intelligence Summary 59, Technical Aviation Intelligence Brief #3, Tactical and Technical Trends #5 (published prior to the first test flight), and Informational Intelligence Summary 85. These results tend to somewhat understate the Zero's capabilities.[32]
Consequences
Data from the captured aircraft were submitted to the BuAer and Grumman for study in 1942.[28] The U.S. carrier-borne fighter plane that succeeded the Grumman F4F Wildcat,[5][33] the F6F, would be tested in its first experimental mode as the XF6F-1 prototype with an under-powered Wright R-2600 Twin Cyclone 14-cylinder, two-row radial engine on 26 June 1942.[34][35] Shortly before the XF6F-1's first flight, and based on combat accounts of encounters between the F4F Wildcat and A6M Zero, on 26 April 1942, BuAer directed Grumman to install the more powerful 18-cylinder Pratt & Whitney R-2800 Double Wasp radial engine — already powering Chance Vought's Corsair design since its beginnings in 1940 — in the second XF6F-1 prototype.[36] Grumman complied by redesigning and strengthening the F6F airframe to incorporate the 2,000 hp (1,500 kW) R-2800-10 engine, driving a three-bladed Hamilton Standard propeller. With this combination Grumman estimated the XF6F-3's performance would increase by 25% over that of the XF6F-1.[37] This first Double Wasp-equipped Hellcat airframe, bearing BuAer serial number 02982, first flew on 30 July 1942. The F6F-3 subtype had been designed with specific "Wildcat vs Zero" input from Battle of the Coral Sea and Battle of Midway veteran F4F pilots such as Jim Flatley and Jimmy Thach, respectively, among several others, obtained during a meeting with Grumman Vice President Jake Swirbul at Pearl Harbor on 23 June 1942, with the first production F6F-3 making its first flight just over three months later, on October 3, 1942.[35][38][39][40] While the captured Zero's tests did not drastically influence the Hellcat's design,[41] they did give knowledge of the Zero's handling characteristics, including its limitations in rolling right and diving.[42] That information, together with the improved capabilities of the Hellcat, were credited with helping American pilots "tip the balance in the Pacific".[33] American aces Kenneth A. Walsh and R. Robert Porter, among others, credited tactics derived from this knowledge with saving their lives.[42] James Sargent Russell, who commanded the PBY Catalina squadron that discovered the Zero and later rose to the rank of admiral, noted that Koga's Zero was "of tremendous historical significance." William N. Leonard concurred, describing it thus: "The captured Zero was a treasure. To my knowledge, no other captured machine has ever unlocked so many secrets at a time when the need was so great."[43]
Some historians dispute the degree to which the Akutan Zero influenced the outcome of the air war in the Pacific. For example, the Thach Weave, a tactic created by John Thach and used with great success by American airmen against the Zero, was devised by Thach prior to the attack on Pearl Harbor, based on intelligence reports on the Zero's performance in China.[44]
The capture and flight tests of Koga's Zero is usually described as a tremendous coup for the Allies as it revealed the secrets of that mysterious aircraft and led directly to its downfall. According to this viewpoint, only then did Allied pilots learn how to deal with their nimble opponents. The Japanese could not agree more ... Yet those naval pilots who fought the Zero at Coral Sea, Midway, and Guadalcanal without the benefit of test reports would beg to differ with the contention that it took dissection of Koga's Zero to create tactics that beat the fabled airplane. To them the Zero did not long remain a mystery plane. Word quickly circulated among the combat pilots as to its particular attributes. Indeed on 6 October while testing the Zero, Akutan Zero test pilot Frederick M. Trapnell made a highly revealing statement: 'The general impression of the airplane is exactly as originally created by intelligence—including the performance'.[45]
However, nine wrecked Mitsubishi A6M Zeros were recovered from Pearl Harbor shortly after the attack in December 1941, and United States Office of Naval Intelligence, along with BuAer had them studied, and then shipped to the Experimental Engineering Department at Dayton, Ohio in 1942. It was noted that the experimental Grumman XF6F-1s then under-going testing in June 1942 and the Zero had "wings integrated with the fuselage,"[46] a design feature not normally practiced in American aircraft production at that time.
The Akutan Zero was destroyed during a training accident in February 1945. While the Zero was taxiing for a take-off, a Curtiss SB2C Helldiver lost control and rammed into it. The Helldiver's propeller sliced the Zero into pieces. From the wreckage, William N. Leonard salvaged several gauges, which he donated to the National Museum of the United States Navy. The Alaska Heritage Museum and the Smithsonian National Air and Space Museum also have small pieces of the Zero.[47]
In an attempt to repatriate Koga's body, American author Jim Rearden led a search on Akutan in 1988. He located Koga's grave, but found it empty. Rearden and Japanese businessman Minoru Kawamoto conducted a records search. They found that in 1947 Koga's body was exhumed by an American Graves Registration Service team and re-buried on Adak Island, further down the Aleutian chain. The team, unaware of Koga's identity, marked his body as unidentified. The Adak cemetery was excavated in 1953, and 236 bodies were returned to Japan. The body buried next to Koga (Shigeyoshi Shindo) was one of 13 identified; the remaining 223 unidentified remains were re-interred in Chidorigafuchi National Cemetery in Japan. It is probable that Koga was one of them.[48] Rearden later wrote the definitive account of the Akutan Zero.
Notes
- ↑ Rearden, Enemy.
- 1 2 James F. Lansdale (1999). "War Prize: The Capture of the First Japanese Zero Fighter in 1941". Archived from the original on 2010-01-17. Retrieved 2014-08-13.
- ↑ Rearden, Fighter, x.
- ↑ Larry Dwyer (2003). "Mitsubishi A6M Zero-Sen – Japan". The Aviation History On-Line Museum. Retrieved 2008-12-09.
- 1 2 Okumiya, 160–163
- 1 2 Rearden, Fighter, 1–3.
- ↑ Oxford guide, "Fighters" entry, pages 278–279. The Zero's supremacy in flight range is given in table 2, sourced to W. Green, Warplanes of the Second World War, 1961. Maneuverability is described as "excellent ... Of the early Allied fighters, only the F4F Wildcat could oppose it on anything like equal terms".
- ↑ Oxford Guide, "Air power" entry, page 17. "It was largely thanks to these blows, and the superiority of the Japanese Navy's Zero fighter to anything that it was to meet for two years to come, that the Japanese were able to sweep through the ill-defended British and Dutch possessions in South-East Asia without the Allies being able to interrupt their communications".
- ↑ Rearden, Fighter, 10.
- ↑ Bergerud, 205
- ↑ Handel, 139.
- ↑ Rearden, Fighter, 14.
- ↑ Rearden, Fighter, 28.
- ↑ Rearden, Fighter, 29.
- ↑ Rearden, Fighter, 30.
- ↑ "Lemelson-MIT program – Inventor of the Week Archive profile of Gerhard Neumann". MIT. 1998. Retrieved 2008-12-09.
- 1 2 Rearden, Fighter, 54.
- ↑ WILLIWAW WAR: The Arkansas National Guard in the Aleutians in World War II by Donald Goldstein and Katherine V. Dillon, March 1992, University of Arkansas Press, page 188. See Also, NEVER GIVE UP! A HISTORY OF THE 206TH COAST ARTILLERY (ANTI-AIRCRAFT) REGIMENT OF THE ARKANSAS NATIONAL GUARD IN THE SECOND WORLD WAR by William E. Maxwell, Jr. March 1992
- ↑ Rearden, Fighter, 56
- ↑ Rearden, Fighter, 67–68.
- ↑ Rearden, Fighter, 57.
- 1 2 Rearden, Fighter, 58.
- ↑ Rearden, Fighter, 61–2.
- ↑ Rearden, Fighter, 66–70.
- ↑ Rearden, Fighter, 72. Appendix II contains an exhaustive list of repairs.
- ↑ Rearden, Fighter, 72.
- ↑ Ewing (Thach Weave) p.84
- 1 2 Thruelsen p. 178
- ↑ Rearden, Fighter, 73.
- ↑ Nicholas, William H.; Edwards, Walter Meayers (September 1943). "Wartime Washington". National Geographic.
- ↑ Rearden, Fighter, 78–84.
- ↑ Richard L. Dunn (2004). "Zero Model 21: unraveling the performance data (part 1)". Retrieved 2008-12-09.
- 1 2 Degan, Flattop, 103.
- ↑ Francillon p. 198
- 1 2 O'Leary, 67–74.
- ↑ Ewing and Lundstrom 2004, pp. 155, 156.
- ↑ Sullivan 1979, p. 4.
- ↑ Ewing (Thach Weave) p. 86, 182, 308
- ↑ Ewing (Reaper Leader) 172, 106
- ↑ Thruelsen p. 166
- ↑ Rearden, Fighter, 86.
- 1 2 Rearden, Fighter, 88.
- ↑ Rearden, Fighter, 86–8.
- ↑ Rearden, Fighter, 4–5.
- ↑ Lundstrom, 535.
- ↑ Ewing 2004 p. 102
- ↑ Rearden, Fighter, 91.
- ↑ Rearden, Fighter, 95–8.
Sources
- Bergerud, Eric M. Fire in the Sky: The Air War in the South Pacific. Westview Press, 2001, ISBN 0-8133-3869-7.
- Handel, Michael I. War, Strategy, and Intelligence. Routledge, 1989. ISBN 0-7146-3311-9.
- Ewing, Steve (2002). Reaper Leader, The Life of Jimmy Flatley. Naval Institute Press. ISBN 1-55750-205-6.
- Ewing, Steve (2004). Thach Weave, The Life of Jimmie Thach. Naval Institute Press. ISBN 1-59114-248-2.
- Francillon, Rene J. (1989). Grumman Aircraft Since 1929. Naval Institute Press. ISBN 0-87021-246-X.
- Lundstrom, John B. The First Team and the Guadalcanal Campaign: Naval Fighter Combat from August to November 1942. Naval Institute Press, 2005. ISBN 1-59114-472-8.
- Okumiya, Masatake, Jiro Horikoshi, and Martin Caidin. Zero! New York: E.P. Dutton & Co., 1956.
- O'Leary, Michael. United States Naval Fighters of World War II in Action. Poole, Dorset, UK: Blandford Press, 1980. ISBN 0-7137-0956-1.
- The Oxford Companion to World War II. Edited by I.C.B. Dear. Oxford University Press, 1995. ISBN 978-0-19-534096-9.
- Rearden, Jim. Koga's Zero: The Fighter That Changed World War II. ISBN 0-929521-56-0, second edition. Missoula, Montana: Pictorial Histories Publishing Company, 1995. Originally published as Cracking the Zero Mystery: How the U.S. Learned to Beat Japan's Vaunted WWII Fighter Plane. ISBN 978-0-8117-2235-3.
- Rearden, Jim. Koga's Zero—An Enemy Plane That Saved American Lives. Invention and Technology Magazine. Volume 13, Issue 2, Fall 1997. Retrieved on 2008-12-09.
- Degan, Patrick Flattop Fighting in World War II. McFarland, 2003. ISBN 978-0-7864-1451-2.
- Thruelsen, Richard (1976). The Grumman Story. Praeger Publishers, ISBN 0-275-54260-2.
External links
| Wikimedia Commons has media related to Akutan Zero. |
| Wikisource has original text related to this article: |
| Wikisource has original text related to this article: |
- Bill Thies's website
- Zeros over China, 1941–1942. Ben Schapiro. The Warbird's Forum, May 2008—An article describing the capture and repair of Gerhard Neumann's Zero in China in 1941.
- War Prize: The Capture Of The First Japanese Zero Fighter In 1941. James F. Lansdale. j-aircraft.com, December 3, 1999. A second article describing the capture and repair of Gerhard Neumann's Zero.
- Article on Yoshimitsu Maeda's crashed Zero