Multi-image
Multi-image is the now largely obsolete practice and business of using 35 mm slides (diapositives) projected by single or multiple slide projectors onto one or more screens in synchronization with an audio voice-over or music track. Multi-image productions[1] are also known as multi-image slide presentations, slide shows and diaporamas and are a specific form of multimedia or audio-visual production.
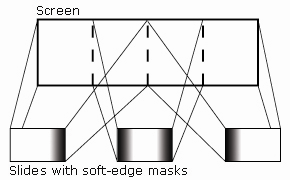
One of the hallmarks of multi-image was the use of the wide screen panorama. Precisely overlapping slides were placed in slide mounts with soft-edge density masks; when the resulting images were projected, the images would blend seamlessly on the screen to create the panorama. By cutting and dissolving between images in the projectors, animation effects were created in the panorama format.
The term multi-image is sometimes used to describe digital photo image computer programs that combine or change images on-screen, for photo montages, and image stitching.
Description
Multi-image presentations were a unique form of communication to audiences of various sizes, to meet a variety of communication and entertainment needs. The use of projected photographic images such as lantern slides for entertainment and instruction dates to the early 1800s.[2] Others, such as L. Frank Baum had a traveling show (1908) that included slides, film, and actors describing the land of Oz. Throughout the years improvements in technology took place and applications for multi-image continued to expand. During the 1960s, automated synchronized audio and slides modules became more common and found use in instructional environments.
In general, multi-image can be defined as being:
- Based largely on analog production tools and technologies including art and audio production and film-based photography. 35mm slide film has high resolution and color range and are based on grain and dye clouds rather than on a fixed raster pattern, which when projected often is perceived[3] as being more realistic, uniform, and detailed than digital images. Line density for 35mm film is up to 3850 lines per inch, which no video projection technology can match.
- Multi-disciplinary in terms of the types of skills required to create and stage multi-image presentations.
- Venue driven; multi-image presentations had specific requirements for the equipment and spaces they were intended for and presented in.
Multi-image business
Multi-image as a business thrived during the 1970s and 1980s. Multi-image presentations ranged from single projector shows run by projector-viewer[4] to large events for business meetings and conventions where multiple shows would be presented and often were rear-projected by 24 or more projectors.
Creating and presenting multi-image productions involved a relatively large number of specialized skills, equipment, and facilities to produce. During the height of multi-image, a number of types of businesses were directly engaged in the industry which employed thousands of specialists that ranged from producers and designers, writers, artists, typesetters, photographers, photo lab technicians, audio technicians, programmers, staging specialists as well as others associated with these disciplines.
A professional organization, the Association for Multi-image International (AMI),[5] was created and had numerous active chapters around the world. The AMI held an annual convention and multi-image competition. Local chapters of AMI in various cities also held regional competitions.
An entire industry grew around supplying the tools and equipment needed to supply and support multi-image production.
- Corporations who manufactured and sold basic equipment and materials used in the production of multi-image, such as 35mm slide projectors, film, slide mounts, soft-edge masks and other items. The list of suppliers for the multi-image industry was extensive with a number of companies attaining international importance for the products they produced, including Eastman Kodak, Wess Slide Mounts, Chief Manufacturing, Navitar and Schneider Optics.[6]
- Manufacturers of highly specialized multi-image equipment such as optical slide cameras and slide projector programming hardware. Precise camera systems were developed for the multi-image market featuring pin-registered film movements capable of making multiple exposures, controlled backlit color light sources, motorized multi-axis compounds for precise positioning of artwork, and long-roll film loads. Slide projector programming computers and dissolve equipment and software was developed to synchronize the slides with the audio by providing precise time control over slide tray positioning and lamp fade rates needed to create multi-image animation. Programmer and camera manufacturers included Audio Visual Labs, Electrosonic, Clearlight Inc. Spindler & Sauppe,[7] Marron Carrel and Forox.
Driven by changes in technology and by economic considerations, multi-image has almost entirely been replaced by video presentations and by readily available computer based technologies such as laptop computers running PowerPoint and projecting through digital projectors. Visual presentation and photo and graphics editing software programs have allowed a wider range of communicators quick, flexible, and easy access to the tools and technologies needed to create presentations. Digital photography has reduced the need for laboratory services and complex equipment. The expansion and ease of use of desktop computing brought a close to the multi-image industry.
Multi-image production technologies

The art and business of multi-image drew from many older existing technologies. When a multi-image project was initiated, various overall management roles were required to provide direction, planning, and project management. These roles generally involved the activities similar to those found in other media industries, such as creative, visual, and technical directors, producers, production managers, and writers.
Often individuals with the various production skills would fill these roles as well as performing their production roles. Multi-image productions in general were deadline driven and it was common that the production process would be non-linear, allowing for multiple activities to take place with overlapping roles.
Art and design
The visual quality of a presentation was based on using photographs or artwork created for use in the presentation as source material. 35mm slides could be used directly as they were originally taken. Often the original photographs were masked or duplicated for positioning and sizing. In some instances, 35mm cameras modified for pin-registration were used to create animated sequences.
Through the use of multiple projectors set up to project onto a screen area, over-projected images could be designed as animations. Typical multi-image animation effects included fading from one photograph or graphic to another, progressively building text to form a completed statement, inserting images or graphics into frames or windows on screen, step by step movement of images across the screen area, and superimposing text or images onto a background. The visual effects were synchronized to music or voice and based on the capabilities and limitations of the slide projectors and dissolve units.
Artwork produced for multi-image presentations in general was based on one of two forms of top-lit reflective copy artwork:
- Materials that were produced and copied as flat art directly to slides to be used in the production, or
- Color- or image separated and layered photomechanical art that would be copied to high-contrast masks which were then used to create slides. This second process was called optical slide printing and was based on many of the basic principles from photomechanical prepress art used in offset printing, silk-screen printing, and cel animation.
Flat art was created by using a variety of standard graphic illustration techniques, using pen and ink, airbrush, paints, from clip art, colored paper, transfer lettering such as Letraset, and by copying from existing materials on a copy stand or on optical slide camera. Cel art, such as found in cel animation, was also used.
Art used in optical slide printing was based on the use of high-contrast photomechanical materials such as photomechanical transfers,[8] black and white type, rubylith and other materials. Phototypesetting was done by a variety of means including the Visual Graphics Corporation PhotoTypositor[9] and the Compugraphic EditWriter[10] at companies that specialized in providing typography. When making artwork for multi-image presentations, photographs, transparencies, and film images or continuous tone film or airbrushed masks could also be used as part of the camera-ready artwork.
The color or image separated layers of artwork were pin-registered using a variety of standard pin systems[11] including 1/4-inch, Oxberry, and Acme. The artwork was created on a light table or animation disc[12] to provide back lighting.
Often the art was created based on a grid system. A copy of the optical slide camera grid or reticle was used to align the artwork elements. The use of the grid for alignment could be used to accurately position images and art elements throughout the process from the creation of the artwork to the final projected images. This process also allowed layers of the artwork to be interchangeable from slide to slide, images or graphic elements could be carefully placed on the screen relative to other images, and for combining parts of images or graphics by separate slides as in an animated sequence.
Audio production
The audio track of a multi-image show provided a framework for the timing of the presentation and for the sequencing and animations of the slides. These were produced generally on 1/4-inch audio tape on multi-track tape recorders such as models by Tascam, TEAC, Sony, Fostex and Crown, which allowed for having two tracks or channels for stereo sound and one for the synchronization or click track which was used to encode and playback the signals for the dissolve units. The audio and synchronization tracks were normally separated by a blank track to prevent any carryover of the synchronization cues into the audio playback. Audio editing of the music or voice-over was done manually to create a scratch track, usually with a cutting block and tape.[13] Once the audio edits were completed, the final version would be copied onto another tape; either to 1/4 inch, cassette or other format so that there tape used to run the presentation would be a fresh uncut tape.
As productions became more sophisticated, 16 and 24-track recording processes were used to create elaborate soundtracks and 4-channel surround sound for large business theatre environments. In productions such as the Maritz-produced car announcement shows for GM and Ford Motor Company, 16-track recorders were used for playback onsite. These 2-inch showtapes would contain extra tracks to support the vocals for a live cast onstage, as well as additional string-section support for the live orchestra and a click track to cue the conductor, in order to maintain synchronization between the cast, orchestra and on-screen visuals.
Printing with light
Completed artwork was copied under top lights on a pin-registered camera on a high contrast film such as Kodaline or Kodalith to create 35mm mattes used in the optical slide printing process. When needed, pin-registered positive mattes known as countermattes were made by contact printing from the mattes. When a set of mattes and countermates were completed, the optical slide camera was used to assemble the separate images onto a single frame of film by making multiple exposures through the mattes. Accuracy in positioning the separate elements of the slide is made possible by the film sprockets, which were also used to position the finished color slides and masks in the slide mounts.
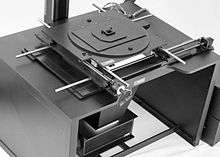
Copy cameras and optical slide cameras usually had motorized movement of the camera on the column toward and away from the table to allow for resizing the image on the camera on the Z-axis.
Fully functional optical slide cameras had compounds for positioning both artwork and the mattes relative to the lens and camera head. A compound could move left to right (horizontal) X-axis and top to bottom (vertical) Y-axis movement as well as rotate (theta-axis). Compounds were often motorized with micro-stepping motors to allow for smooth programmable and repeatable positioning. Higher end optical slide cameras had the ability to create and save programs.
Light sources for copying artwork generally were quartz halogen lights. Backlighting was generally provided by the use a darkroom photographic enlarger colorhead modified for use with the camera. This form of controlled light provide colored light balanced for the color sensitivity of the film used and provided color light for the separate exposures that are made through the mattes.
The optical slide camera could be used to create a number of types of slides and special effects commonly used in multi-image presentations:
- Duplicates: copies of transparencies
- Copy slides: slides made by top-light copying of artwork or illustrations
- Title burns: made by making multiple exposures through a series of mattes, such as text slides
- Color on color slides: Similar to burn slides but with a color background, often requiring countermattes
- Step and repeat: Using a compound, making a series of exposures where the compound is moved between each exposure
- Movements: long exposures made from a backlit matte, the shutter is open while the compound and the camera move the matte creating a streaking effect
- Glow effects: using a light diffusing material while exposing the backlight through a matte to create soft edges around the image on the matte
- Filter effects: using color, star and other types of camera filters for special effects
- Image effects: by either manipulating the mattes and countermattes of by positioning transparencies while duplicating them; posterizations, inserts, split frames, and panoramas
- Camera effects: Some optical slide cameras have the capabilities for in-camera mattes, bi-packing, and rotoscoping
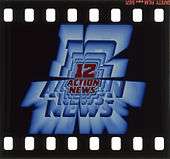
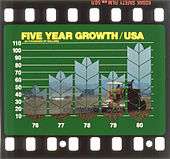 Color on Color Slide |
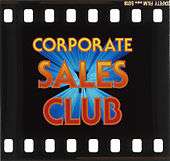
 Step and Repeat Slide |
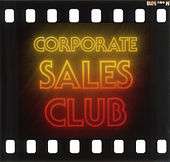
 Movement Slide |
 Glow Slide |
Slides created by these methods and combinations of these methods were made to align and animate when projected, creating what was considered the visual multi-image experience.
Film processing
Film processing requires specific facilities, equipment, and skill needed to maintain consistent results. Film processors for developing transparency film require maintaining processing control which was based on good practices in chemical mixing and storage, accurate time, temperature and agitation during the process and the use of control strips. Control strips were run with the film and read on a densitometer to determine their variation from a standard so that corrections could be made
Computer graphics
The use of computer graphics replaced much of the manual activity in creating the artwork and converting the art into slides. Service bureaus offering production work from large workstations such as Dicomed and Genigraphics[14] dominated larger markets. Smaller producers using desktop software such as Photoshop, Persuasion, Harvard Graphics and PowerPoint allowed many slide producers to quickly create slides which were imaged on film recorders such as Management Graphics, Lasergraphics, Polaroid, Celco, and CCG.[15]
Assembly and programming
Completed slides were mounted into pin-registered slide mounts. Three or more pieces of film could be mounted into a slide mount which allowed slides to contain the image film chip and masks to allow for inserting and over-projecting. Slides were edited and arranged for programming on light tables.

Programming of multi-projector multi-image shows was generally done on one of several systems such as Arion, Audio-Visual Laboratories (AVL), Electrosonic, Clearlight,[16] Dataton,[17] UAV, Spindler-Sauppe and Multivision. Slides were placed in projector trays, projectors were set up on a "grid" so that alignment was made of the projectors onto the screen area. The programming itself was done on a system that allowed for input by the programmer and dissolve units[18] which were attached to the projectors and controlled the functions of the projectors based on the programming instructions. Programming could also be used to control room lights, rewind of the audio tape and resetting of the projectors, and to trigger other effects that might be used in the presentation, such as a strobe light.
There were two basic slide projector programming controls: a set of instructions to position the slide in the projector and a set of instructions for the slide projector lamp. These controls would be used to define the cues. The cues would often designate an action for more than one projector such as with a dissolve between two slides which would require simultaneously fading up on one lamp and fading down another lamp. Similar commands were used to control motion-picture projectors, as well as auxiliary controls for lighting and effects, etc.
| Slide tray | Multi-image programming timing based on slide positioning |
|---|---|
| Forward | Lifts the current slide from the projector gate into the slide tray, rotates the tray one position and drops the next slide into the gate. During this process a shutter at the slide gate in the projector is used prevent projecting while the lamp remains lit. The average time to cycle from slide to slide varies from 0.9 to 1.5 seconds, depending on the projector. |
| No movement | The slide projector is instructed to make no tray move during a cue or series of cues. On AVL systems, this is termed an "alt", and embedded into a lamp command. |
| Reverse | Lifts the current slide from the projector gate into the slide tray, rotates the tray one position in reverse and drops the previous slide into the gate. During the cycle the shutter will close and open in the same manner as a forward movement. |
| Use of shutter | The slide projector shutter can be controlled to block light without controlling voltage to the lamp. The shutter cycle time varies from projector to projector, averaging at about 0.2 seconds to cycle from open to closed. |
| Projector Lamp | Multi-image programming effects based on lamp intensity | |
|---|---|---|
| Lamp on and off | The projector lamp can be instructed to turn on and off. When programmed one or more projectors, can be made to produce several basic effects including:
| |
| Lamp Fade |
| |
| Other Commands | ||
|---|---|---|
| Timing |
| |
| Other effects |
| |
Through synchronizing the audio and the visual effects and combining visual slide effects, the programming process could create a single continuous show that was saved to memory. Once the programming was completed, the most common way to preserve the programming information was to record the programming cues onto the audio track so that the show could be run synchronized with the audio playback. In some situations, data would be contained in the programming computer (stored either on an internal hard disk drive or a floppy disk), and the events would be triggered by a timecode track on the audio tape.
As multi-image programming devices progressed to digital computers and became more sophisticated in the late 1970s, more programming features were added. Complex looping effects, independent cycling allowing background animation over foreground effects, comprehensive control of motion picture projectors, control of (and by) video devices and other peripheral devices, and the use of SMPTE timecode for synchronization became commonplace. Multiply-exposed optical effects and the use of computer-generated imagery allowed the medium to emerge, briefly, as an art form. The use of multitrack audio playback enhanced the experience and provided for surround sound.
On the road
Completed multi-image productions were presented in a variety of venues ranging from temporary one-on-one settings to semi-permanent world's fair pavilions and museum exhibitions. Large multi-projector multi-image presentations required adequate projection space which was often from behind the screen for rear-screen projection. Setting up large show required control over the room lighting and often involved drapes and scaffolds.
The actual presentations often were considered to be business theater, incorporating special effects such as pyrotechnics, breakaway screens, live entertainment, even breakaway screens such as having a vehicle crash through the screen to introduce a new model truck.
See also
- AVL Eagle Computers
- Diaporama
- Multi-dynamic image technique
- Multi-monitor
- Multimedia
- Slide show
- Split screen (filmmaking)
- Video wall
References
- ↑ Kenny, Michael F.; Schmitt, Raymond F. (1983). Images, Images, Images: The Book of Programmed Multi-Image Production. New York: Eastman Kodak. ISBN 978-0-87985-327-3.
- ↑ Rose, Robert, Projection, retrieved 18 February 2012
- ↑ Vitale, Timothy J. "Projecting Digital 'Slide' Images". Retrieved 18 February 2012.
- ↑ Caramate Projectors Provide an Economical Educational Tool
- ↑ Trademark for The Association for Multi-Image, retrieved 8 February 2012
- ↑ http://www.schneideroptics.com
- ↑ Bullough, Robert V. (1981), Multi-image Media, Educational Technology
- ↑ http://www.printingtips.com/email-term/t--1746/photomechanical-transfer.asp
- ↑ http://bellsouthpwp2.net/b/c/bcarberry/tp.html
- ↑ http://www.prepressure.com/library/prepress-history/1970-1979
- ↑ Peg bars, Animation Disk & Desk, retrieved 18 February 2012
- ↑ Nethery, David, Animation Stuff for Students: Purchasing an Animation Disk, retrieved 18 February 2012
- ↑ Editing Audiotape, Integrated Publishing, retrieved 18 February 2012
- ↑ http://www.genigraphics.org/index.html
- ↑ http://www.ccg-germany.com/index.php/about-us
- ↑ http://2live4.com/clearlight.asp
- ↑ http://www.dataton.com/
- ↑ http://www.honda600coupe.com/random/AVL/AVL_Genesis_Procall_X.pdf