Gin Drinkers Line
| Gin Drinkers Line | |
|
Map of the Gin Drinkers Line | |
| Chinese | 醉酒灣防線 |
|---|---|
| Hanyu Pinyin | Zuìjiǔ wān fángxiàn |
| Wade–Giles | Tsui-chiu wan fang-hsien |
| IPA | [tswêitɕjòu wán fǎŋɕjɛ̂n] |
| Yale Romanization | Jeuijáu wāan fòhngsin |
| IPA | [tsɵ̄ytsɐ̌u wáːn fɔ̏ːŋsɪ̄n] |
| Jyutping | Zeoi3zau2 waan1 fong4sin3 |
The Gin Drinkers Line (Chinese: 醉酒灣防線) or Gin Drinkers' Line was a British military defensive line against the Japanese invasion of Hong Kong during the Battle of Hong Kong in December 1941, part of the Pacific War.
The concept came from France's Maginot Line, built after World War I. The British believed the line could protect the colony from Japanese invasion for at least six months and even called it the "Oriental Maginot Line" (Chinese: 東方馬奇諾防線). The Japanese generals also believed the line would stop their advance until the scouts found out the line was very weak. For example, only 30 soldiers defended Shing Mun Redoubt in the Battle of Hong Kong. It had a capacity of 120 men.
Geographical location
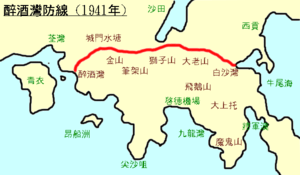
The Line's name originated from Gin Drinkers Bay, a former bay in nearby Kwai Chung, New Territories (now reclaimed and part of Kwai Fong). It passed through Kam Shan, the Shing Mun Reservoir, Beacon Hill, Lion Rock, and Tate's Cairn, ending at Port Shelter in Sai Kung. Its total length was 18 kilometers. Its key points were the stretch between Beacon Hill and Sha Tin Pass, and the Shing Mun Redoubt, the latter of which also housed command HQ for the Line.
The Line made use of the mountains north of the Kowloon Peninsula and was strategically important in preventing any southward invasion from the New Territories.
Construction
Construction lasted from 1936 to 1938. The Line was not a solid defensive line, but rather a series of defensive positions linked together by paths.[1] Bunkers, concrete fortified machine gun posts, trenches, and artillery batteries were built along the line; however, this artillery support may have been insufficient.[1]
Shing Mun Redoubt

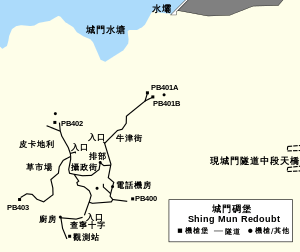
Defensive headquarters were located at Shing Mun Redoubt (Chinese: 城門棱堡 or 城門碉堡), which had an observation post (acting as headquarters of the redoubt) that could call artillery support from Mount Davis battery and Stonecutters Island Fort, and four pillboxes (PB400-403) fitted with Vickers machine guns and Bren LMGs. There were 1.5 meter deep defensive channels or trenches, named after the roads of London such as Charing Cross, to aid the English soldiers of the Middlesex Regiment.
The Battle of Hong Kong
8 December 1941: initial contact
On the morning of 8 December 1941, Japanese forces bombed Kai Tak Airport, wresting control of the skies from the British and initiating the Battle of Hong Kong. At noon, the Japanese advance guard crossed the Shenzhen River to invade the New Territories. The northern garrison fell back to the Gin Drinkers Line, destroying roads and bridges on the way to make it more difficult for the invaders. By dusk, the Japanese had taken Tai Po.
There were only three British Army battalions manning the Gin Drinkers Line: the 2nd Battalion, Royal Scots in the west, the 2/14th Battalion, Punjab Regiment in the centre and the 5/7th Battalion, Rajput Regiment in the east. It was hoped that they could hold for at least three weeks and inflict casualties on the Japanese.[1]
9 December: Japanese sneak attack

On 9 December, Japanese advance scouts of the 228th Regiment headed towards Tai Mo Shan, and discovered that British defences were weak at "225 High Ground" near Shing Mun Redoubt and Shing Mun Reservoir. The high ground dominated all positions of the western portion of the Line. Therefore, the Japanese advanced a sneak attack.
At 21:00 that evening, the lieutenant in charge and ten elite soldiers began the sneak attack. Combat engineers successfully breached the barbed wire and destroyed bunkers. By 07:00 on 10 December, they had taken the high ground and 27 POWs, opening a breach in the Line. The success surprised Japanese commanders who had thought at least a month was required to break the British defences, and thereby diverted more forces from mainland China to boost manpower. They also thought that a premature breakthrough would lead to rear forces and artillery troops falling behind, but ultimately agreed to launch a general assault.
10 December: general assault
Japanese forces then opened a two-pronged assault on the Gin Drinkers Line. By the next day, they had already claimed Kam Shan and Tate's Cairn. Major General Christopher Maltby knew that the position was untenable and at noon decided to withdraw the garrison to Hong Kong Island to preserve its strength, signalling the defeat of the Line. Defenders to the west of the Line began retreating towards the island at 20:00. The Rajput Battalion stayed behind as a rear guard, only retreating on the morning of 13 December towards Devil's Peak and Lei Yue Mun towards Hong Kong Island. This was also the final retreat of British forces from the Kowloon Peninsula.
Reasons for failure
The Gin Drinkers Line was and still is considered to be a complete failure. The line and the whole of Kowloon were abandoned by the British troops in just two days. There can be said to be three main reasons:
- Insufficient troops: although their weaponry was sound, there were not enough British soldiers to maximise the Line's potential. For example, the Shing Mun Redoubt could have garrisoned over 120 men, but was garrisoned by just 30 troops.
- Insufficient training: most of the Hong Kong Garrison was composed of new recruits lacking field experience and proper training.
- Underestimation of the Japanese: the British assumed that the Japanese did not wage night battles and relaxed their guard. They were also overconfident in the Line's capabilities and believed that the Japanese could be easily repulsed.
Today

Most of the Line's remains cannot be found. There are still some defensive structures left at Shing Mun Redoubt, and bunkers at Lion Rock, Tate's Cairn, and Port Shelter.
