4th Special Service Brigade
| 4th Special Service Brigade 4th Commando Brigade | |
|---|---|
| Active | 1944 – 1946 |
| Country |
|
| Allegiance | British Crown |
| Branch | Royal Navy |
| Type | Infantry |
| Role | Amphibious assault |
| Size | Brigade |
| Engagements |
D Day Battle of the Scheldt Walcheren Islands |
| Commanders | |
| Notable commanders | Brigadier B. W. Leicester |
| Insignia | |
| Combined Operations Shoulder Patch |
 |
The 4th Special Service Brigade was a brigade-sized formation of the British Commandos formed during the Second World War in March 1944 from battalion-sized units of the Royal Marines. Due to the success of the British Army Commandos’ operations in Norway, the Channel Islands, St. Nazaire, and the Middle East, the Admiralty dissolved the Royal Marines Division in late 1942 and reorganized its amphibious assault infantry into eight additional Commando units.
The Brigade invaded Normandy on 6 June 1944 during Operation Overlord; it subsequently participated in the Battle of the Scheldt and the assault of the Walcheren Islands.[1] On 6 December the same year, the Brigade was renamed 4th Commando Brigade, removing the hated title Special Service and its association with the German SS.[2]
Formation
- Commander : Brigadier B. W. Leicester
- No. 41 Commando (Royal Marines), Lieutenant-Colonel E. C. E. Palmer
- No. 46 Commando (Royal Marines), Lieutenant-Colonel C. R. Hardy
- No. 47 Commando (Royal Marines), Lieutenant-Colonel C. F. Phillips
- No. 48 Commando (Royal Marines), Lieutenant-Colonel J. L. Moulton [3]
- No. 4 Army Commando was attached for the Battle of the Scheldt in place of No 46 Commando (RM) [4]
- No. 10 (Inter-Allied) Commando, elements attached.[5]
Normandy

The plan
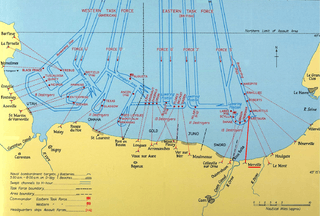
The brigade's task was to secure the flanks of the invasion beaches, linking up the British front from the Orne River to Port-en-Bessin and the Americans on Omaha Beach. The newly raised 46 and 47 Commandos joined 41 Commando and it became apparent to the Allied planners that a fourth Commando unit was needed for the brigade’s mission, so in mid-March the remaining men of the Royal Marine Division and other volunteers began training to form No. 48 Commando in time for the invasion. The Brigade was expected to be in combat for at most a week before being returned home.[6]
- No 41 Cdo (RM) to land at the far right (west) of Sword.
- No 46 Cdo (RM) at Juno to scale the cliffs on the left (east) side of the Orne River estuary and to destroy a battery.
- No 47 Cdo (RM) to go to the west flank of Gold Beach.
- No 48 Cdo (RM) to go to Juno beach with the 3rd Canadian Infantry Division and the 2nd Canadian Armoured Brigade.[7]
Sword
No 41 RM Commando was the senior unit in the Brigade, it landed at Hermanville-sur-Mer and then moved west to Lion-sur-Mer. The unit's first task was to link up with their fellow commandos at Luc-sur-Mer.
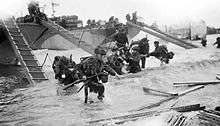
As the Commando came ashore under moderate fire, it lost several men including their Regimental Sergeant Major, the Naval Forward Observation Officer and the second-in-command. Once clear of the beach defences it found itself in a relatively quiet sector. From its assembly area, it marched down the coastal road toward Lion-sur-Mer joined by three Armoured Vehicle Royal Engineers (AVRE)s. As P and Y troops approached the town, a well-concealed German PaK 38 gun ambushed the tanks, knocking all three out and stalling the assault.[6]
A and B troops had been moving ahead on to their second objective at the Chateau, but were attacked on their approach and forced back. Facing overwhelming defences and artillery, the commandos dug in and awaited reinforcements.[6]
At 1330 Hours the 2nd Battalions, Lincolnshire Regiment and the 2nd Battalion, Royal Ulster Rifles moved up to the commandos' position, bringing with them a replacement Naval Observation Officer. As soon as he arrived, the destroyers offshore began a one-hour-long naval bombardment, battering the strong point and chateau. It was now too late for the commandos to launch an effective assault, so they dug-in for the night.[6]
When dawn broke the German artillery fire began once again, pinning the commandos and supporting infantry down for another two hours. They were then subject to a bombing attack by German Heinkel bombers which dropped anti-personnel bombs onto their position, killing several men, including their royal artillery observer and severely wounding the commanding officer, Lieutenant Colonel Gray. Having already lost the second-in-command, Major Barclay, command fell to the Adjutant John Taplin. Under his leadership the Commando joined the Lincolnshire Regiment in the final assault on the strongpoint and chateau. Once the two units had seized the position, 41 Commando moved on alone to Luc-sur-mer. They found the town undefended and dug-in to wait for their colleagues to join them from the Canadian beach.[6]
Juno Beach (48 Commando)


48 Commando were to land at Nan Red sector of Juno Beach with the objective of assaulting the strongpoint at Langrune-sur-Mer and then to link-up with 41 Commando, sealing the breach between the 3rd Canadian Infantry Division and the British 3rd Infantry Divisions. On their approach to the shore, two of their ships struck underwater obstacles and sank. Weighed down by their equipment, many of the marines drowned in the surf. Those that did get ashore faced intense German small arms fire. The combined effect of these two situations was that only fifty percent of the Commando got off the beach unscathed.[6]
Once off the beach, 48 Commando advanced to their objective, the heavily defended guns at Langrune. As they approached, the destroyer HMS Vigilant bombarded the position, with little effect due to the heavy fortifications. The commandos found the strong-point protected by snipers, mines, machine guns and a 4-foot-thick (1.2 m) concrete wall.
They were then joined by two Centaur Support Tanks from the 1st Royal Marine Support Regiment. The first of these tanks moved toward the wall firing its 95mm howitzer and obliterated a machine-gun bunker that had been covering the crossroads. The second Centaur began to move into position, but struck a mine while approaching the wall, forcing the crew to bail out and join the commandos.[6] With the Centaurs out of ammunition or disabled, the attack faltered. B Troop raced across the intersection to a house opposite only to discover that it had been fortified, with the windows and doors facing the strongpoint filled with concrete. The commandos had no choice but to bring down the wall. They set a charge at its base, but the fortification was too strong.[6]
The commandos then received news that the 21st Panzer Division’s counter-attack had already stopped the British advance on Caen and was pushing on toward Lion-sur-Mer. The commandos were ordered to cease the assault and take up defensive positions. The German Panzer grenadiers reached the 716th Infantry Division's positions only to find that they were still manned and situated between the two units of the 4th Special Service Brigade.[6]
The next event was the glider assault landing of the 6th Airlanding Brigade of the 6th Airborne Division to the east. Seeing the gliders landing, the German commander feared he would be outflanked and ordered his force to withdraw towards Caen. Had he pushed onward and attacked the commandos, Sword would have been isolated and the entire eastern flank of the Allied invasion may have collapsed.[6]
In the morning the commandos were joined by a pair of Canadian M10 tank destroyers, which fired anti-tank rounds at the wall; for the next hour the M10s peppered the wall with solid shot and the fortification began to disintegrate. A Sherman tank of the Royal Marines Armoured Support Group then appeared and opened fire on the wall and allowed the commandos to launch an assault. Advancing behind the Sherman, covered by its guns, the commandos seized the interior of the strongpoint and spent the rest of the day silencing the remaining pockets of resistance around Langrune.[6]
Juno Beach (46 Commando)
The brigade’s reserve element, No. 46 Commando, landed on Juno beach at 0900 on 7 June and advanced on to Petit Enfer. They faced stiff German resistance, but were able to force their way through the German positions and on to Luc-sur-Mer. There they met up with 41 Commando, linking Juno and Sword.[6]
Gold Beach
No. 47 Commando was the last British unit to land and came ashore on Gold Beach east of Le Hamel. Their task was to go inland then turn right (west) and make a twelve-mile (19.3 km) march through enemy territory to attack Port en Bessin from the rear. This small harbour, on the British far right, was well sheltered in the chalk cliffs and significant in that it was to be a prime means of supplies being brought in, including fuel by underwater pipe-line from tankers moored offshore.[8]
On 47's approach they could see the preceding units were struggling. Due to intense fire, the Hampshire Regiment had landed one and a half miles further to the east than originally planned.
Ordered to avoid contact with the enemy and advance on Port en Bessin, the commanding officer, Lt. Col. Phillips, ordered his LCAs to approach the beach behind the Hampshires near Les Roquettes. The commandos landed under intense fire, five of their craft being sunk before reaching the shore and almost all the others were damaged, resulting in five officers, (including Lt. Col. Phillips, swimming to shore late in the day), 71 other ranks were reported missing.[6]
Unable to locate Phillips, the second-in-command, Major P.M. Donnell led his men off the beach and turned inland to avoid engaging the enemy. Behind the lines, the commando moved quickly to Buhot where Phillips rejoined it after his long swim. For the next several hours the Commando pushed steadily on, occasionally encountering snipers and small units of unsuspecting rear guards from whom they captured several "spandau" (MG-34 machine guns) and other small arms. As dusk descended upon the Commando they reached Point 72, the highest point on a ridge near Escures, which they discovered was undefended. They dug-in for the night and prepared for the attack on Port-en-Bessin at dawn.[6]
Originally the attack on Port-en-Bessin was planned to be supported by American artillery, but having no working radio made this coordination impossible. The arrival of two French civilians, a replacement Forward Observation Officer and a Gendarme named Gouget, assisted the planned assault. The two civilians identified the German positions and the artillery officer repaired the unit’s wireless set, allowing him to contact the navy ships off-shore.
At 1400 hours two Landing Craft Gun (Large), "LCG(L)", opened fire on the port and were joined by HMS Emerald’s six-inch (152 mm) main armament an hour later. By 1600 hours the city was hit by RAF Hawker Typhoon air strikes and the Royal Artillery bombarded the area with smoke in preparation for the commando's assault.[6]
Gouget guided A and B troops through ditches surrounding the town, past the outer ring of gunpits, while X Troop fixed bayonets and charged the machine-gun nests, quickly taking the positions. Once the outer ring of defences had been breached, A Troop advanced on the western feature, but were repelled when two Kriegsmarine Flak ships, that had moved into the port on 5 June, opened fire on the men with their rapid fire cannons.
B Troop also launched an assault on the town itself, but were pinned down by a pillbox on the heights and machine-gun positions in houses throughout the village.[6]
Philips next ordered his men to launch an assault on the Flak ships, but were repelled once again. Seeing their problem, the captains of HMS Ursa and the Polish ship ORP Krakowiak approached the port, but were unable to open fire on the Flak ships, which were behind the port’s concrete and stone breakwater. The navy then formed boarding parties and launched their motorboats, which crossed the harbour net and attacked the German vessels.[6]
With the Flak ships silenced, B and Heavy weapons troops made their way up the eastern feature and assaulted the German blockhouse, forcing the defenders to surrender. Sporadic fighting continued on until dawn of 8 June when the remaining defenders on the western feature surrendered.[6]
On 9 June PLUTO (Pipe Line Under the Ocean) [the fuel pipe], arrived in the form of an army port company and the petrol started to flow, supplying Allied vehicles across the Normandy front.[6]
Douvre radar station
After being rested and reinforced, the Brigade less NO. 41 Commando, moved south to the Douvres-la-Délivrande Radar Station. This fortified position was the primary Luftwaffe radar station in the area. It was covered with gun pits, minefields, tunnels, bunkers, five 5 cm anti-tank guns, a 7.5 cm field gun and a ring of barbed wire 20 ft (6.1 m) in height. The Brigade was to isolate the station which would allow other Allied forces to pass by and advance on Caen.[6]
After securing the perimeter, 46, 47 and 48 Commandos were sent to support the Canadians and Airborne divisions while 41 Commando stayed behind. For the next week, the commandos continued to harass the strongpoint with occasional mortar fire, Typhoon strikes and volleys from two attached Royal Marine Support Group (RMASG) Centaurs. Although the site did not actively threaten Allied movements in the area, it did provide radar-ranging information for Luftwaffe night fighters and constantly reported on British movements.[6]
On 17 June the assault began with a bombardment from the Royal Artillery’s 7.2-inch (180 mm) guns and ships off-shore. Under their new commander, Lt. Col Palmer, 41 Commando and forty-four armoured engineering vehicles attacked from the north while other tanks created a diversion from the southwest. Sherman Crabs (a mine-clearing tank), cleared the way through the minefields while the AVREs battered the bunkers with their guns. The effect of such fire was devastating on the German defenders. When the commandos entered the entrenchment and opened fire, it was clear that the station could no longer be defended. The two hundred and twenty seven remaining Luftwaffe force surrendered and the last of the 4th Special Service Brigade’s D-Day objectives was finally achieved.[6]
6th Airborne Division
The Brigade less No 41 Commando moved to the Orne River, where they joined 1st Special Service Brigade and the 6th Airborne Division, under the command of Major General Richard 'Windy' Gale. The Brigade would remain in the Orne area until mid-August while the British Second Army launched a series of assaults on Caen.[1][9]
In mid-August, following the capture of Caen, General Gale’s forces broke out of their positions and launched a major offensive. Before sunrise on 20 August, 46 Commando launched an attack on the heights above Putot and the commandos seized the position overlooking the entire Dozulé area. For the remainder of the day, 48 Commando pushed through the bocage, without support, to Point 134 and Point 120 followed by 41 Commando. This location nearly cut the Germans escape route from the town; realizing that they had been out-flanked, they set the village ablaze and withdrew.[1]

With Dozulé captured the Commandos pushed on through Beuzeville to the Risle River. On many occasions the commandos and airborne troops would arrive in a village less than hour after the Germans had made a hasty withdrawal.
Following the capture of Pont-Audemer, the 6th Airborne and 1st Special Service Brigade were relieved by the 49th (West Riding) Infantry Division and returned to England. Leaving behind the 4th Special Service Brigade, which remained in the area for several weeks, clearing pockets of resistance between the Seine and Valmont, they then took up the role of garrison troops in and around the shattered city of Le Havre before finally moving up to positions near Dunkirk where they probed the German lines with small raids.[6]
Walcheren Islands
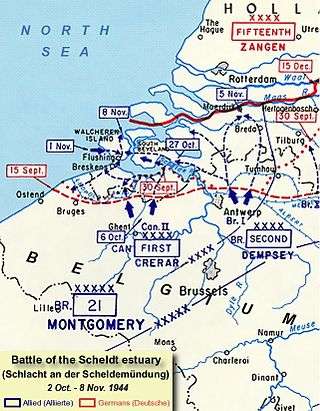
On 27 September the Brigade was withdrawn to an assembly area in De Haan, Belgium. It then prepared for another amphibious assault, on the Dutch island of Walcheren. The island lay at the mouth of the Scheldt River, which ran from Antwerp to the sea. Until the island and the northern banks of the river were cleared, the port could not be used to support the Allied advance. Allied bombers breached the dykes on 3 October at Westkapelle, Flushing and Veere, flooding the island, leaving only a few dry areas around its perimeter and greatly restricting the Germans’ freedom of movement.[1]
The 4th Special Service Brigade formed the seaborne element of the attack while British and Canadian infantry attacked overland from the mainland. This time the commandos came ashore in Landing Vehicle Tracked, (also known as Buffaloes), which had already proven their worth in the Pacific campaign. 41 Commando was tasked with assaulting the town of Westkapelle and then to move north along the causeway to Domburg. Just to their south, 48 Commando took on a radar station and naval gun battery, while 47 completed the encirclement of the western part of the island by moving south towards Flushing.[10]
The brigade would spend the rest of the war making raids across the Maas River in Operations Incalculable and Bogart.[6]
After occupation duties in Germany, the Brigade returned to the United Kingdom in 1946 and was disbanded.[1]
Battle honours
The following Battle honours were awarded to the British Commandos during the Second World War:[11]
- Adriatic
- Alethangyaw
- Operation Plunder - (crossing the Aller)
- Anzio
- Argenta Gap
- Burma 1943–45
- Crete
- Dieppe
- Dives Crossing
- Djebel Choucha
- Flushing
- Greece 1944–45
- Italy 1943–45
- Kangaw
- Landing at Porto San Venere
- Landing in Sicily
- Leese
- Litani
- Madagascar
- Middle East 1941, 1942, 1944
- Monte Ornito
- Myebon
- Normandy Landing
- North Africa 1941–43
- North-West Europe 1942, 1944–45
- Norway 1941
- Pursuit to Messina
- Rhine
- St. Nazaire
- Salerno
- Sedjenane 1
- Sicily 1943
- Steamroller Farm
- Syria 1941
- Termoli
- Vaagso
- Valli di Comacchio
- Westkapelle
See also
- 1st Special Service Brigade
- 2nd Special Service Brigade
- 3rd Special Service Brigade
- British Commandos
- Royal Marines
References
- 1 2 3 4 5 Army Commandos 1940-45 By Mike Chappell, p 31
- ↑ British Commandos 1940-46 By Timothy Robert Moreman, p 32
- ↑ "pegasusarchive".
- ↑ British Commandos 1940-46 By Timothy Robert Moreman
- ↑ No. 10 (Inter-Allied) Commando 1942-45 By Nick Van Der Bijl, Robert Chapman, p49
- 1 2 3 4 5 6 7 8 9 10 11 12 13 14 15 16 17 18 19 20 21 22 23 24 "flames of war".
- ↑ "allied invasion plan".
- ↑ "sword beach".
- ↑ "pegasusarchive".
- ↑ "Corps mem Dates".
- ↑ Moreman, p.94