UV mapping


UV mapping is the 3D modeling process of projecting a 2D image to a 3D model's surface.
UV mapping
This process projects a texture map onto a 3D object. The letters "U" and "V" denote the axes of the 2D texture[note 1] because "X", "Y" and "Z" are already used to denote the axes of the 3D object in model space.
UV texturing permits polygons that make up a 3D object to be painted with color from an image. The image is called a UV texture map,[1] but it's just an ordinary image. The UV mapping process involves assigning pixels in the image to surface mappings on the polygon, usually done by "programmatically" copying a triangle shaped piece of the image map and pasting it onto a triangle on the object.[2] UV is the alternative to XY; it only maps into a texture space rather than into the geometric space of the object. But the rendering computation uses the UV texture coordinates to determine how to paint the three-dimensional surface.
In the example to the right, a sphere is given a checkered texture, first without and then with UV mapping. Without UV mapping, the checkers tile XYZ space and the texture is carved out of the sphere. With UV mapping, the checkers tile UV space and points on the sphere map to this space according to their latitude and longitude.
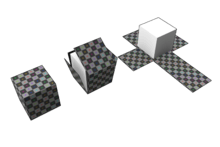
When a model is created as a polygon mesh using a 3D modeler, UV coordinates can be generated for each vertex in the mesh. One way is for the 3D modeler to unfold the triangle mesh at the seams, automatically laying out the triangles on a flat page. If the mesh is a UV sphere, for example, the modeler might transform it into an equirectangular projection. Once the model is unwrapped, the artist can paint a texture on each triangle individually, using the unwrapped mesh as a template. When the scene is rendered, each triangle will map to the appropriate texture from the "decal sheet".
A UV map can either be generated automatically by the software application, made manually by the artist, or some combination of both. Often a UV map will be generated, and then the artist will adjust and optimize it to minimize seams and overlaps. If the model is symmetric, the artist might overlap opposite triangles to allow painting both sides simultaneously.
UV coordinates are applied per face,[2] not per vertex. This means a shared vertex can have different UV coordinates in each of its triangles, so adjacent triangles can be cut apart and positioned on different areas of the texture map.
The UV Mapping process at its simplest requires three steps: unwrapping the mesh, creating the texture, and applying the texture.[1]
Finding UV on a sphere
For any point  on the sphere, calculate
  , that being the unit vector from
  to the sphere's origin.
Assuming that the sphere's poles are aligned with the Y axis, UV coordinates in the range ![[0, 1]](../I/m/ccfcd347d0bf65dc77afe01a3306a96b.png) can then be calculated as follows:
can then be calculated as follows:


UV programs
- Blender (software)
- Hexagon
- Knald
- LithUnwrap
- Oxygen 2 - UV Editor
- Pepakura Designer
- Itoo RailClone
- Ultimate Unwrap 3D
- Unfold3D
- Roadkill UV
- Headus UVLayout
- UVMapper
- Zbrush
See also
- Cartographic projection
- Least squares conformal map
- Mesh parameterization
- NURBS
- Polygon mesh
- Sculpted prim
- Texture mapping
- UVW mapping
Notes
- ↑ when using quaternions (which is standard), "W" is also used; cf. UVW mapping
References
External links
- LSCM Mapping image with Blender
- Blender UV Mapping Tutorial with Blender
- Rare practical example of UV mapping from a blog (not related to a specific product such as Maya or Blender).
