Screw thread

A screw thread, often shortened to thread, is a helical structure used to convert between rotational and linear movement or force. A screw thread is a ridge wrapped around a cylinder or cone in the form of a helix, with the former being called a straight thread and the latter called a tapered thread. A screw thread is the essential feature of the screw as a simple machine and also as a fastener.
The mechanical advantage of a screw thread depends on its lead, which is the linear distance the screw travels in one revolution.[1] In most applications, the lead of a screw thread is chosen so that friction is sufficient to prevent linear motion being converted to rotary, that is so the screw does not slip even when linear force is applied so long as no external rotational force is present. This characteristic is essential to the vast majority of its uses. The tightening of a fastener's screw thread is comparable to driving a wedge into a gap until it sticks fast through friction and slight plastic deformation.
Applications
Screw threads have several applications:
- Fastening
- Fasteners such as wood screws, machine screws, nuts and bolts.
- Connecting threaded pipes and hoses to each other and to caps and fixtures.
- Gear reduction via worm drives
- Moving objects linearly by converting rotary motion to linear motion, as in the leadscrew of a jack.
- Measuring by correlating linear motion to rotary motion (and simultaneously amplifying it), as in a micrometer.
- Both moving objects linearly and simultaneously measuring the movement, combining the two aforementioned functions, as in a leadscrew of a lathe.
In all of these applications, the screw thread has two main functions:
- It converts rotary motion into linear motion.
- It prevents linear motion without the corresponding rotation.
Design
Gender
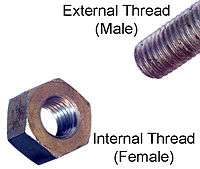
Every matched pair of threads, external and internal, can be described as male and female. For example, a screw has male threads, while its matching hole (whether in nut or substrate) has female threads. This property is called gender.
Handedness
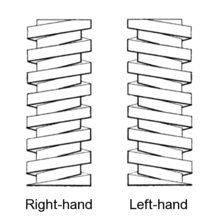

The helix of a thread can twist in two possible directions, which is known as handedness. Most threads are oriented so that the threaded item, when seen from a point of view on the axis through the center of the helix, moves away from the viewer when it is turned in a clockwise direction, and moves towards the viewer when it is turned counterclockwise. This is known as a right-handed (RH) thread, because it follows the right hand grip rule. Threads oriented in the opposite direction are known as left-handed (LH).
By common convention, right-handedness is the default handedness for screw threads. Therefore, most threaded parts and fasteners have right-handed threads. Left-handed thread applications include:
- Where the rotation of a shaft would cause a conventional right-handed nut to loosen rather than to tighten due to fretting induced precession. Examples include:
- The left hand pedal on a bicycle.[2]
- The left-hand grinding wheel on a bench grinder.
- The lug nuts on the left side of some automobiles.
- The securing nut on some circular saw blades - the large torque at startup should tend to tighten the nut.
- In combination with right-handed threads in turnbuckles and clamping studs.[3]
- In some gas supply connections to prevent dangerous misconnections, for example in gas welding the flammable gas supply uses left-handed threads.
- In a situation where neither threaded pipe end can be rotated to tighten/loosen the joint, e.g. in traditional heating pipes running through multiple rooms in a building. In such a case, the coupling will have one right-handed and one left-handed thread
- In some instances, for example early ballpoint pens, to provide a "secret" method of disassembly.
- In mechanisms to give a more intuitive action as:
- The leadscrew of the cross slide of a lathe to cause the cross slide to move away from the operator when the leadscrew is turned clockwise.
- The depth of cut screw of a “Stanley” type metal plane (tool) for the blade to move in the direction of a regulating right hand finger.
- Some Edison base lamps and fittings (such as those formerly used on the New York City Subway) have a left-hand thread to deter theft, since they cannot be used in other light fixtures.
The term chirality comes from the Greek word for "hand" and concerns handedness in many other contexts.
Form
The cross-sectional shape of a thread is often called its form or threadform (also spelled thread form). It may be square, triangular, trapezoidal, or other shapes. The terms form and threadform sometimes refer to all design aspects taken together (cross-sectional shape, pitch, and diameters).
Most triangular threadforms are based on an isosceles triangle. These are usually called V-threads or vee-threads because of the shape of the letter V. For 60° V-threads, the isosceles triangle is, more specifically, equilateral. For buttress threads, the triangle is scalene.
The theoretical triangle is usually truncated to varying degrees (that is, the tip of the triangle is cut short). A V-thread in which there is no truncation (or a minuscule amount considered negligible) is called a sharp V-thread. Truncation occurs (and is codified in standards) for practical reasons:
- The thread-cutting or thread-forming tool cannot practically have a perfectly sharp point; at some level of magnification, the point is truncated, even if the truncation is very small.
- Too-small truncation is undesirable anyway, because:
- The cutting or forming tool's edge will break too easily;
- The part or fastener's thread crests will have burrs upon cutting, and will be too susceptible to additional future burring resulting from dents (nicks);
- The roots and crests of mating male and female threads need clearance to ensure that the sloped sides of the V meet properly despite (a) error in pitch diameter and (b) dirt and nick-induced burrs.
- The point of the threadform adds little strength to the thread.
Ball screws, whose male-female pairs involve bearing balls in between, show that other variations of form are possible. Roller screws use conventional thread forms but introduce an interesting twist on the theme.
Angle
The angle characteristic of the cross-sectional shape is often called the thread angle. For most V-threads, this is standardized as 60 degrees, but any angle can be used.
Lead, pitch, and starts
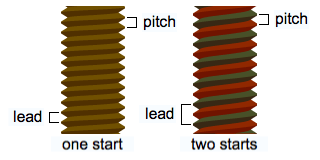
Lead /ˈliːd/ and pitch are closely related concepts.They can be confused because they are the same for most screws. Lead is the distance along the screw's axis that is covered by one complete rotation of the screw (360°). Pitch is the distance from the crest of one thread to the next. Because the vast majority of screw threadforms are single-start threadforms, their lead and pitch are the same. Single-start means that there is only one "ridge" wrapped around the cylinder of the screw's body. Each time that the screw's body rotates one turn (360°), it has advanced axially by the width of one ridge. "Double-start" means that there are two "ridges" wrapped around the cylinder of the screw's body.[4] Each time that the screw's body rotates one turn (360°), it has advanced axially by the width of two ridges. Another way to express this is that lead and pitch are parametrically related, and the parameter that relates them, the number of starts, very often has a value of 1, in which case their relationship becomes equality. In general, lead is equal to S times pitch, in which S is the number of starts.
Whereas metric threads are usually defined by their pitch, that is, how much distance per thread, inch-based standards usually use the reverse logic, that is, how many threads occur per a given distance. Thus inch-based threads are defined in terms of threads per inch (TPI). Pitch and TPI describe the same underlying physical property—merely in different terms. When the inch is used as the unit of measurement for pitch, TPI is the reciprocal of pitch and vice versa. For example, a 1⁄4-20 thread has 20 TPI, which means that its pitch is 1⁄20 inch (0.050 in or 1.27 mm).
As the distance from the crest of one thread to the next, pitch can be compared to the wavelength of a wave. Another wave analogy is that pitch and TPI are inverses of each other in a similar way that period and frequency are inverses of each other.
Coarse versus fine
Coarse threads are those with larger pitch (fewer threads per axial distance), and fine threads are those with smaller pitch (more threads per axial distance). Coarse threads have a larger threadform relative to screw diameter, whereas fine threads have a smaller threadform relative to screw diameter. This distinction is analogous to that between coarse teeth and fine teeth on a saw or file, or between coarse grit and fine grit on sandpaper.
The common V-thread standards (ISO 261 and Unified Thread Standard) include a coarse pitch and a fine pitch for each major diameter. For example, 1⁄2-13 belongs to the UNC series (Unified National Coarse) and 1⁄2-20 belongs to the UNF series (Unified National Fine). Similarly, ISO261 M10 (10mm (398 thou) nominal outer diameter) has a coarse thread version at 1.25mm pitch (49 thou) and a fine thread version at 1 mm (39 thou) pitch.
The term coarse implies here does not mean lower quality, nor does the term fine imply higher quality. The terms when used in reference to screw thread pitch have nothing to do with the tolerances used (degree of precision) or the amount of craftsmanship, quality, or cost. They simply refer to the size of the threads relative to the screw diameter.
Diameters
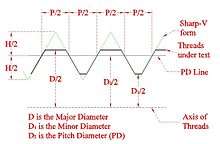
There are three characteristic diameters of threads: major diameter, minor diameter, and pitch diameter: industry standards specify minimum (min) and maximum (max) limits for each of these, for all recognized thread sizes. The min limits for external (or bolt, in ISO terminology), and the max limits for internal (nut), thread sizes are there to ensure that threads do not strip at the tensile strength limits for the parent material. The min limits for internal, and max limits for external, threads are there to ensure that the threads fit together.
Major diameter
The major diameter of threads is the larger of two extreme diameters delimiting the height of the thread profile, as a cross-sectional view is taken in a plane containing the axis of the threads. For a screw, this is its outside diameter. The major diameter of a nut may not be directly measured, but it may be tested with go/no-go gauges.
The major diameter of external threads is normally smaller than the major diameter of the internal threads, if the threads are designed to fit together. But this requirement alone does not guarantee that a bolt and a nut of the same pitch would fit together: the same requirement must separately be made for the minor and pitch diameters of the threads. Besides providing for a clearance between the crest of the bolt threads and the root of the nut threads, we must also ensure that the clearances are not so excessive as to cause the fasteners to fail.
Minor diameter

The minor diameter is the lower extreme diameter of the thread. Major diameter minus minor diameter, divided by two, equals the height of the thread. The minor diameter of a nut is its inside diameter. The minor diameter of a bolt can be measured with go/no-go gauges or, directly, with an optical comparator.
As shown in the figure at right, threads of equal pitch and angle that have matching minor diameters, with differing major and pitch diameters, may appear to fit snugly, but only do so radially; threads that have only major diameters matching (not shown) could also be visualized as not allowing radial movement. The reduced material condition, due to the unused spaces between the threads, must be minimized so as not to overly weaken the fasteners.
Pitch diameter
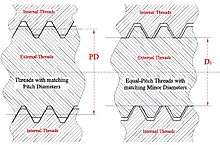
The pitch diameter (PD, or D2) of a particular thread, internal or external, is the diameter of a cylindrical surface, axially concentric to the thread, which intersects the thread flanks at equidistant points, when viewed in a cross-sectional plane containing the axis of the thread, the distance between these points being exactly one half the pitch distance. Equivalently, a line running parallel to the axis and a distance D2 away from it, the "PD line," slices the sharp-V form of the thread, having flanks coincident with the flanks of the thread under test, at exactly 50% of its height. We have assumed that the flanks have the proper shape, angle, and pitch for the specified thread standard. It is generally unrelated to the major (D) and minor (D1) diameters, especially if the crest and root truncations of the sharp-V form at these diameters are unknown. Everything else being ideal, D2, D, & D1, together, would fully describe the thread form. Knowledge of PD determines the position of the sharp-V thread form, the sides of which coincide with the straight sides of the thread flanks: e.g., the crest of the external thread would truncate these sides a radial displacement D - D2 away from the position of the PD line.
Provided that there are moderate non-negative clearances between the root and crest of the opposing threads, and everything else is ideal, if the pitch diameters of a screw and nut are exactly matched, there should be no play at all between the two as assembled, even in the presence of positive root-crest clearances. This is the case when the flanks of the threads come into intimate contact with one another, before the roots and crests do, if at all.
However, this ideal condition would in practice only be approximated and would generally require wrench-assisted assembly, possibly causing the galling of the threads. For this reason, some allowance, or minimum difference, between the PDs of the internal and external threads has to generally be provided for, to eliminate the possibility of deviations from the ideal thread form causing interference and to expedite hand assembly up to the length of engagement. Such allowances, or fundamental deviations, as ISO standards call them, are provided for in various degrees in corresponding classes of fit for ranges of thread sizes. At one extreme, no allowance is provided by a class, but the maximum PD of the external thread is specified to be the same as the minimum PD of the internal thread, within specified tolerances, ensuring that the two can be assembled, with some looseness of fit still possible due to the margin of tolerance. A class called interference fit may even provide for negative allowances, where the PD of the screw is greater than the PD of the nut by at least the amount of the allowance.
The pitch diameter of external threads is measured by various methods:
- A dedicated type of micrometer, called a thread mic or pitch mic, which has a V-anvil and a conical spindle tip, contacts the thread flanks for a direct reading.
- A general-purpose micrometer (flat anvil and spindle) is used over a set of three wires that rest on the thread flanks, and a known constant is subtracted from the reading. (The wires are truly gauge pins, being ground to precise size, although "wires" is their common name.) This method is called the 3-wire method. Sometimes grease is used to hold the wires in place, helping the user to juggle the part, mic, and wires into position.
- An optical comparator may also be used to determine PD graphically.
Classes of fit
The way in which male and female fit together, including play and friction, is classified (categorized) in thread standards. Achieving a certain class of fit requires the ability to work within tolerance ranges for dimension (size) and surface finish. Defining and achieving classes of fit are important for interchangeability. Classes include 1, 2, 3 (loose to tight); A (external) and B (internal); and various systems such as H and D limits.
Standardization and interchangeability
To achieve a predictably successful mating of male and female threads and assured interchangeability between males and between females, standards for form, size, and finish must exist and be followed. Standardization of threads is discussed below.
Thread depth
Screw threads are almost never made perfectly sharp (no truncation at the crest or root), but instead are truncated, yielding a final thread depth that can be expressed as a fraction of the pitch value. The UTS and ISO standards codify the amount of truncation, including tolerance ranges.
A perfectly sharp 60° V-thread will have a depth of thread ("height" from root to crest) equal to .866 of the pitch. This fact is intrinsic to the geometry of an equilateral triangle—a direct result of the basic trigonometric functions. It is independent of measurement units (inch vs mm). However, UTS and ISO threads are not sharp threads. The major and minor diameters delimit truncations on either side of the sharp V, typically about one eighth of the pitch (expressed with the notation 1/8p or .125p), although the actual geometry definition has more variables than that. This means that a full (100%) UTS or ISO thread has a height of around .65p.
Threads can be (and often are) truncated a bit more, yielding thread depths of 60 percent to 75 percent of the .65p value. For example, a 75 percent thread sacrifices only a small amount of strength in exchange for a significant reduction in the force required to cut the thread. The result is that tap and die wear is reduced, the likelihood of breakage is lessened and higher cutting speeds can often be employed.
Truncation is achieved by using a slightly larger tap drill in the case of female threads, or by slightly reducing the diameter of the threaded area of workpiece in the case of male threads, the latter effectively reducing the thread's major diameter. In the case of female threads, tap drill charts typically specify sizes that will produce an approximate 75 percent thread. A 60 percent thread may be appropriate in cases where high tensile loading will not be expected. In both cases, the pitch diameter is not affected. The balancing of truncation versus thread strength is similar to many engineering decisions involving the strength, weight and cost of material, as well as the cost to machine it.
Taper
Tapered threads are used on fasteners and pipe. A common example of a fastener with a tapered thread is a wood screw.
The threaded pipes used in some plumbing installations for the delivery of fluids under pressure have a threaded section that is slightly conical. Examples are the NPT and BSP series. The seal provided by a threaded pipe joint is created when a tapered externally threaded end is tightened into an end with internal threads. Normally a good seal requires the application of a separate sealant in the joint, such as thread seal tape, or a liquid or paste pipe sealant such as pipe dope, however some threaded pipe joints do not require a separate sealant.
Standardization

Standardization of screw threads has evolved since the early nineteenth century to facilitate compatibility between different manufacturers and users. The standardization process is still ongoing; in particular there are still (otherwise identical) competing metric and inch-sized thread standards widely used.[5] Standard threads are commonly identified by short letter codes (M, UNC, etc.) which also form the prefix of the standardized designations of individual threads.
Additional product standards identify preferred thread sizes for screws and nuts, as well as corresponding bolt head and nut sizes, to facilitate compatibility between spanners (wrenches) and other tools.
ISO standard threads
The most common threads in use are the ISO metric screw threads (M) for most purposes and BSP threads (R, G) for pipes.
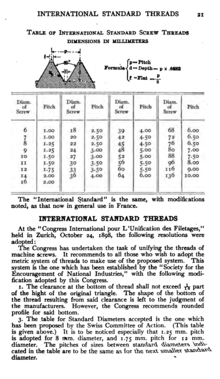
These were standardized by the International Organization for Standardization (ISO) in 1947. Although metric threads were mostly unified in 1898 by the International Congress for the standardization of screw threads, separate metric thread standards were used in France, Germany, and Japan, and the Swiss had a set of threads for watches.
Other current standards
In particular applications and certain regions, threads other than the ISO metric screw threads remain commonly used, sometimes because of special application requirements, but mostly for reasons of backwards compatibility:
- Unified Thread Standard (UTS), is the dominant thread standard used in the United States and Canada. It is defined in ANSI/ASME B1.1 Unified Inch Screw Threads, (UN and UNR Thread Form). This standard includes:
- Unified Coarse (UNC), commonly referred to as National Coarse (NC) in retailing.
- Unified Fine (UNF), commonly referred to as National Fine (NF) in retailing.
- Unified Extra Fine (UNEF)
- Unified Special (UNS)
- National pipe thread (NPT), used for plumbing of water and gas pipes, and threaded electrical conduit.
- NPTF (National Pipe Thread Fuel)
- British Standard Whitworth (BSW), and for other Whitworth threads including:
- British Standard Fine (BSF)
- Cycle Engineers' Institute (CEI) or British Standard Cycle (BSC)
- British standard pipe thread (BSP) which exists in a taper and non taper variant; used for other purposes as well
- British Standard Pipe Taper (BSPT)
- British Association screw threads (BA), primarily electronic/electrical, moving coil meters and to mount optical lenses
- British Standard Buttress Threads (BS 1657:1950)
- British Standard for Spark Plugs BS 45:1972
- British Standard Brass a fixed pitch 26tpi thread
- Glass Packaging Institute threads (GPI), primarily for glass bottles and vials
- Power screw threads
- Camera case screws, used to mount a camera on a photographic tripod:
- ¼″ UNC[6] used on almost all small cameras
- ⅜″ UNC for larger (and some older small) cameras
(many older cameras use ¼" BSW or ⅜" BSW threads, which in low stress applications, and if machined to wide tolerances, are for practical purposes compatible with the UNC threads)
- Royal Microscopical Society (RMS) thread, also known as society thread, is a special 0.8" diameter x 36 thread-per-inch (tpi) Whitworth thread form used for microscope objective lenses.
- Microphone stands:
- ⅝″ 27 threads per inch (tpi) Unified Special thread (UNS, USA and the rest of the world)
- ¼″ BSW (not common in the USA, used in the rest of the world)
- ⅜″ BSW (not common in the USA, used in the rest of the world)
- Stage lighting suspension bolts (in some countries only; some have gone entirely metric, others such as Australia have reverted to the BSW threads, or have never fully converted):
- ⅜″ BSW for lighter luminaires
- ½″ BSW for heavier luminaires
- Tapping screw threads (ST) – ISO 1478
- Aerospace inch threads (UNJ) – ISO 3161
- Aerospace metric threads (MJ) – ISO 5855
- Tyre valve threads (V) – ISO 4570
- Metal bone screws (HA, HB) – ISO 5835
- Panzergewinde (Pg) (German) is an old German 80° thread (DIN 40430) that remained in use until 2000 in some electrical installation accessories in Germany.
- Fahrradgewinde (Fg) (English: bicycle thread) is a German bicycle thread standard (per DIN 79012 and DIN 13.1), which encompasses a lot of CEI and BSC threads as used on cycles and mopeds everywhere (http://www.fahrradmonteur.de/fahrradgewinde.php)
- Edison base Incandescent light bulb holder screw thread
- Fire hose connection (NFPA standard 194)
- Hose Coupling Screw Threads (ANSI/ASME B1.20.7-1991 [R2003]) for garden hoses and accessories
- Löwenherz thread,[7] a German metric thread used for measuring instruments[8]
- Sewing machine thread[9]
History of standardization



Standardization of screw threads began many centuries ago, the first time a craftsman who carved and filed screw threads ever tried to make two screws, or two mated pairs of screw and nut, come out alike. However, in craft production of individual threads or mated pairs of threads, interchangeability was not a requirement; custom fitting was the norm.
Therefore, the first historically important intra-company standardization of screw threads began with Henry Maudslay around 1800, when the modern screw-cutting lathe made interchangeable V-thread machine screws a practical commodity.[10] During the next 40 years, standardization continued to occur on the intra-company and inter-company level.[11] No doubt many mechanics of the era participated in this zeitgeist; Joseph Clement was one of those whom history has noted. In 1841, Joseph Whitworth created a design that, through its adoption by many British railroad companies, became a national standard for the United Kingdom called British Standard Whitworth. During the 1840s through 1860s, this standard was often used in the United States and Canada as well, in addition to myriad intra- and inter-company standards. In April 1864, William Sellers presented a paper to the Franklin Institute in Philadelphia, proposing a new standard to replace the U.S.'s poorly standardized screw thread practice. Sellers simplified the Whitworth design by adopting a thread profile of 60° and a flattened tip (in contrast to Whitworth's 55° angle and rounded tip).[12][13] The 60° angle was already in common use in America,[14] but Sellers's system promised to make it and all other details of threadform consistent.
The Sellers thread, easier for ordinary machinists to produce, became an important standard in the U.S. during the late 1860s and early 1870s, when it was chosen as a standard for work done under U.S. government contracts, and it was also adopted as a standard by highly influential railroad industry corporations such as the Baldwin Locomotive Works and the Pennsylvania Railroad. Other firms adopted it, and it soon became a national standard for the U.S.,[14] later becoming generally known as the United States Standard thread (USS thread). Over the next 30 years the standard was further defined and extended and evolved into a set of standards including National Coarse (NC), National Fine (NF), and National Pipe Taper (NPT). Meanwhile, in Britain, the British Association screw threads were also developed and refined.
During this era, in continental Europe, the British and American threadforms were well known, but also various metric thread standards were evolving, which usually employed 60° profiles. Some of these evolved into national or quasi-national standards. They were mostly unified in 1898 by the International Congress for the standardization of screw threads at Zurich, which defined the new international metric thread standards as having the same profile as the Sellers thread, but with metric sizes. Efforts were made in the early 20th century to convince the governments of the U.S., UK, and Canada to adopt these international thread standards and the metric system in general, but they were defeated with arguments that the capital cost of the necessary retooling would drive some firms from profit to loss and hamper the economy. (The mixed use of dueling inch and metric standards has since cost much, much more, but the bearing of these costs has been more distributed across national and global economies rather than being borne up front by particular governments or corporations, which helps explain the lobbying efforts.)
Sometime between 1912 and 1916, the Society of Automobile Engineers (SAE) created an "SAE series" of screw thread sizes reflecting parentage from earlier USS and ASME standards.
During the late 19th and early 20th centuries, engineers found that ensuring the reliable interchangeability of screw threads was a multi-faceted and challenging task that was not as simple as just standardizing the major diameter and pitch for a certain thread. It was during this era that more complicated analyses made clear the importance of variables such as pitch diameter and surface finish.
A tremendous amount of engineering work was done throughout World War I and the following interwar period in pursuit of reliable interchangeability. Classes of fit were standardized, and new ways of generating and inspecting screw threads were developed (such as production thread-grinding machines and optical comparators). Therefore, in theory, one might expect that by the start of World War II, the problem of screw thread interchangeability would have already been completely solved. Unfortunately, this proved to be false. Intranational interchangeability was widespread, but international interchangeability was less so. Problems with lack of interchangeability among American, Canadian, and British parts during World War II led to an effort to unify the inch-based standards among these closely allied nations, and the Unified Thread Standard was adopted by the Screw Thread Standardization Committees of Canada, the United Kingdom, and the United States on November 18, 1949 in Washington, D.C., with the hope that they would be adopted universally. (The original UTS standard may be found in ASA (now ANSI) publication, Vol. 1, 1949.) UTS consists of Unified Coarse (UNC), Unified Fine (UNF), Unified Extra Fine (UNEF) and Unified Special (UNS). The standard was widely taken up in the UK, although a small number of companies continued to use the UK's own British standards for Whitworth (BSW), British Standard Fine (BSF) and British Association (BA) micro-screws.
However, internationally, the metric system was eclipsing inch-based measurement units. In 1947, ISO was founded; and in 1960, the metric-based International System of Units (abbreviated SI from the French Système International) was created. With continental Europe and much of the rest of the world turning to SI and ISO metric screw thread, the UK gradually leaned in the same direction. The ISO metric screw thread is now the standard that has been adopted worldwide and is slowly displacing all former standards, including UTS. In the U.S., where UTS is still prevalent, over 40% of products contain at least some ISO metric screw threads. The UK has completely abandoned its commitment to UTS in favour of ISO metric threads, and Canada is in between. Globalization of industries produces market pressure in favor of phasing out minority standards. A good example is the automotive industry; U.S. auto parts factories long ago developed the ability to conform to the ISO standards, and today very few parts for new cars retain inch-based sizes, regardless of being made in the U.S.
Even today, over a half century since the UTS superseded the USS and SAE series, companies still sell hardware with designations such as "USS" and "SAE" to convey that it is of inch sizes as opposed to metric. Most of this hardware is in fact made to the UTS, but the labeling and cataloging terminology is not always precise.
Engineering drawing
In American engineering drawings, ANSI Y14.6 defines standards for indicating threaded parts. Parts are indicated by their nominal diameter (the nominal major diameter of the screw threads), pitch (number of threads per inch), and the class of fit for the thread. For example, “.750-10UNC-2A” is male (A) with a nominal major diameter of 0.750 in, 10 threads per inch, and a class-2 fit; “.500-20UNF-1B” would be female (B) with a 0.500 in nominal major diameter, 20 threads per inch, and a class-1 fit. An arrow points from this designation to the surface in question.[15]
Generation
There are many ways to generate a screw thread, including the traditional subtractive types (e.g., various kinds of cutting [single-pointing, taps and dies, die heads, milling]; molding; casting [die casting, sand casting]; forming and rolling; grinding; and occasionally lapping to follow the other processes); newer additive techniques; and combinations thereof.
Inspection
- Inspection of thread geometry is discussed at Threading (manufacturing) > Inspection.
Another common inspection point is the straightness of a bolt or screw. This topic comes up often when there are assembly issues with predrilled holes as the first troubleshooting point is to determine if the fastener or the hole is at fault. ASME B18.2.9 "Straightness Gage and Gaging for Bolts and Screws" was developed to address this issue. Per the scope of the standard, it describes the gage and procedure for checking bolt and screw straightness at maximum material condition (MMC) and provides default limits when not stated in the applicable product standard.
See also
| Wikimedia Commons has media related to Screw threads. |
Notes
- ↑ http://books.google.com/books?id=IRdIAAAAIAAJ&pg=PA137
- ↑ Brown, Sheldon. "Bicycle Glossary: Pedal". Sheldon Brown. Retrieved 2010-10-19.
- ↑ http://www.directindustry.com/prod/s-w-manufacturing-co-inc/clamping-studs-57807-574221.html
- ↑ Bhandari, p. 205.
- ↑ ISO 1222:2010 Photography -- Tripod connections
- ↑ Löwenherz thread
- ↑ Ryffel 1988, p. 1603.
- ↑ Sewing machine thread
- ↑ Quentin R. Skrabec, Jr. (2005). "The Metallurgic Age: The Victorian Flowering of Invention and Industrial Science". p. 169. McFarland
- ↑ Roe 1916, pp. 9–10.
- ↑ ASME 125th Anniversary: Special 2005 Designation of Landmarks: Profound Influences in Our Lives: The United States Standard Screw Threads
- ↑ Roe 1916, pp. 248–249.
- 1 2 Roe 1916, p. 249.
- ↑ Wilson pp. 77–78 (page numbers may be from an earlier edition).
References
- Bhandari, V B (2007), Design of Machine Elements, Tata McGraw-Hill, ISBN 978-0-07-061141-2.
- Degarmo, E. Paul; Black, J T.; Kohser, Ronald A. (2003), Materials and Processes in Manufacturing (9th ed.), Wiley, ISBN 0-471-65653-4.
- Green, Robert E. et al. (eds) (1996), Machinery's Handbook (25 ed.), New York, NY, USA: Industrial Press, ISBN 978-0-8311-2575-2.
- Roe, Joseph Wickham (1916), English and American Tool Builders, New Haven, Connecticut: Yale University Press, LCCN 16011753. Reprinted by McGraw-Hill, New York and London, 1926 (LCCN 27-24075); and by Lindsay Publications, Inc., Bradley, Illinois, (ISBN 978-0-917914-73-7).
- Wilson, Bruce A. (2004), Design Dimensioning and Tolerancing (4th ed.), Goodheart-Wilcox, ISBN 1-59070-328-6.
