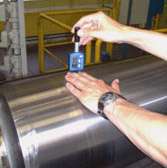
Leeb rebound hardness test

The Leeb rebound hardness test is one of the four most used methods for testing metal hardness. This portable method is mainly used for testing sufficiently large workpieces (mainly above 1 kg).
History
The Leeb rebound hardness test method was developed in 1975 by Leeb and Brandestini at Proceq SA to provide a portable hardness test for metals. It was developed as an alternative to the unwieldy and sometimes intricate traditional hardness measuring equipment. The first Leeb rebound product on the market was named “Equotip”, a phrase which still is used synonymously with “Leeb rebound” due to the wide circulation of the “Equotip” product.
Traditional hardness measurements, e.g., those of Rockwell, Vickers, and Brinell, are stationary, requiring fixed workstations in segregated testing areas or laboratories. Most of the time, these methods are selective, involving destructive tests on samples. From individual results, these tests draw statistical conclusions for entire batches. The portability of Leeb testers can sometimes help to achieve higher testing rates without destruction of samples, which in turn simplifies processes and reduces cost.[1]
Method
The traditional methods are based on well-defined physical indentation hardness tests. Very hard indenters of defined geometries and sizes are continuously pressed into the material under a particular force. Deformation parameters, such as the indentation depth in the Rockwell method, are recorded to give measures of hardness.[2]
According to the dynamic Leeb principle, hardness value is derived from the energy loss of a defined impact body after impacting on a metal sample, similarly to the Shore scleroscope. The Leeb quotient (vi,vr) is taken as a measure of the energy loss by plastic deformation: the impact body rebounds faster from harder test samples than it does from softer ones, resulting in a greater value 1000×vr/vi. A magnetic impact body permits the velocity to be deduced from the voltage induced by the body as it moves through the measuring coil. The quotient 1000×vr/vi is quoted in the Leeb rebound hardness unit HL.[1][3]
While in the traditional static tests the test force is applied uniformly with increasing magnitude, dynamic testing methods apply an instantaneous load. A test takes a mere 2 seconds and, using the standard probe D, leaves an indentation of just ~0.5 mm in diameter on steel or steel casting with a Leeb hardness of 600 HLD. By comparison, a Brinell indentation on the same material is ~3 mm (hardness value ~400 HBW 10/3000), with a standard-compliant measuring time of ~15 seconds plus the time for measuring the indentation.[2]
Scales
Depending on the probe (“impact device”) and indenter (“impact body”) types that vary by geometry, size, weight, material and spring force, diverse impact devices and hardness units are distinguished, e.g.:
- Equotip impact device D with hardness unit HLD
- Equotip impact device G with hardness unit HLG
Generally, impact device types are optimized for certain application fields. This is similar to using various indenter geometries and test loads in Rockwell (e.g. HRA, HRB, HRC), Brinell and Vickers. Leeb hardness results in HL are often converted to the traditional hardness scales HRC, HB and HV mainly for convention reasons between supplier and customer.[4][5]
Standards
- German standards and specifications:
- DIN 50156-1 “Metallic materials – Leeb hardness test - Part 1: Test Method”
- DIN 50156-2 "Metallic materials - Leeb hardness test - Part 2: Verification and calibration of the testing devices"
- DIN 50156-3 "Metallic materials - Leeb hardness test - Part 3: Calibration of reference blocks"
- DGZfP Guideline “Mobile Härteprüfung“
- VDI/VDE Guideline 2616 Part 1 “Hardness testing of metallic materials”
- American standards:
- Official international standards projects:
- ISO/DIS 16859-1 "Metallic materials - Leeb hardness test - Part 1: Test method"
- ISO/DIS 16859-2 "Metallic materials - Leeb hardness test - Part 2: Verification and calibration of the testing devices"
- ISO/DIS 16859-3 "Metallic materials - Leeb hardness test - Part 3: Calibration of reference test blocks"
- Official European standard projects:
- PrEN ISO 16859-1 "Metallic materials - Leeb hardness test - Part 1: Test method"
- PrEN ISO 16859-2 "Metallic materials - Leeb hardness test - Part 2: Verification and calibration of the testing devices"
- PrEN ISO 16859-3 "Metallic materials - Leeb hardness test - Part 3: Calibration of reference test blocks"
See also
References
- 1 2 R. T. Mennicke, “Equotip Metal Hardness”, ICASI 2008 & CCATM 2008 congress proceedings (2008).
- 1 2 K. Herrmann et al., „Härteprüfung an Metallen und Kunststoffen“ (“Hardness tests on metals and plastics”), Expert Verlag, Renningen, 2007.
- ↑ M. Tietze, M. Kompatscher, “Predicative Hardness Testing for Production Control and Materials Design”, IMEKO-TC5-2002-027, 2002.
- ↑ H.-H. Pollok, „Leeb-Härteprüfung als Alternative zu traditionellen Verfahren“ (“Leeb hardness testing as an alternative to traditional test methods”), Qualität und Zuverlässigkeit, Ausgabe 4/2008.
- ↑ R. T. Mennicke, “Converting the Scales – Leeb as a Hardness Alternative”, Industrial Heating, Issue January 2009.