Ice climbing
| Part of a series on |
| Climbing |
|---|
 Ice climbing |
| Background |
| Types |
| Lists |
| Terms |
| Gear |
| Climbing companies |
|

Ice climbing is the activity of ascending inclined ice formations. Usually, ice climbing refers to roped and protected climbing of features such as icefalls, frozen waterfalls, and cliffs and rock slabs covered with ice refrozen from flows of water.[1] For the purposes of climbing, ice can be broadly divided into two spheres, alpine ice and water ice. Alpine ice is found in a mountain environment, usually requires an approach to reach, and is often climbed in an attempt to summit a mountain. Water ice is usually found on a cliff or other outcropping beneath water flows. Alpine ice is frozen precipitation whereas water ice is a frozen liquid flow of water. Most alpine ice is generally one component of a longer route and often less technical, having more in common with standard glacier travel, while water ice is selected largely for its technical challenge. Technical grade is, however, independent of ice type and both types of ice vary greatly in consistency according to weather conditions. Ice can be soft, hard, brittle or tough. Mixed climbing is ascent involving both ice climbing and rock climbing.[2][3]
Techniques
.jpg)
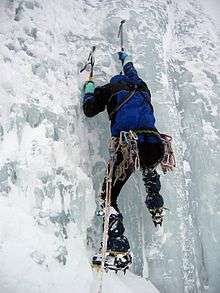
A climber chooses equipment according to the slope and texture of the ice. For example, on flat ice, almost any good hiking or mountaineering boot will usually suffice, but for serious ice climbing double plastic mountaineering boots or their stiff leather equivalent are usually used, which must be crampon compatible and stiff enough to support the climber and maintain ankle support. On short, low angled slopes, one can use an ice axe to chop steps. For longer and steeper slopes or glacier travel, crampons are mandatory for a safe climb. Vertical ice climbing is done with crampons and ice axes (those specific to vertical ice generally being called technical ice axes, or ice tools); climbers kick their legs to engage the front points of the crampons in the ice, and then swing the axe into the ice above their heads. This technique is known as front pointing. The strength of the ice is often surprising; even if the axe goes in only a centimeter or so it is enough to pull up on. If a climber is leading, they will need to place ice screws as protection on the way up (see climbing system). Most mountaineers would only consider the last scenario true ice climbing; the less steep variations are routine aspects of winter mountaineering.
Some important techniques and practices common in rock climbing that are employed in ice climbing include knowledge of rope systems, tying in, belaying, leading, abseiling, and lowering. Beginners should learn these techniques before attempting to ice climb. It is highly recommended that one acquire knowledge from experts and experienced ice climbers.
Rope systems

Single, double, and twin rope are the three main rope systems used in ice climbing. The single rope system, which is suited for straight climbing routes, is the most commonly used rock climbing system in the world. Also often used in climbing is the double rope system which is a more flexible system than the single rope system. Lastly, the twin rope system, which uses two twin ropes in a single rope system, is used for longer multi-pitch routes. Double and twin rope technique is used more frequently in ice climbing because these systems are more redundant, an important consideration given the number of sharp edges the ice climber carries with him. Impact force on ice is an issue, with double ropes gaining popularity over twins.[4]
Tying in
Tying in entails attaching your rope to the climbing harness. This technique is a must particularly when leading a climb or belaying. A commonly used tie-in knot is the Figure-of-eight follow through, but the Bowline and Thumb (stopper) knot is often preferred, since it is easier to untie when frozen. This technique should be done properly to ensure your safety when ice climbing.
Belaying
In this climbing technique, either running belays or fixed belays are used. A running belay on ice is similar to a running belay on rock as well as snow. The leader of the climb puts protection and clips the rope through it. The next climber puts away the protection. There should be at least two points of protection between the leader and the next climber. Fixed belays, on the other hand, require a belayer, belay anchor, and points of protection. A belay anchor is attached to a cliff in supporting a belay or toprope. In using either a running- or fixed belay, it is necessary that you have enough knowledge on boot/ice-screw belay techniques.
Leading
Leading refers to the act of leading a climb and thus, requires a leader and a follower. This ice climbing technique entails putting protection while ascending. In doing so, leading is done in sections. The leader places the protection as he/she climbs until he/she reaches the top of a pitch. At the top, the leader builds a belay anchor with which to belay the second climber. While the second climbs, he/she removes the protection placed by the leader. When the second climber finishes, they both proceed to the second pitch.
Abseiling
Also called rappelling, abseiling uses a fixed rope to descend. This technique is not only used to go down after a climb, it can also be used when trying new climbing routes and when there is a seemingly difficult access to the start of a climb. Careful execution is important when abseiling. There are the possibilities of jammed ropes, ropes becoming severed after getting in contact with sharp edges, and other cases of equipment failure.
Lowering
Lowering is one of the most common methods of getting down. A belayer at the base of the vertical wall ensures that the climber is lowered safely. This climbing technique is used when going down routes where there are short, steep walls. This is also used when you want to go down faster.
These are the different techniques used in climbing activities. Keep in mind, though, that it is very crucial to learn these skills from expert climbers before attempting them yourself.
Protecting ice

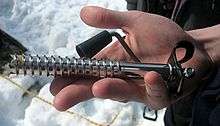
Today the most common protection for ice climbing is an ice screw. Ice screws are hollow tubes with sharp teeth on the front end, a hanger eye at the back to clip into, and threading around the tube. They are screwed into the ice and can provide very strong protection in solid ice.[2] However, because of the variable nature of ice, the strength of ice screw placements can vary greatly.[5]
Ice climbers also use the ice itself as protection. The two most common of such techniques are the V-Thread (also known as the "Abalakov" anchor, named after a Russian climber who popularised the technique) and the ice bollard. In a V-thread two intersecting tunnels are bored into the ice to form a "V" shaped tunnel. A sling or cordelette is then threaded through the V and tied in a loop. The rope is passed through the sling, which remains left behind after use.[5]
In an ice bollard ice is chipped away to create a teardrop shaped "bollard". A sling is placed around it, and the rope through the sling, which again is left behind.[6] When ice conditions permit the sling may be dispensed with.
Natural formations, ice hooks, and ice pitons are also used as protection anchors by ice climbers.
Ice climbing grades

Waterfall ice grading
This discussion focuses on the waterfall ice rating system as used in the Canadian Rockies.
Testpiece examples are given. Note that ice grading, even more so than other climbing media, tends to be subjective and often does not reflect the difficulty of a route at any given time. Routes become much easier after the first ascent of the season. This is due to the cleaning of chandeliered ice and creation of "hooks", which are pockets formed by the tools' picks, reducing the effort expended in cleaning and tool placement.
Routes with high-flow seeps also tend to become easier as the season progresses due to the increase in volume of ice. Low-flow seeps, however (e.g. French Reality, Banff; Moonlight/Snowline, Kananaskis), often form early in the season (September–November) when the flow is good from latent summer heat, and then slow down or even stop with the deepening winter frost; subsequent ablation (and destruction by climbing) of the ice often makes for thinner and brittler ice with time.
Grading in the Canadian Rockies, especially recently, focuses on the steepness of a pitch rather than the more subjective "feeling of difficulty" (mental aspects, e.g. protectability, exposure , commitment, etc.) or "technical difficulty" (e.g. chandeliers, bonding, etc.) during the first ascent. Hence the downgrading of several notorious routes, e.g. Sea of Vapours, which were in poor conditions during the first ascents.
A common use of the "+" designation is to indicate a higher level of technicality than is typical for the grade (e.g. chandeliers, poor bonding, etc.) that is consistent from year to year (i.e. Wicked Wanda, WI4+, has vicious mushrooms on an otherwise low-angled route, and these features always exist from year to year, probably due to the winds).
Finally, Canadian Rockies WI grading does NOT have anything to do with whether a climb is multi-pitch or not. Therefore, a 4-pitch WI5 is not granted WI6 just because it's long, and likewise a 4-pitch WI6 is not given WI7.
WI2 - low-angled (60 degree consistent ice), with good technique can be easily climbed with one ice axe. Grades beyond this generally require the use of two ice tools.
WI3 - generally sustained in the 60-70 degree range with occasional near-vertical steps up to 4 metres (Cascade Waterfall, Banff; This House of Sky, Ghost River)
WI4 - near-vertical steps of up to 10 metres, generally sustained climbing requiring placing protection screws from strenuous stances (Professor's Falls, Banff; Weeping Wall Left, Icefields Parkway; Silk Tassle, Yoho; Moonlight & Snowline, Kananaskis)
WI4+ - highly technical WI4. (Wicked Wanda, Ghost River)
WI5 - near-vertical or vertical steps of up to 20 metres, sustained climbing requiring placing multiple protection screws from strenuous stances with few good rests (Carlsberg Column, Field; The Sorcerer, Ghost River; Bourgeau Left Hand, Banff)
WI5+ - highly technical WI5 (Oh le Tabernac, Icefield Parkway; Hydrophobia, Ghost River; Sacre Bleu, Banff; Stairway to Heaven, Provo Canyon)
WI6 - vertical climbing for the entire pitch (e.g. 30–60 metres) with no rests. Requires excellent technique and/or a high level of fitness (The Terminator, Banff; Nemesis, Kootenay Park; Whiteman Falls, Kananaskis Country; Riptide, Banff)
WI6+ - vertical or overhanging with no rests, and highly technical WI6 (French Maid, Yoho; French Reality, Kootenay Park)
WI7 - sustained and overhanging with no rests. Extremely rare, near-mythical, and widely accepted testpiece examples of this grade don't exist in the Canadian Rockies(e.g. Sea of Vapours, Banff; Riptide, Icefield Parkway, Banff)
See Alpinist's Climbing Grades section for a variation on this discussion: http://www.alpinist.com/p//climbing_notes/grades
Mixed ice grading
| YDS | Hueco | Mixed |
|---|---|---|
| 5.8 | V0- | M4 |
| 5.9 | V0 | M5 |
| 5.10a | V0+ | M6 |
| 5.10b | ||
| 5.10c | V1 | |
| 5.10d | ||
| 5.11a | V2 | M7 |
| 5.11b | ||
| 5.11c | V3 | M8 |
| 5.11d | ||
| 5.12a | V4 | |
| 5.12b | V5 | |
| 5.12c | M9 | |
| 5.12d | V6 | |
| 5.13a | V7 | |
| 5.13b | V8 | |
| 5.13c | M10 | |
| 5.13d | V9 | |
| 5.14a | V10 | |
| 5.14b | V11 | |
| 5.14c | V12 | M11 |
| 5.14d | V13 | |
| 5.15a | V14 | |
| 5.15b | V15 | M12 |
| 5.15c | V16 | M13 |
Mixed climbing has its own grading scale that roughly follows the WI rating system with respect to its physical and technical demands. Typically starts at M4. Subgrades of "-" and "+" are commonly used, although the distinctions are typically very subjective. The following table makes a comparison with the WI system and the Yosemite Decimal System. Comparing these is rough, and only gives an idea of the relative difficulty; the reason different systems exist in the first place is because it's difficult to compare grades between climbing media.
References
- ↑ Chouinard, Yvon (1978). Climbing Ice. San Francisco: Sierra Club Books. ISBN 978-0871562081.
- 1 2 Lowe, Jeff (1996). Ice World: Techniques and Experiences of Modern Ice Climbing. Seattle: The Mountaineers.
- ↑ Gadd, Will; Roger Chayer (November 2003). Ice & Mixed Climbing: Modern Technique (First ed.). Mountaineers Books. ISBN 0-89886-769-X.
- ↑ climbingextreme.com, Juho Risku (January 2012). "Climbing Extreme: Ice climbing, ropes and single vs. half". Retrieved 2012-01-21.
- 1 2 Steven M. Cox and Kris Fulsaas, ed. (2003) [1960]. Mountaineering: The Freedom of the Hills (7th ed.). Seattle: The Mountaineers Books. ISBN 978-0898868289.
- ↑ http://alpineinstitute.blogspot.com/2011/01/ice-bollard.html
External links
| Wikimedia Commons has media related to Ice climbing. |
| ||||||||||||||||||||||||||||||||||||||||||||||||||