Besseringen B-Werk

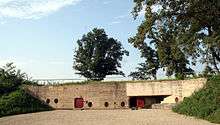
The B-Werk near Besseringen is the only completely preserved fortification built to construction standard "B" in the Siegfried Line. It is part of the so-called Saar position and lies within the borough of the German town of Merzig.
Siegfried Line
The defensive system of the Siegfried Line was built between 1936 and 1940 on the western border of the German Empire and had a length of around 630 kilometres. It consisted of a huge number of bunkers and tank obstacles of many different types. A total of 22,000 bunkers and structures was planned, and around 14,800 were actually built, including 32 armoured works of construction standard (or thickness) "B", whence the German term B-Werk.
B-Werke
The B-Werke were the largest and best-equipped bunker systems in the Siegfried Line. Their name is derived from the construction thickness standards, whereby "B" referred to wall and ceiling thicknesses of 1.5 metres. Officially the term Panzerwerk ("armoured structure") or a codename (such as the name of an animal, field or military figure) was used in order not to give away the construction thickness to the enemy.
The Besseringen B-Werk
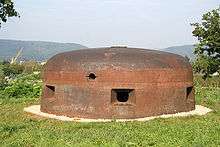
The B-Werk in Besseringen dates to the years 1938 and 1939. Its construction cost then about 1,300,000 Reichsmarks. It was made from about 2,800 cubic metres of concrete and 200 tonnes of steel. The structure is three storeys high and has over 44 rooms with a floor area of 24.60 metres by 17.80 metres. It was intended for a crew of 85 to 90 soldiers who, if necessary, could live and fight autonomously in the B-Werk for up to 30 days. The bunker had its own water and electricity supply, air filter systems, engine rooms and accommodation, and was equipped with two turrets, each with six weapon ports, an observation cupola and flanking embrasures (Schartenplatten). Its weaponry consisted of machine guns for the two six-port turrets and the flanking ports, as well as an M 19 grenade launcher and a fixed FN flamethrower. In addition, there were the normal rifles carried by the infantry, the Mauser Model 98.
The B-Werk was designated as Bunker No. 38401 and, later, as WH No. 118.
Weaponry and armour plating

The main weapons were the two MG 34 machine guns in each six-port turret. These machine guns were fixed to gun mounts in the turrets and could be moved from port to port on rails. They could also be aimed using circular scales on the inside walls of the turret. The machine guns could not be placed in two adjacent ports; there always had to be at least one port between the two gun positions. The ports were closed when not in use by universal ball joint locks (Kugelkalottverschlüssen). The gun mounts had a matching ball head that sealed the ports when the machine gun was in its firing position. The six-port turrets were of Type 20P7, had an average wall thickness of 255 millimetres, an inside diameter of 2.25 metres and a weight of 51 tonnes. Their overall height was 2.64 metres, of which only 1.34 metres projected above the roof of the bunker. Due to their effective range of 1,650 metres, the machine guns in the turrets could be seen as the "long distance weapons" of the bunker; in particular, they could cover the opposite bank of the River Saar and the hillside that climbed away from it.
The M 19 grenade launcher was intended for close-quarter defence. It had a range of between 20 and 600 metres and could in theory fire up to 120 50mm grenades per minute. The grenade launcher was built into an armoured Type 424P01 turret, which only projected 0.50 metres above the top of the bunker. The turret had a weight of 26 tonnes, an inside diameter of 1.70 metres, an overall height of 2.63 metres and an average wall thickness of 250 millimetres.
The fortress flamethrower was known as a Festungs-Nahkampf-Gerät, a fortress close quarter combat device. It was intended for the defence of the top of the bunker and the immediate surrounding area. Its maximum range was 40 metres and it could last up to 90 seconds, using 120 litres of oil. The flamethrower worked at a pressure of 20 atmospheres which was created in a special pressure cylinder. The pressure vessel was filled from a container that held 2,500 litres of oil. The device took two minutes to prepare for firing (filling the pressure vessel and building up the pressure). The ignition of the oil was achieved using acetylene gas.

For observation and fire control the commander had a Type 90P9 observation cupola. Through 5 slits, that could be closed by slides, the commander could observe the surrounding area and direct fire using two armoured periscopes. The cupola had a weight of 6 tonnes, an average wall thickness of 120 millimetres, an overall height of 1.6 metres of which only 0.65 metres protruded above the bunker.
There was another machine gun in a flank fire position of the bunker that covered the entrance. It is not entirely clear which machine gun was used here. The weapon was fixed to a box stand (Untersetzkasten) with the corresponding gun mount. The flank fire position had a 7P7 armoured embrasure plate with a thickness of 10 centimetres and a weight of 7.5 tonnes, in front of which there was a stepped embrasure made of concrete. By means of a slide, the embrasure and observation slit could be close. In addition, for the viewing slit there was a sliding plate of armoured glass which could be used to observe the situation when under fire.
Technical facilities
Power
The engine room took up two floors, the upper floor could only be entered through the engine room from below. The bottom of the upper floor consisted of steel beams and plates. For power generation, the bunker had two diesel generators in the engine room. These were water-cooled, four-cylinder, four-stroke engines, generating 38 hp each. The alternators each produced 28 kW of three-phase, alternating current at 380 volts. This powered the electric motors in the bunker, the electric heaters in the accommodation and the boilers and hobs in the kitchen. The main lighting was supplied at 220 volts. Sensitive areas were operated by accumulator batteries to ensure continuity of power available in case the generators failed. This delivered a 24 volt power supply to light the battle positions and the optics as well powering the emergency lighting. The radio room of the bunker had its own separate 24-volt batteries. Today, the generators have been removed.
Air filter system and ventilation
An important aspect of the bunkers of the Siegfried Line was their ability to operate under gas attack. The bunkers could be hermetically sealed and supplied with purified air from outside. Because of their importance, the B-Werke had the most elaborate filter systems designed and built into the facilities. A constant overpressure prevented the penetration of gases in the event of minor leaks and allowed the removal of stale air and exhaust gases from the battle positions. One or more spaces were combined to form gas-tight cells. Pressure relief valves in the rooms or cells regulated the pressure. The air sucked in from outside was passed through a pre-filter, which cleared the air of dust and water vapour. Then it flowed through four, parallel, room filters, which filtered dangerous gasses out using active carbon inserts. If required, the air for heating the bunker could be warmed using a heat exchanger before being blown into the bunker. The capacity of the central fan was 40 m³ / minute. To ensure the ventilation of the plant even in the event of the central fan failing, individual rooms or cells had hand-operated HES ventilators (army unit protection ventilators) with 1.2 m³ or 2.4 m³ capacity per minute. The central fan and its filters was located above the engine room but is no longer in place.
Communication facilities
The bunker had a sophisticated array of communication facilities. Three underground cables of the fortress telephone network were terminated in a separate radio room, where there was a switchboard. Its inputs included slots into which field cable could also be connected either to provide additional cable connections or to bridge damaged underground cable. Telephones were installed in the most important room or at least connections for portable telephones were available. The turrets were connected independently of the central exchange in the radio to the associated battle preparation rooms with separate telephone lines. Voicepipes were used to link the inner entrance defence rooms and the flank fire position.
Water supply
The bunker had its own well. In the well chamber was a pump that pumped the water into a tank. From there water was pumped into a pressure vessel in order to provided the necessary water pressure to the taps. There were take-off points in the kitchen, the sick bay, the command post, the hallways and the washroom. The bunker only had wash basins, there were no showers, in the toilets and in the engine room. In addition to the need for drinking water, water was needed to cool the diesel generator sets and there was also an automatic sprinkler system in the ammunition store. Waste water was collected in a pit from where it was pumped to the surface by an electric pumping system activated by a float.
Manning during the Second World War
The Besseringen B-Werk was first used in the period after its completion until summer 1940, when its occupation no longer seemed necessary following the successful German invasion of France. In autumn 1944 it was manned again. After the Allies had surrounded Merzig in spring 1945, during Operation Undertone, its crew left the bunker at Besseringen.
Post-war period
After the end of the war almost all the fittings of the B-Werk were removed. The site was used as a rubbish tip and was walled up and covered with earth in 1980. In 1997 work began on uncovering and restoring it. From 1997 to 2002 the site was managed by the Merzig Reservist Association (Reservistenkameradschaft Merzig) and, from 2002, the Merzig Local History Society (Verein für Heimatkunde Merzig).
Museum
In autumn 2005 the B-Werk was opened to the public, although, as at September 2011, not all areas of the site may be visited and opening times are restricted to Sundays and public holidays between April and September from 2 to 6 pm. In the basement there is a permanent exhibition of the fighting at the Orscholz Switch (also known as the Siegfried Switch) as well as the consequence for the civilian population and resistance movements. To date (Sep 2011), four rooms have been restored almost to their original state. From the outside, only the entrance area and the armoured cupolas may be seen. In the entrance yard is an original sentry hut which was used during the construction of the Siegfried Line as to control access to the such sites.
Further information
See also
- Siegfried Line
- Siegfried Line Museum, Pirmasens
- Regelbau
- List of surviving elements of the Siegfried Line
Literature and sources
- Dieter Robert Bettinger, Hans-Josef Hansen, Daniel Lois: Der Westwall von Kleve bis Basel – Auf den Spuren deutscher Geschichte. Podzun-Pallas-Verlag GmbH, Wölfersheim-Berstadt, 2002, ISBN 3-7909-0754-5
- Data sheet and project description by the Merzig Local History Society
External links
- Further photographs, including one of the interior
- Technical details
- Circular walk and detailed description
- Siegfried Line website www.Ostwallinfo.de
Coordinates: 49°27.909′N 6°37.251′E / 49.465150°N 6.620850°E