Tunisia Campaign
| Tunisia Campaign | |||||||
|---|---|---|---|---|---|---|---|
| Part of the North African Campaign of the Second World War | |||||||
 German and Italian prisoners of war, following the fall of Tunis, 12 May 1943. | |||||||
| |||||||
| Belligerents | |||||||
|
|
| ||||||
| Commanders and leaders | |||||||
|
|
| ||||||
| Casualties and losses | |||||||
|
76,020 casualties[nb 1] 849 aircraft destroyed[nb 2] |
Roughly 300,000 casualties[nb 3] 600+ aircraft captured[1] | ||||||
| ||||||
The Tunisia Campaign (also known as the Battle of Tunisia) was a series of battles that took place in Tunisia during the North African Campaign of the Second World War, between Axis and Allied forces. The Allies consisted of British Imperial Forces, including Polish and Greek contingents, with American and French corps. The battle opened with initial success by the German and Italian forces, but the massive supply and numerical superiority of the Allies led to the Axis's complete defeat. Over 230,000 German and Italian troops were taken as prisoners of war, including most of the Afrika Korps.
Background
Western Desert

The first two years of the war in North Africa were characterised by a lack of supplies and an inability to provide any sort of consistent concentrated logistics support. The North African coast has few natural harbours and the main British supply head at Alexandria on the Nile delta was some 2,100 km (1,300 mi) by road from the main Italian port at Tripoli. Smaller ports at Benghazi and Tobruk were respectively 1,050 km (650 mi) and 640 km (400 mi) west of Alexandria on the single road running along a narrow corridor along the coast. At the time the central Mediterranean was contested, and because the British and Italian navies were equally matched, their abilities to supply their garrisons via Alexandria and Tobruk were limited both by Italian and British actions, although the British were also able to supply Egypt via the very extended route around the Cape of Good Hope and into the Red Sea.
The constrained supplies led to a "back and forth" contest for the land along the coast. The initial Italian offensive in 1940, advancing roughly 97 km (60 mi) across the Libyan border into Egypt, left their front line troops more than 1,600 km (1,000 mi) in a straight line from Tripoli, 600 km (370 mi) from Benghazi and 320 km (200 mi) from Tobruk. The British, still close to their supply bases, quickly built up their own forces and counterattacked into Libya. The front line ended up at El Agheila, some 970 km (600 mi) from Alexandria. With the arrival of the German Afrika Korps the Axis drove the front eastward but their advance eventually petered out in April 1941 at the Egyptian border as they outran their lines of supply. By November 1941 the Allies had once again regained their strength, helped by their relatively short line of supply, and launched Operation Crusader, relieving the Siege of Tobruk and once more pushing the front line to El Agheila. However, their exhausted troops were almost immediately pushed back to near Tobruk and Rommel's attack in May 1942 pushed them all the way back to El Alamein, only 160 km (100 mi) from Alexandria.
Things changed dramatically by 1942. By this point the Royal Navy and Italian Navy were still disputing the Mediterranean but the British retention of Malta allowed the Royal Air Force to interdict an increasing amount of Italian supplies at sea. As large quantities of supply became available from the United States the logistics situation increasingly swung in favour of Bernard Montgomery's Eighth Army, eventually becoming overwhelming.
With Eighth Army no longer short of supplies as in earlier battles, the Axis forces were driven westwards during its breakout from Egypt following the Second Battle of El Alamein in November 1942.
Operation Torch
In July 1942, the Allies agreed that proposed relatively small-scale amphibious operations to land in northern France during 1942 (Operation Sledgehammer which was to be the precursor to Operation Roundup, the main landings in 1943) were impractical and should be deferred.[12] Instead it was agreed that landings would be made to secure the Vichy territories in North Africa: Morocco, Algeria and Tunisia and then to thrust east to take the Axis forces in the Western Desert in their rear.[13] An Allied occupation of the whole of the North African coast would open the Mediterranean to Allied shipping thus releasing the huge capacity required to maintain supplies round the circuitous route via the Cape of Good Hope.

On 8 November, Operation Torch landed allied forces in Algeria (at Oran and Algiers) and Morocco (at Casablanca) with the intention that once Vichy forces in Algeria had capitulated an advance would be made to Tunis some 800 km (500 mi) to the east.
Compromises imposed on the Tunisia operation
Because of the nearness of Sicily to Tunisia, the Allies expected that the Axis would move to occupy the country as soon as they heard of the Torch landings.[14] In order to forestall this, it would be necessary to occupy Tunisia as quickly as possible after the landings were made. However, there was a limit to how far east the Torch landings could be made because of the increasing proximity of Axis airfields in Sicily and Sardinia which at the end of October held 298 German and 574 Italian aircraft.[15] Algiers was accordingly chosen for the most easterly landings. This would ensure the success of the initial landings in spite of uncertainty as to how the incumbent French forces would react. Once Algiers was secured, a small force, the Eastern Task Force, would be projected as quickly as possible into Tunisia in a race to occupy Tunis, some 800 km (500 mi) distant along poor roads in difficult terrain during the winter rainy season,[16] before the Axis could organise. However, planners had to assume the worst case regarding the extent of Vichy opposition at Algiers and the invasion convoys were assault-loaded with a preponderance of infantry to meet heavy ground opposition. This meant that at Algiers the disembarkation of mobile forces for an advance to Tunisia would necessarily be delayed.[17] Plans were thus a compromise and the Allies realised that an attempt to reach Bizerta and Tunis overland before the Axis could establish themselves represented a gamble which depended on the ability of the navy and air force to delay the Axis build-up.[18] The Allies, although they had provided for the possibility of strong Vichy opposition to their landings both in terms of infantry and air force allocations, seriously underestimated the Axis appetite for and speed of intervention in Tunisia.[19] Furthermore, once operations had commenced and despite clear intelligence reports regarding the Axis reaction, the Allies were slow to respond and it was not until nearly two weeks after the landings that air and naval plans were made to interdict Axis sea transport to Tunis.[20] At the end of November, naval Force K was reformed in Malta with three cruisers and four destroyers and Force Q formed in Bône with three cruisers and two destroyers. No Axis ships sailing to Tunis were sunk in November but the Allied naval forces had some success in early December sinking seven Axis transports. However, this came too late to affect the fighting on land because the armoured elements of 10th Panzer Division had already arrived. To counter the surface threat, Axis convoys were switched to daylight when they could be protected by air cover. Night convoys resumed on completion of the extension of Axis minefields which severely restricted the activities of Force K and Force Q.[21]
Tunisia's natural defences
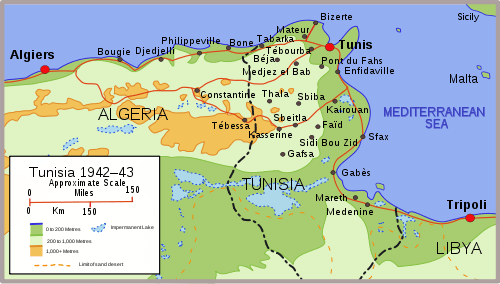
Much better defensive possibilities existed to the west of Libya in Tunisia. Tunisia is roughly rectangular, with its northern and much of its eastern boundary defined by the Mediterranean. Most of the inland western border with Algeria was astride the western line of the roughly triangular Atlas Mountains. This portion of the border was easily defensible in the limited number of passes through the two north-south lines of the mountains. In the south, a second line of lower mountains limited the approaches to a narrow gap, facing Libya to the east, between these Matmata Hills and the coast. The French had earlier constructed a 20 kilometres (12 mi) wide and 30 kilometres (19 mi) deep series of strong defensive works known as the Mareth Line along this plain, in order to defend against an Italian invasion from Libya. Only in the north was the terrain favorable to attack; here the Atlas Mountains stopped near the eastern coast, leaving a large area on the northwest coast unprotected.
Generally, Tunisia offered an excellent and fairly easily defended base of operations. Defensive lines in the north could deal with the approaching Allied forces of Operation Torch, while the Mareth Line made the south rather formidable. In between, there were only a few easily defended passes through the Atlas Mountains. Better yet, Tunisia offered two big deep water ports at Tunis and Bizerte, only a few hundred miles from Italian supply bases on Sicily. Supplies could be brought in at night, protecting them from RAF patrols, stay during the day, and then return again the next night. In contrast, Italy to Libya was a full-day trip, making supply operations vulnerable to daylight air attacks. In Hitler's view, Tunisia could hold out for months, or years, upsetting Allied plans in Europe.
Run for Tunis
By 10 November, French opposition to the Torch landings had ceased,[22] creating a military vacuum in Tunisia. Lieutenant-General Kenneth Anderson, commanding British First Army, who was in overall command, immediately ordered 36th Infantry Brigade group, which had been the floating reserve for the Algiers landing, eastward by sea to occupy the Algerian ports of Bougie, Philippeville, and Bône and the airfield at Djedjelli, preliminary to advancing into Tunisia. The Combined Chiefs of Staff had previously decided that with the forces available, Torch would not include assault landings in or near Tunisia. As a result, Anderson needed to get his limited force east as quickly as possible before the Axis could build a defensive critical mass in Tunis.[22] The Allies had available only two brigade groups and some additional armour and artillery for an attack on Tunisia. Nevertheless, they believed if they moved quickly, before the newly arrived Axis forces were fully organised, they would capture Tunisia at relatively little cost.[nb 4]
The French governor in Tunisia, Admiral Esteva, was afraid to support the Allies or oppose the Axis. He did not close access to the airfields there to either side, and the Germans moved first. As early as 9 November there were reports of 40 German aircraft arriving at Tunis and by 10 November aerial reconnaissance reported 100 aircraft.[25] Two days later, an airlift began that would bring in over 15,000 men and 581 tons of supplies, backed up with transport ships that added 176 tanks, 131 artillery pieces, 1,152 vehicles, and 13,000 tons of supplies. By the end of the month, they had shipped in three German divisions, including the 10th Panzer Division, and two Italian infantry divisions. Walther Nehring was assigned command of the newly formed XC Corps on 12 November, and flew in on 17 November.
The French military commander in Tunisia, General Barré, distrusted the Italians. He moved his troops into the western mountains of Tunisia, and formed a defensive line from Tebersouk through Majaz al Bab (also referred to as Medjez el Bab), ordering that anyone attempting to cross the line should be shot.[26]
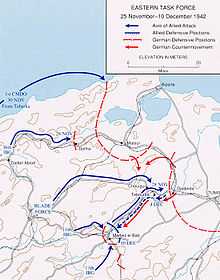
Allied advance
There were two roads eastwards into Tunisia from Algeria. The Allied plan was to advance along the two roads and take Bizerte and Tunis.
On 11 November, the British 36th Infantry Brigade had landed unopposed at Bougie but logistic difficulties meant Djedjelli was only reached by road on 13 November.[22] Bone airfield was occupied following a parachute drop by 3rd Parachute Battalion and this was followed up on 12 November by 6 Commando seizing the port.[27] Advanced guards of 36th Brigade reached Tebarka on 15 November and Djebel Abiod on 18 November, where they made first contact with opposition forces.[28]
Further south a U.S. parachute battalion on 15 November had made an unopposed drop at Youks-les-Bains, capturing the airfield there, and advanced to take the airfield at Gafsa on 17 November.[28]
Axis response
On 19 November, the German commander, Walter Nehring, demanded passage for his forces across the bridge at Medjez and was refused by Barré. The Germans attacked twice and were repulsed. However, the French took heavy casualties and, lacking armour and artillery, were obliged to withdraw.[26][28]
French formally side with the Allies
Despite some Vichy French forces, such as Barré's units, openly siding against the Axis the position of Vichy forces generally had remained uncertain. On 22 November, the North African Agreement finally placed French North Africa on the Allied side, allowing the Allied garrison troops to be sent forward to the front. By this time, the Axis had been able to build up an entire Corps, and the Axis forces outnumbered their Allied counterparts in almost all ways.
Battle

Two Allied brigade groups advanced toward Djebel Abiod and Beja respectively. The Luftwaffe, happy to have local air superiority while the Allies planes had to fly from relatively distant bases in Algeria, harassed them all the way.[29]
On 17 November, the same day Nehring arrived, the leading elements of the British 36th Brigade on the northern road met a mixed force of 17 tanks and 400 paratroops with self-propelled guns at Djebel Abiod. The German paratroopers, Luftwaffe and Italian fire support from the 1st Mountain Infantry Division Superga[nb 5] knocked out 11 tanks, but their advance was halted while the fight at Djebel Abiod continued for nine days.[31] On 21 November, the Italian 50th Special Brigade under the command of General Giovanni Imperiali di Francavilla helped the German paratroopers repel U.S.tanks outside Gabes.[nb 6] On 22 November, tanks from the Italian 50th Brigade forced US paratroopers to abandon Gafsa.[nb 7]
The two Allied columns concentrated at Djebel Abiod and Beja, preparing for an assault on 24 November. The 36th Brigade was to advance from Djebel Abiod toward Mateur and 11th Brigade was to move down the valley of the River Merjerda to take Majaz al Bab (shown on Allied maps as Medjez el Bab or just Medjez) and then to Tebourba, Djedeida and Tunis. Blade Force, an armoured regimental group was to strike across country on minor roads in the gap between the two infantry brigades towards Sidi Nsir and make flanking attacks on Terbourba and Djedeida.[33]

The northern attack did not take place because torrential rain had slowed the build-up. In the south 11th Brigade were halted by stiff resistance at Medjez. However, Blade Force passed through Sidi Nsir to reach the Chouigui Pass, north of Terbourba. Then part of Blade Force infiltrated behind Axis lines to the newly activated airbase at Djedeida in the afternoon and destroyed more than 20 Axis planes. However, without infantry support, they were not in a position to consolidate their gains and withdrew to Chouigui.[34] Blade Force's attack caught Nehring by surprise and he decided to withdraw from Medjez and strengthen Djedeida, only 30 km (19 mi) from Tunis.[35]
The 36th Brigade's delayed attack went in on 26 November but they were ambushed with the leading battalion taking 149 casualties.[36] Further attacks were driven back from cleverly planned interlocking defences. A supporting landing by 1 Commando 23 km (14 mi) west of Bizerta on 30 November in an attempt to outflank the Jefna position failed in its objective and the unit had rejoined 36th Brigade by 3 December.[28] The position remained in German hands until the last days of fighting in Tunisia the following spring[37]

Early on 26 November, as the Germans withdrew, 11 Brigade were able to enter Medjez unopposed and by late in the day had taken positions in and around Tebourba, which had also been evacuated by the Germans, preparatory to advancing on Djedeida. However, on 27 November the Germans attacked in strength and 11th Brigade's attempt to regain the initiative in the early hours of 28 November, attacking toward Djedeida airfield with the help of U.S. armour, failed.[38]
On 29 November, Combat Command B of US 1st Armored Division had concentrated forward for an attack in conjunction with Blade Force planned for 2 December. They were forestalled by an Axis counterattack, led by Major-General Wolfgang Fischer, whose 10th Panzer Division had just arrived in Tunisia,[39] By the evening of 2 December, Blade Force had been withdrawn leaving 11th Brigade and Combat Command B to deal with the Axis attack.[40] This threatened to cut off 11th Brigade and break through into the Allied rear, but desperate fighting over four days delayed the Axis advance and permitted a controlled withdrawal to the high ground on each side of the river west of Terbourba.[41]
The Allied force initially withdrew roughly 9.7 km (6 mi) to the high positions of Longstop Hill (djebel el Ahmera) and Bou Aoukaz on each side of the river but concern over the vulnerability to flanking attacks prompted a further withdrawal west so that by the end of 10 December, Allied units held a defensive line just east of Medjez el Bab. Here. they started a buildup for another attack, and were ready by late December 1942. The continued but slow buildup had brought Allied force levels up to a total of 54,000 British, 73,800 American, and 7,000 French troops. A hasty intelligence review showed about 125,000 combat and 70,000 service troops, mostly Italian, in front of them.
The main attack began the afternoon of 22 December. Despite rain and insufficient air cover, progress was made up the lower ridges of the 900-foot (270 m) Longstop Hill that controlled the river corridor from Medjez to Tebourba and thence to Tunis. After three days of to-and-fro fighting, with ammunition running low and Axis forces now holding adjacent high ground, the Longstop position became untenable and the Allies were forced to withdraw to Medjez,[42] and by 26 December 1942 the Allies had withdrawn to the line they had set out from two weeks earlier, having suffered 20,743 casualties.
The Allied run for Tunis had been stopped.
Change in French command

While the battles wound down, factionalism among the French again erupted. On 24 December, François Darlan was assassinated and Henri Giraud succeeded him as High Commissioner. To the frustration of the Free French the US government had displayed considerable willingness to make a deal with Darlan and the Vichyists. Consequently, Darlan's death appeared to present an opportunity to bring together the French in North Africa and Charles de Gaulle's Free French. De Gaulle and Giraud met in late January but little progress was made in reconciling their differences or the constituencies they represented.[43] It was not until June 1943 that the French Committee of National Liberation (CFLN) was formed under the joint chairmanship of Giraud and de Gaulle when de Gaulle quickly eclipsed Giraud, who openly disliked political responsibility and more or less willingly from then on deferred to the Leader of the Free French.
Stalemate, reinforcement
Things were similarly upsetting for the Axis. Nehring, considered by most to be an excellent commander, had continually infuriated his superiors with his outspoken critiques. They decided to "replace" him by upgrading the command to an army and Colonel-General Hans-Jürgen von Arnim arrived in Tunis unannounced on 8 December to assume command of Fifth Panzer Army. The Army consisted of the composite Infantry Division von Broich/von Manteuffel in the Bizerte area, the 10th Panzer Division in the centre before Tunis, and the Italian Superga Division on the southern flank but Hitler, in an interview prior to von Arnim's departure for Tunis, had told him the army would grow to three mechanised and three motorised divisions.[44] The Allies had made strong efforts to prevent the Axis build up, committing substantial air and sea forces to the task. However, Tunis and Bizerta were only 190 km (120 mi) from the ports and airfields of western Sicily, 290 km (180 mi) from Palermo and 480 km (300 mi) from Naples making it very difficult to intercept Axis transports which had the benefit of substantial air cover.[18] From mid-November through January, 243,000 men and 856,000 tons of supplies and equipment arrived in Tunisia by sea and air.

Eisenhower, meanwhile, transferred further units from Morocco and Algeria eastward into Tunisia. In the north, Lt Gen Kenneth Anderson's British First Army over the next three months received three more divisions, 1st, 4th and 46th, joining the 6th Armoured and 78th Infantry Divisions. By late March a second British Corps headquarters, British IX Corps under Lieutenant-General John Crocker had arrived to join V Corps in controlling the expanded army.[45] On their right flank, the basis of a two-division French corps (French XIX Corps) under Alphonse Juin was being built and in the south was a new U.S. II Corps, to be commanded by Lloyd Fredendall, eventually to consist of the majority of six divisions: the 1st, 3rd, 9th, and 34th Infantry and the 1st and 2nd Armored. At this stage Giraud had rejected Eisenhower's plan to have the French corps under First Army and they and US II Corps for the time being remained under direct command of AFHQ. Equally important, considerable effort was put into building new airfields and improving provision of air support[46]
The U.S. also started to build up a complex of logistics bases in Algeria and Tunisia, with the eventual goal of forming a large forward base at Maknassy, on the eastern edge of the Atlas Mountains, in excellent position to cut the German-Italian Panzer Army in the south off from its lines of supply to Tunis and isolate it from Fifth Panzer Army in the north.
Kasserine
Prelude
.jpg)
During the first half of January, Andersen had with mixed results kept constant pressure through limited attacks and reconnaissance in strength.[47] Von Arnim sought to do the same:[48] on 18 January he launched Operation Eilbote (courier), an attack by elements of 10th Panzer and 334th Infantry Divisions from Pont du Fahs to create more space in front of the Italian Superga Division and forestall any possible attempt by the Allies to thrust east to the coast at Enfidaville and cut Rommel's line of communication.[49] The westward thrust against the right wing of the British V Corps at Bou Arada had little success, but further south his attack against French positions around the "hinge" of the Western and Eastern Dorsals was more successful, advancing 56 km (35 mi) south to Ousseltia and 40 km (25 mi) southwest to Robaa. The poorly equipped defenders resisted well[50] but were overwhelmed and the equivalent of seven infantry battalions cut off in the mountains.[47] Anderson sent 36th Brigade to Robaa and requested Lloyd Fredendall to send Combat Command B from 1st Armored Division to Ousseltia, both to come under Juin's orders on arrival. Fierce fighting lasted until 23 January, but the front was stabilised.[47]
The obvious lack of co-ordination stung Eisenhower into action. On 21 January, Anderson had been made responsible for the co-ordination of the whole front and on 24 January his responsibilities were extended to include "the employment of American troops". That night, Juin agreed to place his Corps under Anderson, confirmed by Giraud the next day. However, control still proved problematical with forces spread over a 320 km (200 mi) front and poor means of communication (Anderson reported that he motored over 1,600 km (1,000 mi) in four days in order to speak to his corps commanders). Importantly, however, Eisenhower had appointed a single executive air support commander, Brigadier General Laurence S. Kuter, for the whole front on 21 January.[47]
Meanwhile, Erwin Rommel had made plans for forces retreating through Libya to dig-in in front of the abandoned French fortifications of the Mareth Line. This would leave the Axis forces in control of the two natural entrances into Tunisia in the north and south, with only the easily defended mountain passes between them. In January Rommel's forces were reorganised: the elements of his German-Italian Panzer Army on the Mareth defences were redesignated First Italian Army with Giovanni Messe in command, separate from the units (including the remains of the Afrika Korps) he had facing the Western Dorsale.
On 23 January 1943, the Eighth Army took Tripoli, by which point the army retreating through Libya was already well on its way to the Mareth position.
By this point in time, elements of the U.S. II Corps had crossed into Tunisia through passes in the Atlas Mountains from Algeria, controlling the interior of the triangle formed by the mountains. Their position raised the possibility of a thrust eastwards towards Sfax on the coast and cutting off the First Italian Army at Mareth from von Arnim's forces to the north around Tunis. Rommel could not allow this and formed a plan to attack before this occurred.
Battle of Sidi Bou Zid

On 30 January 1943, the German 21st Panzer and three Italian divisions from von Arnim's 5th Panzer Army met elements of the French forces near Faïd, the main pass from the eastern arm of the mountains into the coastal plains. Fredendall did not respond to the French request to send reinforcements in the form of tanks from 1st Armored Division and after desperate resistance, the under-equipped French defenders were overrun.[51] Several counterattacks were organized, including a belated attack by Combat Command B of the U.S. 1st Armored Division, but all of these were beaten off with ease by von Arnim's forces which by this time had created strong defensive positions.[51] After three days, the Allied forces had been forced to pull back and were withdrawn into the interior plains to make a new forward defensive line at the small town of Sbeitla.
In Operation Frühlingswind (spring wind), von Arnim ordered four armoured battle groups forward on 14 February in the area of Sidi Bou Zid held by 34th Infantry Division's 168th Regimental Combat Team and 1st Armored Division's Combat Command A. The defenders' dispositions were poor, with concentrations dispersed so that they were unable to be mutually supportive. By 15 February, CCA had been severely damaged leaving the infantry units isolated on hill tops. Combat Command C was ordered across country to relieve Sidi Bou Zid but were repelled with heavy losses. By the evening of 15 February, three of the Axis battlegroups were able to head toward Sbeitla, 32 km (20 mi) to the northwest.[52] Pushing aside the remains of CCA and CCC, the battlegroups were confronted by Combat Command B in front of Sbeitla. With the help of air support, CCB held on through the day. However, the air support could not be sustained and the defenders of Sbeitla were obliged to withdraw and the town lay empty by midday on 17 February.[52]
To the south, in Operation Morgenluft (morning air), an Italian First Army battlegroup made up of the remains of the Afrika Korps under Karl Bülowius had advanced toward Gafsa at dusk on 15 February to find the town deserted, part of a withdrawal to shorten the Allied front to facilitate a reorganisation involving the withdrawal of French XIX Corps in order to re-equip. US II Corps withdrew to the line of Dernaia-Kasserine-Gap-Sbiba with XIX Corps on their left flank vacating the Eastern Dorsal to conform with them.[53] By the afternoon of 17 February, Rommel's troops had occupied Feriana and Thelepte (roughly 24 km (15 mi) southwest of Kasserine) forcing the evacuation on the morning of 18 February of Thelepte airfield, the main air base in British First Army's southern sector.[54]
Battle of Kasserine Pass

After further discussion, the Comando Supremo issued orders on 19 February for Rommel to attack through the Kasserine and Sbiba passes toward Thala and Le Kef to threaten First Army's flank. Rommel's original proposal was for a limited but concentrated attack through Kasserine to confront II Corps' strength at Tébessa and gain vital supplies from the US dumps there. Although he was to have 10th and 21st Panzer Divisions transferred to his command, Rommel was concerned that the new plan would dilute his force concentration and expose his flanks to threat.[55]
On 19 February 1943, Rommel, having now been given formal control of the 10th and 21st Panzer Divisions, the Afrika Korps battlegroup as well as General Messe's forces on the Mareth defences (now renamed Italian First Army),[56] launched what would become the Battle of Kasserine Pass. Hoping to take the inexperienced defenders by surprise, he sent the light armour of the 3rd Reconnaissance Battalion racing into the pass. Colonel Alexander Stark's Stark Force, a brigade group made up of US and French units, was responsible for the defence of the pass.[56] It had not had time to organise properly but was able to direct heavy artillery fire from the surrounding heights which brought the Afrika Korps battlegroup's leading mechanised units to a halt.[57] Before they could continue, infantry had to be sent up into the high ground seeking to eliminate the artillery threat. Meanwhile, a battlegroup under Hans-Georg Hildebrand including tanks from 21st Panzer were advancing north from Sbeitla toward the Sbiba Gap. In front of the hills east of Sbiba they were bought to a halt by 1st Guards Brigade and 18th Regimental Combat Team which had strong field and anti-tank artillery support and were joined by two infantry regiments from 34th Infantry Division.[58]

By the morning of 20 February, the bitter hand-to-hand fighting in the hills above Kasserine was continuing while the Afrika Corps battlegroup, by this time joined by a battalion from the 131 Armoured Division Centauro and more artillery, prepared for another attack through the pass once it had been joined by a 10th Panzer Division battlegroup coming from Sbeitla. The morning attack made slow progress, but the intense pressure applied during the renewed attack that afternoon triggered a collapse in the Allied defences.[59]
Having rolled through the Kasserine Pass on the afternoon of 20 February, units of the Centauro Division headed west toward Tébessa, meeting little or no resistance. Following them came the von Broich battlegroup from 10th Panzer, which forked right onto the road to Thala where they were slowed by a regimental armoured group from 26th Armoured Brigade (Gore Force). Their tanks outgunned, Gore Force sustained heavy losses but bought time for Nick Force, a composite force from British 6th Armoured Division, based around 26th Armoured Brigade Group with extra infantry and artillery (which Anderson had ordered the previous day to leave the Kesra area to bolster the Thala defences) to prepare defensive positions further up the road. Meanwhile, Fredendall had sent 1st Armored Division's CCB to meet the threat to Tébessa.[60]

By 1pm on 21 February, von Broich's battlegroup were in contact with the dug-in 26th Armoured Brigade Group on the Thala road and making slow progress. Rommel took direct control of the attack and forced the defences by 4pm.[61] However, 26th Brigade Group were able to withdraw in reasonable order to the next, final, defensive line in front of Thala. Fighting at this position started at 7pm and continued at close quarters for three hours with neither side able to gain a decisive advantage. Nick Force had taken a heavy beating and did not expect to be able to hold out the next day. However, during the night a further 48 artillery pieces from U.S. 9th Infantry Division arrived after an 1,300 km (800 mi) trip from Morocco on poor roads and in bad weather. On the morning of 22 February, as Von Broich prepared to launch his attack, his front was hit by a devastating artillery barrage. Surprisingly, Rommel told Von Broich to regroup and assume a defensive posture, so surrendering the initiative.[62]
Meanwhile, the 21st Panzer battlegroup at Sbiba was making no progress. Two battalions of experienced Bersaglieri soldiers are recorded by the 23 Field Regiment, Royal Artillery as having made a daylight counterattack through the Ousseltia Plain, which was repelled.[63]
Further south, the Afrika Korps battlegroup on the road to Tébessa had been halted on 21 February by CCB's armour and artillery dug in on the slopes of Djebel Hamra.[64] An attempt to outflank them during the night of the 21 February had failed and resulted in heavy Axis casualties on 22 February. A further attack early on 23 February was again beaten back.[65]
In a dispirited meeting on 22 February with Kesselring, Rommel argued that faced with stiffening defences and the news that the Eighth Army's lead elements had finally reached Medenine, only a few kilometres from the Mareth Line, he should call off the attack and withdraw to support the Mareth defences, hoping that the Kasserine attack had caused enough damage to deter any offensive action from the west in the immediate future. Kesselring was keen for the offensive to continue but finally agreed that evening and the Comando Supremo formally terminated the operation.[66] The Axis forces from Kasserine reached the Mareth line on 25 February.
Aftermath
Action then abated for a time, and both sides studied the results of recent battles. Rommel remained convinced that U.S. forces posed little threat, while the British and Commonwealth troops were his equal. He held this opinion for far too long, and it would prove very costly. The US likewise studied the battle, and relieved several senior commanders while issuing several "lessons learned" publications to improve future performance. Most important, on 6 March 1943 command of the U.S. II Corps passed from Fredendall to George S. Patton, with Omar Bradley as assistant Corps Commander. Commanders were reminded that large units should be kept concentrated to ensure mass on the battlefield, rather than widely dispersed as Fredendall had deployed them. This had the intended side effect of improving the fire control of the already-strong US artillery. Close air support had also been weak (although this had been hampered by the generally poor weather conditions).
Reorganisation of Allied and Axis commands

At the Casablanca Conference, it had been decided to appoint General Sir Harold Alexander as Deputy Commander-in-Chief of the Allied forces in French North Africa. This came into effect on 20 February and at the same time, in order better to co-ordinate the activities of his two armies in Tunisia, Eisenhower at AFHQ brought First and Eighth Armies under a new headquarters, 18th Army Group, which Alexander was to command.[67] Shortly after taking up his new appointment, Alexander reported to London:
...I am frankly shocked at the whole situation as I have found it...Real fault has been the lack of direction from above from [the] very beginning resulting in no policy and no plan.[68]
He was critical of Anderson although this was later felt to be a little unfair. Once he had been given control of the whole front at the end of January, Anderson's aim had been to reorganise the front into consolidated national sectors and create reserves with which to regain the initiative[68] - exactly the same priorities articulated in Alexander's orders dated 20 February.[69] On 21 February, Alexander declared his objective to destroy all enemy forces in Tunisia. He would achieve this by first advancing Eighth Army north of Gabès while First Army mounted attacks to draw off reserves which would otherwise be used against the Eighth. Next, both armies would concentrate on gaining airfields from which the growing dominance of the Allied air power could be launched. Finally, the co-ordinated land, sea and air strength of the Allies would strike to draw a net round the Axis forces in Tunisia. He aimed to achieve this by 30 April to meet the timetable set at the Casablanca Conference to allow the planned invasion of Sicily to be launched during the favourable weather of August.[70]

The Casablanca Conference had also agreed a far reaching reorganisation of air forces in the Mediterranean to create greater integration. This was implemented over the next month. Air Chief Marshal Sir Arthur Tedder was made commander of the Mediterranean Air Command, responsible for all Allied air activity in the Mediterranean and Major General Carl Spaatz became commander of the Northwest African Air Forces under Tedder with responsibility for all air operations in Tunisia.[71] By 23 February Air Marshal Sir Arthur Coningham had succeeded Kuter at the Allied Air Support Command which had become the Northwest African Tactical Air Force, part of Spaatz's command, with the Desert Air Force, which had been supporting Eighth Army, under its operational control. Coningham was surprised to find that arrangements in Tunisia were the same as had existed in the Western Desert in 1941 when he had first assumed command of the Desert Air Force. Strangely, the hard-earned lessons of the Desert Campaign, both operational and administrative, had not been integrated into the planning for Torch and this had had a significant impact on the ability of the air arm, already at the time constrained by shortage of numbers and logistical problems, to provide tactical support to the land forces during the Run for Tunis. He immediately set about integrating the British and American operational commands and training them in new operational policies.[72]
The Axis too decided to create a combined command for their two armies. Hitler and the German General Staff believed that von Arnim should assume command but Kesselring argued for Rommel. Von Arnim was appointed to command the new Army Group Africa on 23 February.[73]
Southern front around Mareth
Battle of Medenine
Eighth Army had been consolidating in front of the Mareth defences since the 17 February and launched probes westward on the 26th. According to Associated Press war correspondent Don Whitehead, an Italian infantry battalion from the 10th Bersaglieri Regiment supported by 30 tanks counterattacked in the British sector on 3 March, but lost half its strength killed to machine-gun fire:
Last night three companies of Italians followed by 30 tanks and lorried infantry attacked the Highlander's advance screen. The Jocks “mowed 'em down”—and didn't lose a man. The tanks and infantry scurried back to the safety of the hills. Half the Italians were killed.[74]
On 6 March 1943, three German armoured divisions, two light divisions, and nine Italian divisions, launched Operation Capri, an attack southward in the direction of Medenine, the northernmost British strongpoint. British artillery fire was intense, beating off the Axis attack and knocking out 55 Axis tanks.

With the failure of Capri, Rommel decided that the only way to save his armies would be to evacuate them. He therefore left Tunisia on 9 March to see Hitler at his headquarters in the Ukraine to try to convince him to abandon Tunisia and return the Axis armies to Europe. Hitler refused, and Rommel was placed, in strict secrecy, on sick leave. Von Arnim became commander of Army Group Africa.[75]
Battle of the Mareth Line
Montgomery launched his major attack, Operation Pugilist, against the Mareth Line in the night of 19 March/20 March 1943. Elements of the British 50th Infantry Division penetrated the line and established a bridgehead west of Zarat on 20 March/21 March, but a determined counterattack by 15th Panzer Division destroyed the pocket and established the line once again during 22 March.
On 26 March, General Horrocks' X Corps drove around the Matmata Hills, captured the Tebaga Gap and the town of El Hamma at the northern extreme of the line Operation Supercharge II. This flanking movement made most of the Mareth Line untenable. The following day, German and Italian units managed to stop Horrock's advance with well-placed anti-tank guns, in an attempt to gain time for a strategic withdrawal. Within 48 hours, the defenders of the Mareth Line marched 60 kilometres northwest and established new defensive positions at Wadi Akarit near Gabès.
Gabès
By this point, the newly reorganized U.S. II Corps had started out of the passes again, and were in position to the rear of the Axis lines. The 10th Panzer was tasked with pushing them back into the interior, and the two forces met at the Battle of El Guettar on 23 March. At first the battle went much as it had in earlier matchups, with the German tanks rolling up lead units of the US forces. However, they soon ran into a US minefield, and immediately the US artillery and anti-tank units opened up on them. The 10th lost 30 tanks over a short period, and retreated out of the minefield. A second attack formed up in the late afternoon, this time supported by infantry, but this attack was also beaten off and the 10th returned to Gabès.
The US was unable to take advantage of the German failure, however, and spent several frustrating weeks attempting to push Italian infantry off two strategic hills on the road to Gabès. Repeated major attempts would make progress, only to be pushed back by small units of the 10th or 21st Panzer who would drive up the road from Gabès in an hour or so. Better air support would have made this "mobile defence" difficult, but coordination between air and ground forces remained a serious problem for the Allies.

Both the Eighth Army and the U.S. II Corps continued their attacks over the next week, and eventually the 8th captured El Hamma on 28 March and the Axis was forced to abandon Gabès and retreat to join the Fifth Panzer Army to the north. General Alberto Mannerini's Raggruppamento Sahariano[nb 8] had fought most determinedly. A French war correspondent recalls El Hamma only fell soon after the Germans had taken over the Italian defences:
The enemy positions seemed impregnable, and, in fact, the Italians manning them held out for three days ... Rommel, in a last desperate effort replaced the Italians with crack German troops. Hand-to-hand fighting followed, but the enemy, finally fell back into the ravine, leaving many dead behind.[77]
Italian Marines, well dug in at Wadi Akarit and plentifully supplied with automatic weapons and grenades, also fought well during 6 and 7 April, but the British attackers pressed forward, although casualties among the 6th Green Howards had been severe; two senior officers, six senior NCO's and junior officers and one hundred and eighteen other ranks killed.[78]
"When we were about ten yards away we had reached the top of the slit trench and we killed any of the survivors," recalled Bill Cheall, who had just seen his section leader shot down by an Italian. "It was no time for pussy footing, we were intoxicated with rage and had to kill them to pay for our fallen pal."[79]
The hills in front of the US forces were now abandoned, allowing them to join the British forces in Gabès later that day. The 2nd New Zealand Division and 1st Armoured Division pursued the retreating Germans 225 km (140 mi) northward into strong defensive positions in the hills west of Enfidaville. From this point on, the battle became one of attrition. Noting the increasing Italian resistance, British military expert Basil Henry Liddell Hart, wrote that the "Italians fought as vigorously as the Germans".[80]
Northern sector February to April 1943

On 26 February, von Arnim, in the mistaken belief that the Kasserine battles had forced the Allies to weaken their northern Tunisia line to reinforce the south, launched (with Kesselring's approval but without consulting Rommel) Operation Ochsenkopf (ox head), an attack against V Corps across a wide front and commanded by General Weber.[81] The main attacks were by Weber Corps (named after its commanding general) which included 334th Infantry Division, newly arrived elements of the Hermann Göring Division and the elements of 10th Panzer Division which had not been involved in Operation Frűhlingswind. Weber's force was to advance in three groups: one moving west toward Medjez el Bab; a second, to the north of the first group, advancing southwest on the route from Mateur to Béja (which was some 40 km (25 mi) west of Medjez); and the third group pushing west some 25 miles south of Medjez. The northern flank of Weber's corps was to be protected by the von Manteuffel Division advancing west and forcing the Allies out of their advanced positions opposite 'Green Hill' and the Axis-held Jefna Station.[82]
In fierce fighting, the attack on Medjez was defeated by 78th Division but further south some tactical gains were made before the advance was halted. In the north, progress was made toward Béja but, in fighting which lasted until 5 March and in terrible weather conditions, the attack was blunted at Hunt's Gap (about 24 km (15 mi) northeast of Béja) by 46th Division's 128th Infantry Brigade with substantial artillery and two squadrons of tanks from the North Irish Horse under command.[83] over several days intense fighting.[84]

Von Arnim's attack in the north by the Manteuffel Division made good progress across the French-held, lightly defended hills between Cap Serrat and the railway town of Sedjenane. Costly counter-attacks on February 27 and 2 March by elements of 46th Division's 139th Infantry Brigade and attached units (No 1 Commando and supporting artillery)[83] delayed the Axis advance. However, Sedjenane was captured on 4 March and the 139th Brigade was pushed slowly back over the next three weeks some 24 km (15 mi) toward Djebel Abiod. Von Arnim abandoned his attacks in the centre and south of the front, but withdrawals of French battalions in the Medjez area to join XIX Corps had allowed him to occupy, with little opposition, the high ground dominating the town, which was left in a dangerous salient.[84]
On 25 March, Alexander gave orders to regain the initiative on V Corps's front. On 28 March, Anderson launched 46th Division, composed at this time of 138th Infantry Brigade with 128th Infantry Brigade in reserve and reinforced by the attachment of 36th Infantry Brigade, 1st Parachute Brigade and French units including a tabor of specialist mountain Goumiers, supported by the artillery of two divisions plus more from army resources. In four days, it succeeded in recapturing all ground previously lost to the Manteuffel Division and took 850 German and Italian prisoners in the process.[84]
On 7 April, Anderson tasked 78th Infantry Division with clearing the Béja-Medjez road. Supported by artillery and close air support, they methodically advanced 16 km (10 mi) through difficult mountain terrain over the next 10 days clearing a front 16 km (10 mi) wide. 4th Infantry Division were introduced for the first into the fighting taking position on 78th Division's left and pushing toward Sidi Nisr.[85]
Endgame
The salient at Medjez had been relieved and lateral roads in the V Corps area cleared so that Anderson was able to turn his full attention to the orders he had received on 12 April from Alexander to prepare the large-scale attack, scheduled for 22 April, to gain Tunis.[85]
By this stage, Allied aircraft had been moved forward to airfields in Tunisia to prevent the aerial supply of Axis troops in North Africa (Operation Flax) and large numbers of German transport aircraft were shot down between Sicily and Tunis. British destroyers operating from Malta prevented marine supply, reinforcement or evacuation of Tunisia by sea (Operation Retribution). Admiral Cunningham, Eisenhower's Naval Task Force commander, issued Nelsonian orders to his ships: "Sink, burn, capture, destroy. Let nothing pass".
By 18 April, after attacks by Eighth Army from the south and flanking attacks by IX Corps and French XIX Corps the German-Italian forces had been pushed into a defensive line on the north-east coast of Tunis, attempting to protect their supply lines, but with little hope of continuing the battle for long.
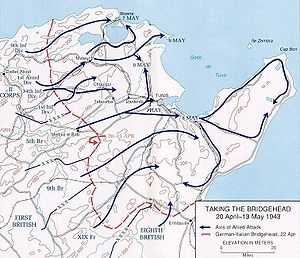
Plans for the final offensive
Alexander planned that while U.S. II Corps would attack on the north towards Bizerte, First Army would attack towards Tunis while Eighth Army attacked north from Enfidaville. Anderson would co-ordinate the actions of First Army and U.S. II Corps, issuing the appropriate orders to achieve this.[85]
Anderson's plan was for the main attack to be in the centre of the V Corps front at Medjez, confronting main Axis defences. However, IX Corps on the right would first attack north-east with, by speed of movement, the intention of getting in behind the Medjez position and disrupting their armoured reserves. U.S. II Corps would make a double thrust: one to capture the high ground on V Corps' left flank and a second toward Bizerte. French XIX Corps would be held back until IX Corps and Eighth Army had drawn in the opposition and then advance toward Pont du Fahs.
Battle

The Allied forces had reorganised. During the night of 19–20 April, the 8th Army captured Enfidaville. This sector was defended by the Italian 16th Motorised Division Pistoia, which carried out several counterattacks over the next three days,[86] but the British repulsed the attacks. During the same period, the action at Takrouna also took place where the Italians from the Folgore and Trieste Divisions distinguished themselves.[87]An Allied war correspondent reported that 326 defenders had been captured and that the Italians had fought very hard:
The fight atop the 600-foot peak finally ended at 8 p.m. last night. At that hour the first real Italian defenders the British had met surrendered in a body, 326 of them. They gave up only because their ammunition gave out.
These Italians were tough, trained killers who didn't feel faint when stout British troopers flung their comrades over the cliffs to clear the road up the side of the steep peak and reach the village atop it.
They stood, fired and fought back and when they gave up they said the allies wouldn't get to Tunis. They holed up in caves and crevices of the slopes and had to be dragged out before their machine guns and mortars were silenced.
—The Bend Bulletin, Oregon, 24 April 1943[88]

General Harold Alexander noted: "It was noticed that the Italians fought particularly well, outdoing the Germans in line with them."[89] The northward advance of Eighth Army had "pinched out" U.S. II Corps eastward facing front line, allowing the whole corps to be withdrawn and switched to the northern end of the Allied front. von Arnim knew that an Allied offensive was imminent and launched a spoiling attack on the night of 20–21 April between Medjez and Goubellat and also on the IX Corps front. The Hermann Göring Division supported by tanks from 10th Panzer Division penetrated up to 5 miles (8 km) at some points but they could not force a general withdrawal, and eventually returned to their lines. No serious disruption was caused to Allied plans although the first attack of the offensive, by IX Corps, had to be delayed by four hours from 0400 on 22 April.[90]
On the morning of 22 April, 46th Division attacked on the IX Corps front creating a sufficient gap for 6th Armoured Division to pass through by nightfall. They were followed by 1st Armoured Division, striking east for the next two days. However, progress was not quick enough to forestall the creation of a strong anti-tank screen which halted their progress. Nevertheless, their action had drawn the Axis reserves of armour south, away from the central front. Seeing that no further progress was likely Anderson withdrew 6th Armoured and most of 46th Infantry Divisions into Army Reserve.[90]

The V Corps attack went in on the evening of 22 April and U.S. II Corps launched their offensive in the early hours of 23 April capturing Hill 609, a key hill position which opened the way to Bizerte. In grim hand-to hand fighting against the Hermann Göring, 334th Infantry and 15th Panzer Divisions, it took V Corps' 1st, 4th and 78th Infantry Divisions, supported by Army tanks and heavy artillery concentrations, eight days to penetrate 9.7 km (6 mi) and capture most of the Axis defensive positions. Casualties were heavy on both sides but the dominating hill of Longstop was captured which opened the way to Tunis and Anderson felt a breakthrough was imminent.[90]
On 30 April, it had become clear to Montgomery and Alexander that Eighth Army's attack north from Enfidaville into strongly-held and difficult terrain would not succeed. Alexander therefore gave Montgomery a holding task and transferred British 7th Armoured Division, Indian 4th Infantry Division and 201st Guards Brigade from Eighth Army to First Army, (joining 1st Armoured Division which had transferred before the main offensive).[91] (See also: British First Army order of battle, 4 May 1943).
The necessary movements were completed by the night of 5 May. Anderson had arranged for a dummy concentration of tanks near Bou Arada on the IX Corps front to deflect attention from the arrival of 7th Armoured in the Medjez sector. In the event, he achieved a considerable measure of surprise as to the size of his armoured force when the attack went in.[92]
The final assault was launched at 0330 on 6 May by British IX Corps, now commanded by Lieutenant-General Brian Horrocks who had taken over from the wounded John Crocker, V Corps having made a preliminary attack on 5 May to capture high ground and secure IX Corps' left flank. The British 4th and Indian 4th Infantry Divisions, concentrated on a narrow front and supported by heavy artillery concentrations, broke a hole in the defences for 6th and 7th Armoured Divisions to pass through. On 7 May, British armour entered Tunis,[92] and American infantry from II Corps which had continued its advance in the north, entered Bizerte.[93]
Axis surrender

Six days after the fall of Tunis and Bizerte, the last Axis resistance in Africa ended with the surrender of over 230,000 prisoners of war.[1] Major-General Lucian King Truscott, commander of the US 3rd Infantry Division and Major-General Ernest Nason Harmon, commander of the US 1st Armored Division, reported that German resistance in the American sector ceased to exist on 6 May[94] and German troops started surrendering en masse.[nb 9]
On 8 May 1943, the German 334th Division surrendered to the British forces between Mateur and Tebourba.[96]
At 10:00 on 9 May, the U.S. II Corps cornered Major General Gustav von Vaerst and what remained of the 5th Panzer Army, which surrendered before noon.[97] At least 12,000 Germans surrendered, in Major General Fritz Krause's sector alone, and out of the initial batch of 25,000 prisoners, fewer than 400 were Italians.[98]Around 22,000 Germans in the mountainous Zaghouan sector also ceased fighting on 11 May, surrendering with all their equipment to the Free French Force.[99][100]Daniel De Luce, war correspondent for the Associated Press, wrote that on 11 May, 30,000 Germans surrendered without a fight when a squadron of British armoured cars reached their positions at Lighthouse Hill:
The German fighting spirit ebbed to nothingness and tens of thousands of Nazi soldiers threw up their arms and raised white flags in surrender to a squadron of British armoured cars that reached Cape Bon's Lighthouse Hill at 3 p.m. today ... Hitler fed them well, dressed them well and inspired them with what they thought almost a holy mission. But they did not fight today. They quit. Rommel's Africa Corps and Von Arnim's elite divisions from Europe didn't fight to the bitter, heroic end.[101]
British and Commonwealth forces reported they captured 150,000 Axis troops in the German-held sector between 5 May and 12 June and that Major General Count Theodor von Sponeck, commander of the 90th Light Division, had surrendered unconditionally after threatening to fight till the last round.[102]

In the meantime, General Giovanni Messe, commander of the 1st Italian Army continued to hold his line north of Takrouna.

On 12 May, General Messe cabled the Italian Supreme Command vowing to fight till the bitter end, despite the limitations:
The Italian Army, which has had the privilege of being the last and final defender of our flag on African soil, will continue to fight to the end. The enemy is now closing in from all sides. The enormous disproportion of the forces in the field and the steady drop in supplies and artillery ammunition lead us to conclude that resistance cannot continue for very long.[103]
At 19:55 that evening, in the face of the German collapse, Mussolini gave Messe orders to surrender.[nb 10]
On 13 May, Marshal Messe and the Italian 1st Army that were still holding opposite Enfidaville; his 80,000-strong force were now completely surrounded. The Royal Air Force and British artillery shelled and bombed them, and around midday surrendered to the 8th Army.[105][106]
Lieutenant-General Sir Bernard Freyberg in an interview on 21 June 1943, praised the Italians and claimed that in the final week of the Tunisian campaign the German will to fight collapsed completely:
Though about 247,000 prisoners were taken, the enemy's battle casualties in the last stages were between 1,000 and 2,000 ... But in the last phase the Italians fought because they were defending their homes. They regarded Tunisia as an outpost of their own country, but ever since El Alamein the Germans wanted to get out of Africa altogether. They saw no chance of getting away. They were being heavily bombed and attacked from the front, and the sea was locked behind them. Therefore they surrendered.[107]
Aftermath

The Official British History opined that "Had the Allies been able to get a tighter stranglehold on the Axis communications immediately after the 'Torch' landings, they might have won the gamble of the Tunisian Campaign by the end of 1942, and victory in Africa as a whole might have been close. Conversely, the Axis might have staved off for a long time their defeat in May 1943 had their forces received the supplies they needed."[108] According to historian Williamson A. Murray, "The decision to reinforce North Africa was one of the worst of Hitler's blunders: admittedly, it kept the Mediterranean closed for six more months, with a negative impact on the Allied shipping situation, but it placed some of Germany's best troops in an indefensible position from which, like Stalingrad, there would be no escape. Moreover, Hitler committed the Luftwaffe to fight a battle of attrition under unfavourable conditions, and it suffered losses that it could not afford."[109]
The Axis's desperate gamble had only slowed the inevitable, and the US loss at Kasserine may, paradoxically, have been the best thing that could have happened to them. With North Africa now in Allied hands, plans quickly turned to the invasion of Sicily, and Italy after it.
A Victory March was held in Tunis on May 20th 1943 in which units of British First and Eighth Armies and included representative detachments of the American and French forces. Troops marched past, with bands playing and General Eisenhower taking the salute.
As a reward for his leadership in North Africa and the final victory in Tunisia Harold Alexander was elevated to the peerage on 1 March 1946 by King George VI; he was created Viscount Alexander of Tunis.
See also
- Tunisian Victory
- List of World War II Battles
- Military history of Italy during World War II
Notes
- footnotes
- ↑ These casualties include the losses incurred by First Army from 8 November 1942 and Eighth Army from 9 February 1943. British and Commonwealth losses amounted to 38,360 men; 6,233 killed, 21,528 wounded, and 10,599 missing. Free French losses accumulated to 19,439 men; 2,156 killed, 10,276 wounded, and 7,007 missing.[1] American losses amounted to 18,221 men; 2,715 killed, 8,978 wounded, and 6,528 missing.[1][2]
- ↑ Between 22–30 November 1942 the Royal Air Force (RAF) flew 1,710 sorties and lost at least 45 aircraft. The United States Army Air Force (USAAF) flew 180 sorties and lost at least 7 planes.[3] Between 1–12 December the RAF flew 2,225 sorties and lost at least 37 planes. The USAAF flew 523 sorties and lost 17 planes.[4] Between 13–26 December the RAF flew 1,940 sorties for the lost of at least 20 planes while the USSAF launched 720 sorties for the cost of 16 planes.[5] Between 27 December 1942–17 January 1943 the RAF flew 3,160 sorties at the cost of 38 planes while the USAAF flew an estimated 3,200 sorties and lost 36 planes.[6] Between 18 January–13 February the RAF flew 5,000 sorties, excluding those against shipping, for the loss of 34 aircraft while the USAAF few an estimated 6,250 sorties for the loss of 85 planes.[7] During the remainder of February to 28 March 156 allied planes were lost.[8] Between 29 March and 21 April 203 Allied aircraft were destroyed.[9] Between 22 April till the end of the campaign 45 bombers and 110 fighters were lost; the RAF lost 12 bombers and 47 fighters, the USAAF losing 32 bombers and 63 fighters, while the French lost 1 bomber.[10]
- ↑ Writer Rick Atkinson states that Axis losses remain uncertain, and due to numerous factors, it is estimated that the German Army lost 8,500 men killed during the campaign while the Italian Army lost 3,700 men killed. Atkinson estimates that a further 40-50,000 Axis soldiers were wounded.[11] The British official campaign historian Major-General I.S.O. Playfair claims the total number of unwounded prisoners taken, according to Allied records, amounted to 238,243 men; 101,784 Germans, 89,442 Italians, and 47,017 men of an unspecified nationality.[1] Atkinson also states these figures and states that a quarter of a million men captured is a “reasonable estimate”.[11] Playfair notes that the American Official History claims 275,000 Axis soldiers captured, an 18th Army Group calculation of 244,500, Rommel's estimate of 130,000 Germans captured, and von Arnim's estimate of 100,000 German and 200,000 Italian captured.[1]rt|400
At least 1045 aircraft destroyedxandria on the sBetween 22–30 November 1942 the Luftwaffe flew 1,084 sorties losing 63 aircraft including 21 planes on the ground. The Italian air force, the Regia Aeronautica, recorded the loss of 4 planes.[3] Between 1–12 December the Luftwaffe flew 1,000 sorties and lost 37 planes, including 9 on the ground while the Italians recorded the loss of 10.[4] Between 13–26 December the Luftwaffe flew 1,030 sorties losing 17 planes while the Italians lost 3.[5] Between 27 December 1942-17 January 1943 the Luftwaffe lost 47 planes while the Regia Aeronautica losses are unknown.[6] Between 18 January-13 February the Luftwaffe lost 100 planes while the Italian losses are unknown.[7] During the remainder of February to 28 March 136 German planes were lost while the Regia Aeronautica lost 22.[8] Between 29 March and 21 April 270 Luftwaffe planes were destroyed while 46 "operational aircraft and almost their entire remaining air transport fleet" was lost.[9] Between 22 April till the end of the Luftwaffe lost 273 aircraft; 42 bombers, 166 fighters, 52 transporters, and 13 Storch. The Italians recorded the loss of 17 planes.[10] - ↑ After the event both Anderson and Cunningham, the naval commander, expressed the view that without landings east of Algiers, the race for Tunis was lost before it started.[23] Eisenhower, when accepting the Combined Chiefs' ruling, pointed out that the decision not to land east of Algiers removed the early capture of Tunis "from the realm of the probable to the remotely possible".[24]
- ↑ "In the meantime, the British 78th Infantry Division had advanced on Bizerta and passed Abiod and the mountain of the same name, where it encountered Major Witzig's airborne combat engineers. Witzig and his men held up the British for 48 hours. The heavy weapons from the Superga Division supported the paratroopers, and the Luftwaffe supplied much needed help from the air."[30]
- ↑ "When U.S. tanks showed up outside of Gabes 48 hours later, they were turned back by the paratroopers and two battalions of the "Brigade L" of General Imperiali. The Italian force had arrived as reinforcements."[30]
- ↑ "From here, the paratroopers were forced to withdraw as the jaws of a pincer movement of Italian tanks closed in from Sened and Keili."[32]
- ↑ "Nell'interno, agendo con forti masse d'uomini, il nemico tentava di impossessarsi di El Hamma tenuta dal Raggruppamento Sahariano con cui entrò in contatto il 21 marzo."[76]
- ↑ "Two remarkable features of this Axis debacle were, firstly, that in the end, when the battle had obviously gone against the Axis, the Italians fought better than the Germans. The German morale collapsed completely towards the close of the campaign."[95]
- ↑ "Stop the fighting. You are promoted to marshal of Italy. Honor goes to you and your brave men."[104]
- citations
- ↑ 1.0 1.1 1.2 1.3 1.4 1.5 Playfair, p.460
- ↑ Atkinson, p. 536
- ↑ 3.0 3.1 Playfair, p. 179
- ↑ 4.0 4.1 Playfair, p. 186
- ↑ 5.0 5.1 Playfair, p. 189
- ↑ 6.0 6.1 Playfair, p. 278
- ↑ 7.0 7.1 Playfair, p. 284
- ↑ 8.0 8.1 Playfair, p. 355
- ↑ 9.0 9.1 Playfair, p. 401
- ↑ 10.0 10.1 Playfair, pp. 460-461
- ↑ 11.0 11.1 Atkinson, p. 537
- ↑ Playfair, p. 111.
- ↑ Playfair, p. 114.
- ↑ Playfair, pp. 151-152.
- ↑ Playfair, p. 116.
- ↑ Playfair, pp. 117-118.
- ↑ Hinsley, pp. 472-473
- ↑ 18.0 18.1 Playfair, p. 239.
- ↑ Hinsley, p. 487
- ↑ Hinsley, p. 493
- ↑ Hinsley, pp. 495-496
- ↑ 22.0 22.1 22.2 Anderson (1946), p. 2 The London Gazette: (Supplement) no. 37779. p. 5450. 5 November 1946. Retrieved 2008-04-25.
- ↑ Hinsley, p. 492
- ↑ Eisenhower, p. 90
- ↑ Playfair, p. 152.
- ↑ 26.0 26.1 Watson (2007), p. 60
- ↑ Anderson (1946), p. 4 The London Gazette: (Supplement) no. 37779. p. 5452. 5 November 1946. Retrieved 2008-04-25.
- ↑ 28.0 28.1 28.2 28.3 Anderson (1946), p. 5 The London Gazette: (Supplement) no. 37779. p. 5453. 5 November 1946. Retrieved 2008-04-25.
- ↑ Ford (1999), p. 17
- ↑ 30.0 30.1 Kurowski, Franz (2010). Das Afrika Korps. Stackpole Books. p. 202.
- ↑ Ford (1999), pp. 19-22
- ↑ Rolf, David (2001). The Bloody Road to Tunis: Destruction of the Axis Forces in North Africa, November 1942-May 1943. Greenhill Books. p. 35.
- ↑ Ford (1999), p. 23
- ↑ Ford (1999), pp. 23-25
- ↑ Ford (1999), p.25
- ↑ Ford (1999), p.28
- ↑ Ford (1999), p. 40
- ↑ Ford (1999), p37-38
- ↑ Watson (2007), pp. 62–63
- ↑ Anderson (1946), p. 6 The London Gazette: (Supplement) no. 37779. p. 5454. 5 November 1946. Retrieved 2008-04-25.
- ↑ Ford (1999), p.50
- ↑ Ford (1999), p.53-54
- ↑ Playfair, p. 266.
- ↑ Watson (2007), p. 64
- ↑ Playfair, pp. 258-259.
- ↑ Anderson (1946), p. 7 The London Gazette: (Supplement) no. 37779. p. 5455. 5 November 1946. Retrieved 2008-04-25.
- ↑ 47.0 47.1 47.2 47.3 Anderson (1946), p. 8 The London Gazette: (Supplement) no. 37779. p. 5456. 5 November 1946. Retrieved 2008-04-30.
- ↑ Watson (2007), p.67
- ↑ Playfair, pp. 278-279.
- ↑ Playfair, p. 279
- ↑ 51.0 51.1 Watson (2007), p. 68
- ↑ 52.0 52.1 Watson (2007), p.77
- ↑ Anderson (1946), p. 9 The London Gazette: (Supplement) no. 37779. p. 5457. 5 November 1946. Retrieved 2008-05-01.
- ↑ Playfair, p. 294.
- ↑ Watson (2007), pp. 80–81
- ↑ 56.0 56.1 Watson (2007), p. 82
- ↑ Watson (2007), p.84
- ↑ Watson (2007), pp. 86-87
- ↑ Watson (2007), pp. 89-93
- ↑ Watson (2007), p. 102
- ↑ Watson (2007), p. 103
- ↑ Watson (2007), p. 104
- ↑ "BBC Peoples War website". Bbc.co.uk. Retrieved 2013-09-01.
- ↑ Watson (2007), p. 105
- ↑ Watson (2007), pp. 106-107
- ↑ Watson (2007), pp. 109-110
- ↑ Playfair, p. 303,
- ↑ 68.0 68.1 Playfair, p. 304.
- ↑ Playfair, p. 305.
- ↑ Playfair, pp. 315-316.
- ↑ Playfair, p. 271.
- ↑ Playfair, pp. 307-311.
- ↑ Watson (2007), pp. 110-111
- ↑ Combat Reporter: Don Whitehead's World War II Diary and Memoirs, p. 125, Fordham Univ Press, 2006
- ↑ Watson (2007), pp.121 & 123
- ↑ Mugnone, Giuseppe (1962). I ragazzi di Bir el Gobi (in Italian). Editrice La Lucciola. p. 168.
- ↑ Fighting French Troops' Part Advance in Advance on Gabes
- ↑ Cheal, Bill (May 1994). publisher=The Friends of the Green Howards website "Chapter 11: Into Battle (AT Wadi Akrit)". The War of a Green Howard, 1939 - 1945. Retrieved 2008-04-09.
- ↑ Cheal, Bill (May 1994). publisher=The Friends of the Green Howards website "Chapter 12: Preparing". The War of a Green Howard, 1939 - 1945. Retrieved 2008-04-09.
- ↑ Liddell Hart, Basil Henry (1999). History of the Second World War. Da Capo Press. p. 425.
- ↑ Playfair, p. 326.
- ↑ Playfair, p. 306.
- ↑ 83.0 83.1 Playfair, p. 327.
- ↑ 84.0 84.1 84.2 Anderson (1946), p. 10 The London Gazette: (Supplement) no. 37779. p. 5458. 5 November 1946. Retrieved 2008-05-01.
- ↑ 85.0 85.1 85.2 Anderson (1946), p. 11 The London Gazette: (Supplement) no. 37779. p. 5459. 5 November 1946. Retrieved 2008-05-01.
- ↑ The Field Artillery Journal
- ↑ An Italian view of the battle for Takrouna
- ↑ British and Italians Battle To Death on Top Bloody Peak
- ↑ Gooch, John (2012). Decisive Campaigns of the Second World War. Routledge. p. 95.
- ↑ 90.0 90.1 90.2 Anderson (1946), p. 12 The London Gazette: (Supplement) no. 37779. p. 5460. 5 November 1946. Retrieved 2008-05-01.
- ↑ Mead, p.44
- ↑ 92.0 92.1 Anderson (1946), p. 13 The London Gazette: (Supplement) no. 37779. p. 5461. 5 November 1946. Retrieved 2008-05-01.
- ↑ Anderson (1946), p. 14 The London Gazette: (Supplement) no. 37779. p. 5462. 5 November 1946. Retrieved 2008-05-01.
- ↑ Heefner, Wilson A. (2010). Dogface Soldier: The Life of General Lucian K. Truscott, Jr. University of Missouri. p. 101.
- ↑ Strabolgi, Joseph Montague Kenworthy (1944). The Conquest of Italy. Hutchinson. p. 17. OCLC 9964125.
- ↑ Williamson, Gordon (2012). Afrikakorps 1941-43. Osprey. p. 25.
- ↑ 80,000 Germans Trapped. Bizerte Army Surrenders To Americans
- ↑ "INVINCIBLE" GERMAN ARMY BITES DUST IN AFRICA
- ↑ Nazis Surrender Unconditionally To French Force
- ↑ Bulletin of International News, Vol. 20, No. 11 (May 29, 1943)
- ↑ German Fighting Spirit Missing As Troops Rush To Surrender
- ↑ Cooped in 9-Mile Circle, General Messe Refuses to Throw In Sponge
- ↑ Corvaja, p. 226
- ↑ Corvaja, p. 227
- ↑ Christopherson, Stanley (2013). Holland, James, ed. An Englishman at War: The Wartime Diaries of Stanley Christopherson DSO MC & Bar 1939-1945. Random House. p. ?. ISBN 9780552165655.
- ↑ Delaforce, Patrick (2008). Monty's Marauders: The 4th and 8th Armoured Brigades in the Second World War. Pen and Sword. p. 133.
- ↑ Nazis Had No Stomach for Fight At End in Tunisia, Freyberg Says
- ↑ Playfair, p.419
- ↑ Parker, Geoffrey (ed.). Cambridge Illustrated History of Warfare. p. 322. ISBN 0-521-79431-5.
References
- Abramides, John A. (2011). Battle of Sidi Nsir a Personal Account.
- Anderson, Charles R. (1993). Tunisia 17 November 1942 to 13 May 1943. WWII Campaigns. United States Army Center of Military History. ISBN 0-16-038106-1. CMH Pub 72-12.
- Anderson, Lt.-General Kenneth (1946). Official despatch by Kenneth Anderson, GOC-in-C First Army covering events in NW Africa, 8 November 1942–13 May 1943 published in The London Gazette: (Supplement) no. 37779. pp. 5449–5464. 5 November 1946. Retrieved 2008-04-23.
- Atkinson, Rick (2004) [2002]. An Army at Dawn: The War in North Africa, 1942–1943. Abacus. ISBN 0-349-11636-9.
- Anon (1990) [1st. Pub. 1943]. To Bizerte with the II Corps 23 April to 13 May 1943. American Forces in Action series. Washington D.C.: United States Army Center of Military History. CMH Pub 100-6.
- Bauer, Eddy; Young, Peter (general editor) (2000) [1979]. The History of World War II (Revised ed.). London, UK: Orbis Publishing. ISBN 1-85605-552-3.
- Blaxland, Gregory (1977). The plain cook and the great showman : the First and Eighth Armies in North Africa. London: Kimber. ISBN 0-7183-0185-4.
- Corvaja, Santi (2001). Hitler & Mussolini: The Secret Meetings. Enigma Books.
- Ford, Ken (1999). Battleaxe Division. Stroud (UK): Sutton Publishing. ISBN 0-7509-1893-4.
- Gooch, John (Editor); Ceva, Lucio (1990). "The North African Campaign 1940-43: A Reconsideration". Decisive Campaigns of the Second World War. Routledge. ISBN 0-7146-3369-0.
- Hinsley, F.H.; Thomas, E.E.; Ransom, C. F. G.; Knight, R. C. (1981). British Intelligence in the Second World War. Its influence on Strategy and Operations. Volume Two. London: HMSO. ISBN 0 11 630934 2.
- Hooton, E.R. (1999) [1997]. Eagle in Flames: The Fall of the Luftwaffe. London: Arms & Armour Press. ISBN 1-86019-995-X.
- Mead, Richard (2007). Churchill's Lions: A biographical guide to the key British generals of World War II. Stroud (UK): Spellmount. ISBN 978-1-86227-431-0.
- Playfair, Major-General I.S.O.; and Molony, Brigadier C.J.C.; with Flynn, Captain F.C.(R.N.) & Gleave, Group Captain T.P. (2004) [1st. pub. HMSO 1966]. Butler, J.R.M, ed. The Mediterranean and Middle East, Volume IV: The Destruction of the Axis Forces in Africa. History of the Second World War United Kingdom Military Series. Uckfield, UK: Naval & Military Press. ISBN 1-84574-068-8.
- Watson, Bruce Allen (2007) [1999]. Exit Rommel: The Tunisian Campaign, 1942-43. Stackpole Military History Series. Mechanicsburg, PA: Stackpole Books. ISBN 978-0-8117-3381-6.
External links
| Wikimedia Commons has media related to Tunisia in World War II. |
- Italian communique report the capture of 300 British paratroopers by part of the Bersaglieri
- The Green Howards Regimental History, - Bill Cheall's Story
- The Irish Brigade Contains accounts of the 38th (Irish) Brigade in the Battle of Bou Arada in January–February 1943 and north of Medjez el-Bab in April 1943.
- A film clip ALLIES WIN SEA, AIR BATTLE IN FIGHT FOR AFRICA [ETC. (1943)] is available for free download at the Internet Archive
| ||||||||||||||||||||||