Operation Compass
| ||||||||||||||||||||||||||||||
| ||||||||||||||||||||||||||||||

Operation Compass was the first big Allied military operation of the Western Desert Campaign during World War II. British and other Commonwealth forces attacked Italian forces in western Egypt and eastern Libya in December 1940, with great success. The Western Desert Force (Lieutenant-General Sir Richard O'Connor) with about 30,000 men, advanced from Mersa Matruh in Egypt on a five-day raid on the Italian positions of the 10th Army (Marshal Rodolfo Graziani), which had about 150,000 men in fortified posts around Sidi Barrani and in eastern Libya (Cyrenaica).
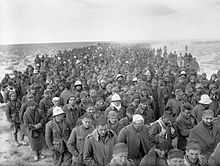
The 10th Army was swiftly defeated and the British prolonged the operation, to pursue the remnants of the 10th Army to Beda Fomm and El Agheila on the Gulf of Sirte. The British lost 1,900 killed and wounded, about 10 percent of their infantry and took 138,000 Italian and Libyan prisoners, hundreds of tanks and over 1,000 guns and aircraft. The British were unable to continue beyond El Agheila, due to broken-down and worn out vehicles and the diversion of the best-equipped units to the Greek Campaign.
Background
10th Army
When war was declared, the 5th Army (General Italo Gariboldi) was in the west of Libya in Tripolitania and the 10th Army (General Mario Berti) was in Cyrenaica, the eastern province. Once the French in Tunisia no longer posed a threat to Tripolitania, units of the 5th Army were used to reinforce the 10th Army. When Balbo was killed, Marshal Graziani took his place as Governor-General of Libya. Graziani expressed doubts about the capabilities of his large non-mechanized force to defeat the British, who though smaller in numbers were largely motorised. After being reinforced from the 5th Army, the 10th Army controlled the equivalent of four corps with 150,000 infantry, 1,600 guns, 600 tankettes and tanks and 331 aircraft. .[1] The XX Corps had the Italian 60 Infantry Division Sabratha.[2] The XXI Corps had the 1st Blackshirt Division 23 Marzo, the 2nd Blackshirt Division 28 Ottobre and the 63 Infantry Division Cirene. The XXII Corps had the 61st Infantry Division Sirte.[3] The XXIII Corps had the 4th Blackshirt Division 3 Gennaio and the 64th Infantry Division Catanzaro.[4]
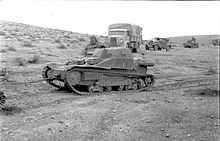
The new "Group of Libyan Divisions" (Gruppo Divisioni Libiche) had the Maletti Group, the 1st Libyan Division Sibelle commanded by Major-General Luigi Sibelle, and the 2nd Libyan Division Pescatori commanded by Major-General Armando Pescatori.[4] The only unit Berti had that was not an infantry division was the partially motorized and lightly armoured Maletti Group. Raggruppamento Maletti (General Pietro Maletti) was formed at Derna on 8 July 1940, with seven Libyan motorized infantry battalions, a company of Fiat M11/39 tanks, a company of L3/33 tankettes, motorized artillery and supply units as the main motorized unit of the 10th Army. On 29 August, as more tanks arrived from Italy, the Comando carri della Libia (Libyan Tank Command) was formed under the command of Colonel Valentini with three Raggruppamenti. Raggruppamento Aresca (Colonel Aresca) with the I Medium Tank Battalion and the 31st, 61st and 62nd light tank battalions, Raggruppamento Trivioli (Colonel Antonio Trivioli), with the II Medium Tank Battalion, less one company and the IX, XX, and LXI light tank battalions and Raggruppamento Maletti with the LX light tank battalion and the remaining M11/39 company from the II Medium Tank Battalion.[5] Raggruppamento Maletti became part of the Regio Corpo Truppe Coloniali della Libia (Royal Corps of Libyan Colonial Troops), with the 1st Libyan Division Sibelle and the 2nd Libyan Division Pescatori.[6]
Western Desert Force
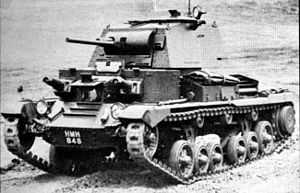
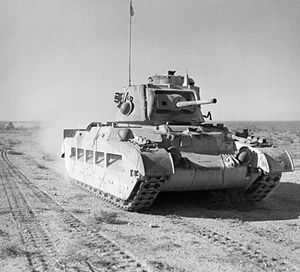
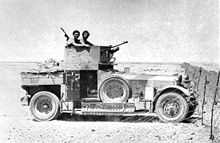
Middle East Command under General Archibald Wavell had about 36,000 soldiers, 120 guns, 275 tanks and 142 aircraft, in two squadrons of Hurricanes, one of Gloster Gladiators, three of Blenheims, three of Wellingtons and one of Bombays, about 46 fighters and 116 bombers.[7] The Western Desert Force was commanded by Lieutenant-General Richard O'Connor with the 4th Indian Infantry Division (Major-General Noel Beresford-Peirse) and the 7th Armoured Division (Major-General Sir Michael O'Moore Creagh). From 14 December, troops of the 6th Australian Infantry Division (Major-General Iven Giffard Mackay), replaced the 4th Indian Division, which was sent to East Africa. The British had some fast Cruiser Mk I, Cruiser Mk II and Cruiser Mk III tanks with Ordnance QF 2-pounder guns, were superior to Fiat M11/39 tanks. The British also had a small number of Matilda II infantry tanks that while slow, were well armoured and also equipped with the 2-pounder. The armour of the Matilda tanks could not be penetrated by Italian anti-tank guns or field guns.[8]
Border skirmishes

Italy declared war on Britain and France on 10 June 1940. During the next few months there were raids and skirmishes between Italian forces in Libya and British and Commonwealth forces in Egypt. On 12 June 1940, the Mediterranean Fleet bombarded Tobruk. The force included the cruisers HMS Liverpool and HMS Gloucester also exchanged fire with the Italian cruiser San Giorgio. Royal Air Force Blenheim bombers from No. 45, No. 55 and No. 211 squadrons, hit the San Giorgio with one bomb.[9] On 19 June, the British submarine HMS Parthian fired two torpedoes at San Giorgio but missed. San Giorgio's role was then to support the local anti-aircraft units and claimed 47 British aircraft shot down or damaged. San Giorgio also shot down the Savoia-Marchetti SM.79 aircraft carrying Italo Balbo, the Governor-General of Libya and Commander-in-chief of Italian forces in North Africa.[10]
On 19 June 1940, in the first dogfight over North Africa, five Fiat CR.42s from 84a Squadriglia of the Tobruk-based 10° Gruppo, escorting Breda Ba.65 light bombers, encountered four Gladiators from 33 Squadron and a Hurricane from 80 Squadron; a Gladiator and two CR.42s were shot down. In the last week of June 1940, the pilots of the Aeronautica della Libia 2° Stormo claimed to have shot down six Royal Air Force (RAF) Blenheim bombers, losing one CR.42.[11] The British report the loss of two Blenheims near Tobruk.[lower-alpha 1] On 23 July 1940, the RAF lost another three Blenheims. On 7 December 1940, an Italian fighting patrol from Maktila raided British positions in the area and according to Marshal Graziani, captured several defenders.[lower-alpha 2] On 21 December 1940, an Italian reinforced platoon or company reconnoitring the area of the Australian 2/2nd Battalion, got within 1,600 metres (1,700 yd) of the forward platoons before being discovered and forced to retire.[12]
Prelude
Operazione E
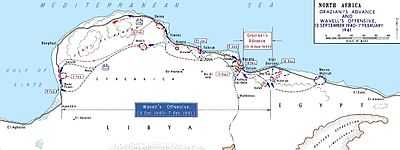
Marshal Italo Balbo was Governor-General and military commander of Italian North Africa (Libya). Italian dictator Benito Mussolini urged Balbo to attack the British in Egypt. Mussolini's aim was to capture the Suez Canal and link up with Italian East Africa. But for many reasons, Balbo was reluctant. After Balbo's death in a friendly fire accident on 28 June, Mussolini urged his replacement, General Rodolfo Graziani, to attack. Like Balbo, Graziani too was reluctant, stating that the water supply was inadequate. On 8 August 1940, he said to the Foreign Minister Galeazzo Ciano "We move toward a defeat which, in the desert, must inevitably develop into a rapid and total disaster.[13] Graziani ultimately followed Mussolini's orders. On 13 September 1940, elements of the Italian 10th Army advanced into Egypt in Operazione E. As the Italians advanced, the small British force at Sollum withdrew to the main defensive positions east of Mersa Matruh.[14] The Italian advance was harassed by the 3rd Coldstream Guards, attached artillery and other units..[15]
After recapturing Fort Capuzzo, progress was slow. The Italians advanced approximately 95 kilometres (59 mi) in three days. On 16 September, the advance stopped at Maktila, 16 kilometres (9.9 mi) beyond Sidi Barrani. The Italian high command claimed that the Italians advanced 60 mi (97 km) in a desert sandstorm that surprised the British garrison at Sidi Barrani and that the "resistance" of the army defending the western desert had been "crushed everywhere".[lower-alpha 3] The Italians then dug in, fortified their positions and awaited reinforcements and supplies along the Via della Vittoria, an extension of the Via Balbia being built from the frontier. They created a line of five fortified camps around Sidi Barrani which ran from Maktila, 24 kilometres (15 mi) east on the coast, southward through Tummar East, Tummar West and Nibeiwa, to Sofafi on the escarpment to the south-west.[16]
British plan
Following the Italian advance, Wavell ordered the commander of British Troops Egypt, Lieutenant-General Sir Henry Maitland Wilson, to plan a limited operation to push the Italians back. Wavell had noted that the Italian defensive positions were separated by large distances, which meant they could not provide mutual support.[17] Operation Compass, for administrative reasons, was originally planned as a five-day raid but consideration was given to continuing the operation to exploit success.[18][19] On 28 November, Wavell wrote to Wilson that,
I do not entertain extravagant hopes of this operation but I do wish to make certain that if a big opportunity occurs we are prepared morally, mentally and administratively to use it to the fullest.— Wavell[20]
The 7th Support Group was to observe the Italian camps on the escarpment around Sofafi to prevent the garrisons from interfering, while the rest of the division and 4th Indian Division passed through the Sofafi–Nibeiwa gap. An Indian brigade and Infantry tanks (I tanks) of 7th Royal Tank Regiment (7th RTR) would attack Nibeiwa from the west, as the 7th Armoured Division protected their northern flank. Once Nibeiwa was captured, a second Indian brigade and the 7th RTR would attack the Tummars. The Matruh Garrison would furnish Selby Force (3rd Battalion Coldstream Guards plus some artillery) to contain the enemy camp at Maktila on the coast and the Royal Navy would bombard Maktila and Sidi Barrani.[21]
Assuming success, Sidi Barrani would be attacked on the second day by the 4th Indian Division and a westward exploitation would follow.[22] Preparations were kept secret and only a few officers knew during the training exercise held from 25–26 November that the objectives marked out near Matruh were replicas of Nibeiwa and Tummar; the troops were also told that a second exercise was to follow and did not know that the operation was real until 7 December, as they arrived at their jumping-off points.[23]
British assembly
Late on 8 December, an Italian reconnaissance aircrew reported that attack on Maktila and Nibeiwa was imminent but Maletti was not informed. On 9 December, the 1st Libyan Division Sibelle was at Maktila and the 2nd Libyan Division Pescatori was at Tummar. The Maletti Group was located at Nibiewa and the 4th Blackshirt Division 3 Jennaio and the headquarters of the Libyan Corps were at Sidi Barrani. The 63rd Infantry Division Cirene and the headquarters of XXI Corps were at Sofafi and the 64th Infantry Division Catanzaro was at Buq Buq. The headquarters of the XXIII Corps and the 2nd Blackshirt Division "28 Ottobre" were in Sollum and Halfaya Pass respectively and the 62nd Infantry Division Marmarica was at Sidi Omar, south of Sollum.[24] Berti was on sick leave and Gariboldi, the 1st Blackshirt Division 23 Marzo and the 10th Army HQ were far back at Bardia. (By the time Berti arrived in Libya, so had the British.)[25]
Operation Compass (la battaglia della Marmarica Battle of the Marmarica) began on the night of 7/8 December. The Western Desert Force with the 7th Armoured Division, 4th Indian Division and the 16th Infantry Brigade advanced 113 kilometres (70 mi) to their start line. The RAF made attacks on Italian airfields destroying or damaging 29 aircraft on the ground. Selby Force (Brigadier A. R. Selby) with 1,800 men, the maximum for whom transport could be found, moved up from Matruh, set up a brigade of dummy tanks in the desert and reached a position south-east of Maktila by dawn on 9 December. Maktila had been bombarded by the monitor HMS Terror and the gunboat HMS Aphis; Sidi Barrani had been shelled by the gunboat HMS Ladybird.[26]
Battle of the Camps
Nibeiwa
At 05.00 on 9 December, a detachment of artillery commenced diversionary fire from the east for an hour, on the fortified camp at Nibeiwa, which was occupied by the Maletti Group.[22] At 07.00 the main divisional artillery started to register targets and by 07.15 the divisional artillery commenced the preliminary bombardment. The 11th Indian Infantry Brigade, with 7th RTR under command, attacked Nibeiwa from the north-west, which reconnaissance had established as the weakest sector. By 08.30, after fierce fighting Nibeiwa was captured; Maletti had been killed in the fighting and 2,000 Italian and Libyan soldiers had been taken prisoner. [lower-alpha 4] Large quantities of supplies were captured and the British had casualties of eight officers and forty-eight men.[27]
The Tummars
Beresford-Peirse ordered the 5th Indian Infantry Brigade to move up with supporting field artillery and take positions for the attack on the Tummars.[22] The attack commenced on Tummar West at 13.50, after the 7th RTR had refuelled and re-armed and artillery had bombarded the defences for an hour. Another north-west approach was made and the tanks broke through the perimeter without too much difficulty and were followed twenty minutes later by the infantry. The defenders put up stronger opposition than at Nibeiwa and the Italian gunners fought courageously but by 16.00 Tummar West was overrun, except for the north-eastern corner. The tanks moved on to Tummar East, the greater part of which was captured by nightfall. The 4th Armoured Brigade while performing flank defence, had advanced to Azziziya where the garrison of 400 surrendered. Light patrols of the 7th Hussars pushed forward to cut the road from Sidi Barrani to Buq Buq while armoured cars of the 11th Hussars ranged further west. The tanks of 7th Armoured Brigade were held in reserve.[28]
Maktila
Unaware of the situation at the Tummars, Selby sent units to cut the western exits from Maktila but the 1st Libyan Division Sibelle filtered through and escaped.[29] Selby Force had followed up the retreat of the 1st Libyan Division Sibelle as it moved the 15 miles (24 km) from Maktila to Sidi Barrani and drove part of the column into sand dunes north of the coast road. Cruiser tanks of the 6th Royal Tank Regiment (6th RTR) arrived in the sandstorm and overran the Italians in the dunes at about 5:15 p.m., then joined Selby Force to continue the pursuit. The Italian defenders were caught at Sidi Barrani, in a pocket 10 by 5 miles (16.1 km × 8.0 km) backing on to the sea. When the British attacked again at dawn on 11 December, mass surrenders began everywhere except at Point 90, where troops of the 2nd Libyan Division Pescatori held out for a short time and then 2,000 troops surrendered.[30]
Sidi Barrani, Buq Buq and Sofafi
On 10 December, the 16th Infantry Brigade was brought forward from 4th Indian Division reserve and with part of the 11th Indian Brigade under command, was sent forward in lorries to attack Sidi Barrani. While moving forward that morning across exposed ground, some casualties were incurred but with support from artillery and the 7th RTR, it was in position barring the south and south western exits to Sidi Barrani by 13.30. At 16.00, supported by the divisional artillery, the attack began and the town was captured by nightfall and the remains of the two Libyan Divisions and the 4th Blackshirt Division 3 Gennaio were trapped between the 16th Infantry Brigade and Selby Force. On 11 December, Selby Force supported by some tanks, attacked and secured the surrender of the 1st Libyan Division Sibelle. By evening, the 4th Blackshirt Division 3 Gennaio had also surrendered. On 11 December, the 7th Armoured Brigade was ordered out of reserve and relieved 4th Armoured Brigade in the Buq Buq area, to mop up and captured large numbers of men and guns. On 11 December, a patrol from the 7th Support Group entered Rabia to find it empty. The 63rd Division Cirene had withdrawn from there and Sofafi overnight. An order to the 4th Armoured Brigade to cut them off west of Sofafi arrived too late and they were able to make their way along the top of the escarpment to link with Italian forces at Halfaya.[31]
Exploitation

Over the next few days the British 4th Armoured Brigade, on top of the escarpment, and the 7th Armoured Brigade, on the coast tried to pursue vigorously. They encountered acute supply problems, exacerbated by the large number of prisoners (twenty times the number planned for) and found it extremely difficult to advance. Italian forces crowded along the coast road while retreating from Sidi Barrani and Buq Buq were easy targets for Terror and the two gunboats, which bombarded the Sollum area all day and most of the night of 11 December. Late on 12 December, all that remained of the Italian positions in Egypt, were the approaches to Sollum and a force in the region of Sidi Omar. 73 Italian tanks and 237 guns were destroyed or captured and 10,000–38,289 Italian and Libyan soldiers were killed, wounded or captured and the British suffered 634 casualties.[32] The British and Indian forces reorganised and then moved quickly west along the Via della Vittoria, through Halfaya Pass and re-captured Fort Capuzzo in Libya.[33]
Section commander Nazzareno Ganino, 86th Infantry Regiment, 60th Infantry Division Sabratha, later described the patrol actions of the period,
I held the rank of corporal and was in charge of a small squad of about eleven or so men, our job was to go on night patrols into enemy held ground, either cutting wire or reporting on enemy activities or positions. Because of the nature of the work there was nearly always casualties, where one or sometimes more would not make it back to camp, either through capture or even death. We faced fear and sometimes lost our way in the darkness and featureless landscape, but I always tried to avoid unnecessary loss of life.— Nazzareno Ganino[34]
O'Connor wanted to continue the offensive at least as far as Benghazi but on 11 December, Wavell ordered the 4th Indian Division to withdraw, to take part in the East African Campaign against Italian forces in Italian East Africa.[35] The 6th Australian Division replaced the 4th Indian Division from 14 December. The Australians had barely finished training, were missing their armoured regiment and as yet had only one artillery regiment equipped with the new 25-pounder field gun.
Pursuit
Sollum, Halfaya and Fort Capuzzo
Exploitation continued by the two armoured brigades and the 7th Support Group, with the infantry of 16th Infantry Brigade (which had not gone with the Indian division to the Sudan) following up. By 15 December, Sollum and the Halfaya Pass had been captured. The British advance by-passed Italian garrisons further south in the deep desert. Fort Capuzzo, 64 kilometres (40 mi) inland, at the end of the frontier wire, was captured en passant by 7th Armoured Division in December 1940, as it advanced westwards to Bardia. The 7th Armoured Division concentrated south-west of Bardia, waiting for the arrival of 6th Australian Division. By this time the Western Desert Force had taken 38,300 prisoners and captured 237 guns and 73 tanks, while suffering casualties of 133 killed, 387 wounded and eight missing.[36]
Bardia
After the disaster at Sidi Barrani and the withdrawal from Egypt, Lieutenant General Annibale Bergonzoli's XXIII Corps faced the British within the strong defences of Bardia, which was captured from 3–5 January 1941 and was the first battle of the war in which an Australian Army formation took part, the first to be commanded by an Australian general and the first to be planned by an Australian staff. The 6th Australian Division (Major General Iven Mackay) attacked Bardia, assisted by air support and naval gunfire, under the cover of an artillery barrage. The 16th Australian Infantry Brigade attacked at dawn from the west, where the defences were known to be weak. Sappers blew gaps in the barbed wire with Bangalore torpedoes and filled in and broke down the sides of the anti-tank ditch with picks and shovels. This allowed the infantry and 23 Matilda II tanks of the 7th Royal Tank Regiment to enter the fortress and capture all their objectives, along with 8,000 prisoners.[37]
The impact of insufficient food and drink on the Italian defenders at Bardia was soon quite clear to the Australians ... many were dying and weak with hunger and thirst ... They went down on their knees and drank up puddles of water ... Warrant Officer R. Donovan, 2/21 Field Regiment was haunted by mass cries for 'aqua, aqua,' ... Some died of exhaustion and thirst.— C. Stockings[38]
In the second phase of the operation, the 17th Australian Infantry Brigade exploited the breach made in the perimeter and pressed south, as far as a secondary line of defences known as the Switch Line. On the second day, the 16th Australian Infantry Brigade captured the township of Bardia, cutting the fortress in two. Thousands of prisoners were taken and the remnants of the Italian garrison held only the northern and southernmost parts of the fortress. On the third day, the 19th Australian Infantry Brigade advanced south from Bardia, supported by artillery and the remaining six Matilda tanks. Its advance allowed the 17th Australian Infantry Brigade to move forward and the two brigades reduced the southern sector of the fortress. The Italian garrisons in the north surrendered to the 16th Australian Infantry Brigade and the 7th Armoured Division Support Group outside the fortress and about 25,000 were taken, along with 400 guns, 130 light and medium tanks and hundreds of motor vehicles. The Western Desert Force pressed on to Tobruk after taking Bardia.[39]
Capture of Tobruk
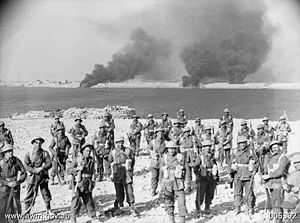
The 2/3rd Australian Battalion attacked at 5:40 a.m. on 21 January and after an hour, the 16th Australian Brigade and 18 infantry tanks broke through 1-mile (1.6 km) deep on a 1-mile (1.6 km) front, against patchy resistance. As the 16th Australian Brigade fanned out at 8:40 a.m., the 19th Australian Brigade advanced north, behind an artillery barrage and counter-battery fire on the Italian artillery. The 2/8th Australian Battalion was held up at the Bardia–El Adem crossroads by a force of dug-in tanks and machine-gun nests but at 2:00 p.m. the Australians attacked again and broke through on the right. On the left the Australians were counter-attacked by seven tanks and infantry behind an artillery barrage, which was driven off by the Australians, two anti-tank guns and two infantry tanks. More resistance was met near Pilastrino, which held out until 9:30 p.m. and the area around Solero was captured along with Mannella.[40]
During the day, Blenheims of 55 and 113 squadrons flew 56 sorties against Tobruk and the Gladiators and Hurricanes of 3 Squadron RAAF and 73 and 274 squadrons RAF had patrolled to the west. Half of the Tobruk area had been captured by nightfall and the Italians began demolitions at the harbour. At dawn, the commander of the Sirte Division, Major-General Della Mura surrendered with several thousand of his troops. The 6th Australian Cavalry Regiment reached the port and took the surrender of Admiral Vietina and the naval garrison. By 3:45 p.m. resistance had ceased 15,000 208 guns and 87 tanks were taken, for a XIII Corps loss of 400 men, 355 of them Australian. Most of the demolitions conducted by the Italians had been of stores rather than installations. The Inshore Squadron began minesweeping and opened the port on 24 January.[41]
Babini Group
In late 1940, Comando Supremo organized the Brigata Corazzata Speciale (Special Armoured Brigade, BCS or Babini Group) and send the volunteer force to North Africa. The Babini Group had Fiat M13/40 tanks, the most modern Italian medium tank, far superior to the M11/39s used by the Raggruppamento Maletti (Maletti Group). The M13/40 had a turret-mounted Cannone da 47/32 M35 47 mm gun, capable of penetrating the armour of British light and cruiser tanks but except for command vehicles, the M13s did not carry radio. The Babini Group also had three Bersaglieri battalions, one motorcycle battalion, an artillery regiment, two anti-tank gun companies, an engineer company and supply units. The tank force included the III Battalion and the V Battalion of the 131st Armoured Division "Centauro" and should have amounted to 139 × M13/40s but 82 had just arrived at Benghazi and required ten days to be made operational.[42]
Derna

HQ British Troops Egypt was removed from the line of command so that O'Connor reported direct to Wavell at Middle East Command. O'Connor continued the advance towards Derna with the 19th Australian Brigade of the 6th Australian Division and sent another Australian brigade to reinforce the 7th Armoured Division south of the Jebel Akhdar mountains towards Mechili to try to defeat the Italian force in detail.[43] On 24 January, the 4th Armoured Brigade engaged tanks of the Babini Group north of Mechili on the Derna–Mechili track. The British knocked out eight tanks and lost a cruiser and six light tanks.[44] The 2/11th Australian Battalion engaged the 60th Division Sabratha and Bersaglieri companies of the Babini Group at Derna airfield on 25 January and made slow progress against determined resistance. Italian bombers and modern fighters flew sorties against the 2/11th Australian Battalion as it attacked the Italian-held airfield and nearby heights.[45]
In the Derna–Giovanni Berta area, held by the 60th Division Sabratha and Bersaglieri companies of the Babini Group, there were fierce exchanges with Italian counter-attacks taking place around Wadi Derna. On 26 January, the 2/4th Battalion cut the road running south from Derna to Mechili and a company had managed to move north and cross the massive Wadi Derna. On the northern edge of the wadi, an Italian counter-attack was a costly failure, with 40 Italians killed and 56 captured. On 27 January, the 2/4th Australian Battalion repulsed another battalion-strength attack.[46] The Babini Group ambushed a column of armoured vehicles of the 6th Australian Cavalry Regiment and took the survivors prisoner. The advance of other units south of Wadi Derna, threatened the Babini Group with encirclement and it disengaged on the night of 26/27 January. The 4th Armoured Brigade pursued the Babini Group but had to give up on 28 January, due to mud, rain, breakdowns and fuel shortage; Derna fell on 30 January.[47]
Casualty figures for the fighting for Derna and Giovanni Berta have not been compiled but at least 15 Australians and two British airmen were killed. Much of the 60th Division Sabratha was lost. On 4 February, Italian pilots from 368a Squadriglia shot down a Bleinheim over the Barce–Derna area. In another action that day a Hurricane from 73 Squadron, a Caproni Ca.133 from 366a Squadriglia and a CR.42 from 368a Squadriglia were shot down.[48]
Battle of Beda Fomm
The rapid British advance during Operation Compass forced the Italian 10th Army to evacuate Cyrenaica, the eastern province of Libya. In late January, the British learned that the Italians were retreating along the Litoranea Balbo (Via Balbia) from Benghazi. The 7th Armoured Division (Creagh) was dispatched to intercept the remnants of the 10th Army by moving through the desert, south of the Jebel Akhdar (Green Mountain) via Msus and Antelat as the 6th Australian Division pursued the Italians along the coast road, north of the jebel. The terrain was hard going for the British tanks and Combe Force (Lieutenant-Colonel J. F. B. Combe), a flying column of wheeled vehicles, was sent ahead across the chord of the jebel.[49]
Late on 5 February, Combe Force arrived at the Via Balbia south of Benghazi and set up road blocks near Sidi Saleh, about 32 kilometres (20 mi) north of Ajedabia and 48 kilometres (30 mi) south-west of Antelat. The leading elements of the 10th Army arrived thirty minutes later and were blocked. Next day the Italians attacked to break through the road block and continued into 7 February. With British reinforcements arriving and the Australians pressing down the road from Benghazi, the 10th Army surrendered. From Benghazi–Agedabia, the British took 25,000 prisoners, captured 107 tanks and 93 guns of the totals for Operation Compass of 133,298 men, 420 tanks and 845 guns.[50]
Desert operations
Giarabub
The Italians had posted garrisons at strategic sites in the hinterland, at Giarabub 150 miles (240 km) south of Sollum, Kuffra Oasis, Jalo at the west end of the Great Sand Sea and Murzuk, 500 miles (800 km) south of Tripoli. The oasis of Giarabub was attacked and invested in January 1941 and captured in March, after a three-month siege by the 6th Australian Cavalry Regiment and an Australian infantry battalion. Further south, on the far side of the Sand Sea, the oasis of Kufra was attacked by Free French force from French Equatorial Africa, in concert with Long Range Desert Group (LRDG) patrols. Kufra fell after the two-month Battle of Kufra in March 1941. Further west, on the border with the French territory of Chad, the Italian base at Murzuk was raided during the Battle of Kufra in January, when two patrols of the new Long Range Patrol Unit and a local sheikh travelled 2,100 kilometres (1,300 mi), to rendezvous near Kayugi, with a small Free French detachment.[51]
The force attacked Murzuk and destroyed three aircraft and a hangar; the French commander was killed, most of the Italians surrendered and several prisoners were taken.[51] The raiders then shot up three forts and departed. The Italian garrison at Uweinat 970 kilometres (600 mi) inland and the closest Libyan base to the East African Empire, was withdrawn. The British patrols visited Faya and met another French detachment with General Philippe Leclerc for an attack on Kufra. The British were attacked by aircraft and armoured cars of the Italian Auto-Saharan Company, which destroyed several lorries. Leclerc decided that an attack on Kufra was not possible and the remaining British returned to Cairo, after a 45-day round trip of 6,900 kilometres (4,300 mi). Kufra was captured on 1 March, by the French and became the new LRDG base in April.[51]
Aftermath
Analysis
| Place | PoW | Tanks | Guns | ||
|---|---|---|---|---|---|
| Sidi Barrani | 38,289 | 73 | 297 | ||
| Sidi Omar | 900 | 0 | 8 | ||
| Bardia | 42,000 | 130 | 275 | ||
| Tobruk | 25,000 | 87 | 208 | ||
| Mechili | 100 | 13 | 0 | ||
| Derna Benghazi | 2,000 | 10 | 24 | ||
| Benghazi Agedabia | 25,000 | 107 | 93 | ||
| Total | 133,298 | 420 | 845 | ||
After ten weeks, the 10th Army was no more. The British had advanced 800 kilometres (500 mi) but the 10th Army had been robust enough to cost the attackers dear in tanks, and, in 2003, Hixson wrote that the British would have been hard-pressed in resuming their advance and taking Tripolitania.[53] In 1996, Hunt disputed the claim that the 10th Army was immobile, the Italians had so much motor transport that the British motorised two brigades with captured vehicles. Without the captured transport, the WDF could never have pushed so far into Libya; of particular value were the large 10-ton diesel lorries of which the 10th Army had large quantities.[4]
Casualties
The WDF lost 500 killed, 55 missing, and 1,373 wounded.[54] The RAF lost 15 aircraft, 6 Hurricanes, 5 Gladiators, three Wellingtons, a Valentia and a Blenheim.[55][56] Italian casualties were 3,000 killed, 100,000–115,000 captured, 140–400 tanks and 700–1,292 guns[57] In 2013 Hixson wrote that the Italians lost about 115,000 prisoners and that the British destroyed 200 of the 564 aircraft lost by the Regia Aeronautica [53] Nijboer wrote that the Italians lost 700 aircraft.[58] Latimer counted 58 Italian aircraft lost in combat, 91 captured intact and 1,100 captured damaged.[59][55] Other sources offer different figures, in 1996, Harris wrote that 25,000 Italians surrendered at Bardia and that in three months the British had captured 114,000 prisoners, with negligible losses to themselves.[60] In 2014, Smith wrote that 25,000 prisoners were taken at Bardia.[61] In 1942, the New Zealand Army Board reported that 15,000 Italians had been captured at Tobruk.[62]In 1943, Sheppard wrote that four generals and an admiral, with their staffs and over 15,000 prisoners and 200 guns were taken, for fewer than 500 casualties.[63]
In 2003, Cawthorne and in 2013, Doherty wrote that 30,000 prisoners were taken at Tobruk.[64][65] Churchill wrote that 45,000 prisoners and 462 guns were taken.[57] In 2003, Collier wrote that on 3 January, 45,000 men surrendered at Bardia, with 463 guns and 129 tanks.[66] In 2005, Neillands wrote that when the 19th and 16th Australian Infantry brigades came up to join it, the 7th Armoured Division had already surrounded the Tobruk defences, which contained around 20,000 men and 200 guns, about half the number of men at Bardia with twice the front to defend.[67] In 2012, Carruthers wrote that the British captured 20,000 Italians at Bardia on 21 January.[68] In 1962, Radames wrote that on 22 January 1941, the fortress of Tobruk fell with another 20,000 prisoners.[69] Collier wrote that, although only 16 Matildas were still running, they made the vital penetration and the coastal fortress fell the next day, yielding 30,000 prisoners, 236 guns and 87 tanks.[70] Brayley wrote that the assault was launched on 21 January and by nightfall on 22 January, Tobruk was in British hands, along with another 30,000 prisoners.[71]
Subsequent operations
On 9 February 1941, as the British reached El Agheila, Churchill ordered the advance to stop and troops to be dispatched to Greece. Only about 32,000–50,000 men from the 10th Army escaped the disaster in Cyrenaica but the 5th Army had four divisions in Tripolitania.[72] The Italians reinforced the Sirte, Tmed Hassan and Buerat strongholds and replacements and armoured vehicles continued to arrive from Italy, which brought the total of Italian soldiers in Tripolitania to about 150,000. Further afield, on 11 January 1941, Italian Stukas from 237 Squadriglia and Sparviero bombers from 279 Squadriglia inflicted extensive damage on Illustrious, which forced the aircraft carrier to dock in Malta.[73][74] The first troops of the Deutsches Afrikakorps (DAK, German Africa Corps) led by General Erwin Rommel landed in Tripolitania on 11 February, as part of Operation Sonnenblume (Sunflower).[75] On 25 March 1941, Gariboldi replaced Graziani who had requested to be relieved.[76]
Order of battle
| 10th Army, 9 December | Western Desert Force, 9 December[lower-alpha 5] | |
|---|---|
Western Desert Force
Commander-in-Chief, Middle East: General Sir Archibald Wavell
11 December)
| |
See also
Footnotes
- ↑ RAF Commands. Part 4
- ↑ Graziani Explains Setback In Full Report to IL Duce
- ↑ AP: "Italians Report Success In Desert" Ludington Daily News, 18 September 1940, Ludington, Michigan.
- ↑ Maletti and Captain Burroni Sigfrido were awarded posthumous Medaglia d'oro al Valore Militare medals, Italy's highest award for bravery.
- ↑ Details taken from Christie (1999) unless specified.[77]
- ↑ The Western Desert Force consisted of about 31,000 soldiers, 120 guns, 275 tanks and sixty armoured cars. The Italian 10th Army in Egypt consisted of 80,000 troops. 250 guns and 125 tanks. The 4th Indian Division was exchanged with the 6th Australian Division for the pursuit after the first part of Operation Compass.[79]
Citations
- ↑ Playfair et al. 1954, p. 266.
- ↑ Macksey 1971, p. 121.
- ↑ Macksey 1971, p. 106.
- ↑ 4.0 4.1 4.2 Hunt 1990, p. 51.
- ↑ Christie 1999, pp. 32, 48.
- ↑ Walker 2003, p. 61.
- ↑ Playfair et al. 1954, p. 262.
- ↑ Pitt 1980, p. 102.
- ↑ Playfair et al. 1954, pp. 112–113.
- ↑ Hunt 1990, p. 21.
- ↑ Gustavsson, Caruana & Slongo 2013, p. 14.
- ↑ Stockings 2009, p. 94.
- ↑ Ciano 2002, p. 375.
- ↑ Mackenzie 1951, pp. 26–27.
- ↑ Playfair et al. 1954, p. 210.
- ↑ Mackenzie 1951, p. 27.
- ↑ Wavell 1946, p. 3,261.
- ↑ Playfair et al. 1954, p. 264.
- ↑ Mead 2007, p. 331.
- ↑ Playfair et al. 1954, p. 265.
- ↑ Playfair et al. 1954, pp. 260–261.
- ↑ 22.0 22.1 22.2 Wavell 1946, p. 3,263.
- ↑ Playfair et al. 1954, pp. 263, 265.
- ↑ Macksey 1971, p. 68.
- ↑ Playfair et al. 1954, p. 281.
- ↑ Playfair et al. 1954, pp. 265–267.
- ↑ Playfair et al. 1954, pp. 267–268.
- ↑ Playfair et al. 1954, pp. 268–269.
- ↑ Playfair et al. 1954, p. 269.
- ↑ Pitt 1980, p. 114.
- ↑ Playfair et al. 1954, p. 270.
- ↑ Playfair et al. 1954, pp. 271–273.
- ↑ Bierman & Smith 2002, p. 46.
- ↑ Ganino 2006.
- ↑ Mead 2007, p. 332.
- ↑ Playfair et al. 1954, p. 273.
- ↑ Playfair et al. 1954, pp. 282–284.
- ↑ Stockings 2009, p. 316.
- ↑ Playfair et al. 1954, pp. 284–287.
- ↑ Playfair et al. 1954, pp. 292–293.
- ↑ Playfair et al. 1954, p. 293.
- ↑ Walker 2003, p. 63.
- ↑ Playfair et al. 1954, pp. 353.
- ↑ Long 1952, p. 242.
- ↑ Long 1952, pp. 242–245.
- ↑ Long 1952, pp. 245–247, 250.
- ↑ Long 1952, pp. 250–253, 255–256.
- ↑ Gustafsson 2015.
- ↑ Playfair et al. 1954, pp. 351–356.
- ↑ Playfair et al. 1954, pp. 356–362.
- ↑ 51.0 51.1 51.2 Playfair et al. 1954, p. 297.
- ↑ CCIS 1941.
- ↑ 53.0 53.1 Hixson 2003, p. 247.
- ↑ Wavell 1946, p. 3,268.
- ↑ 55.0 55.1 Latimer 2013, p. 87.
- ↑ Maresciallo Giovanni Accorsi Medaglia d'oro al valor militare
- ↑ 57.0 57.1 Churchill 2013, p. 386.
- ↑ Nijboer 2014, p. 38.
- ↑ Latimer 2002, p. 23.
- ↑ Harris 1966, p. 112.
- ↑ Smith 2008, p. 89.
- ↑ NZAB 1942, p. 22.
- ↑ Sheppard 1943, p. 18.
- ↑ Cawthorne 2003, p. ?.
- ↑ Doherty 2013, p. 37.
- ↑ Collier 2003, p. 31.
- ↑ Neillands 2005, p. 32.
- ↑ Carruthers 2012, p. 100.
- ↑ Radames 1962, p. 16.
- ↑ Collier 2003, p. ?.
- ↑ Brayley 2012, p. 10.
- ↑ Sadkovich 1991, p. 293.
- ↑ Playfair et al. 1954, pp. 321–323.
- ↑ Caruana 1998.
- ↑ Bierman & Smith 2002, p. 50.
- ↑ Playfair et al. 1954, p. 368.
- ↑ Christie 1999, pp. 65, 68–78.
- ↑ Playfair et al. 1954, pp. 265, 271.
- ↑ Christie 1999, p. 86.
References
- Books
- Bauer, Eddy (2000) [1979]. Young, Peter, ed. The History of World War II (Revised ed.). London: Orbis. ISBN 1-85605-552-3.
- Bierman, John; Smith, Colin (2002). The Battle of Alamein: Turning Point, World War II. New York: Viking. ISBN 0-670-03040-6.
- Brayley, Martin (2012). The British Army 1939–45: Middle East and Mediterranean II. Oxford: Osprey. ISBN 1-29959-566-9.
- Carruthers, B. (2012). The Afrika Korps in Combat. Hitler's war machine. Barnsley: Pen and Sword Military. ISBN 1-78159-134-2.
- Churchill, W. (2013). The Second World War. A & C Black.
- Ciano, G.; Miller, R. L. (translator) (2002) [1947]. Ciano's Diary: 1937–1943 (Phoenix ed.). London: Methuen (Diary 1937–1938: 1952) and Heinemann (Diary 1939–1943: 1947). ISBN 1-84212-476-5.
- Collier, Paul (2003). The Second World War: The Mediterranean 1940–1945 IV. Oxford: Osprey. ISBN 0-20349-860-7.
- Doherty, Richard (2013). British Armoured Divisions and their Commanders, 1939–1945. Barnsley: Pen and Sword. ISBN 1-47382-674-8.
- Gustavsson, Hëkan; Caruana, Richard; Slongo, Ludovico (2013) [2009]. Fiat CR.42 Aces of World War 2. Oxford: Osprey. ISBN 978-1-47280-192-0.
- Harris, R. W. (1966). An Historical Introduction to the Twentieth Century. London: Blandford Press. OCLC 2679614.
- Hixson, Walter L. (2003). The American Experience in World War II: The United States in the European Theater. London: Taylor & Francis. ISBN 978-0-41594-033-7.
- Hunt, Sir David (1990) [1966]. A Don at War. London: Frank Cass. ISBN 0-7146-3383-6.
- Cawthorne, G. H. (2003). Steel Fist: Tank Warfare 1939–45. London: Arcturus Publishing. ISBN 0-57202-872-5.
- Latimer, Jon (2013) [2000]. Operation Compass 1940: Wavell's Whirlwind Offensive (reprint ed.). Oxford: Osprey. ISBN 1-85532-967-0.
- Latimer, Jon (2002). Alamein. New York: Harvard University Press. ISBN 978-0-67401-016-1.
- Long, Gavin (1952). To Benghazi (PDF). Australia in the War of 1939–1945. Canberra: Australian War Memorial. OCLC 314648263. Retrieved 24 September 2009.
- Mackenzie, Compton (1951). Eastern Epic. London: Chatto & Windus. OCLC 1412578.
- Macksey, Major Kenneth (1971). Beda Fomm: The Classic Victory. Ballantine's Illustrated History of the Violent Century, Battle Books 22. New York: Ballantine Books. ISBN 0-345-02434-6.
- Mead, Richard (2007). Churchill's Lions: A Biographical Guide to the Key British Generals of World War II. Stroud (UK): Spellmount. ISBN 978-1-86227-431-0.
- Neillands, R. (2005). Eighth Army: The Triumphant Desert Army that Held the Axis at Bay from North Africa to the Alps, 1939–1945. Overlook Press. ISBN 1-58567-689-6.
- Nijboer, D. (2014). Spitfire V vs C.202 Folgore: Malta 1942. Duel (60). Oxford: Osprey. ISBN 1-78200-356-8.
- New Zealand Army Expeditionary Force (1942). Prelude to Battle: New Zealanders in the First Libyan Campaign. New Zealand Army Board. OCLC 4271736.
- Pitt, B. (1980). Wavell's Command. The Crucible of War (2001 ed.). London: Cassell. ISBN 0-304-35950-5.
- Playfair, Major-General I. S. O.; with Stitt R.N., Commander G. M. S.; Molony, Brigadier C. J. C. & Toomer, Air Vice-Marshal S. E. (1954). Butler, J. R. M., ed. The Mediterranean and Middle East: The Early Successes Against Italy (to May 1941). History of the Second World War, United Kingdom Military Series I. HMSO. ISBN 1-84574-065-3.
- Sany Lackany, Radames (1962). Sollum and Its Environments: A Historical & Geographic Monography. Lackany series. The Egyptian riviera. Alexandria: El Thager Office. OCLC 38784718.
- Sheppard, E. W. (1943). The Army from January 1941 to March 1942. Hutchinson. OCLC 20987623.
- Smith, P. C. (2008). The Great Ships: British Battleships in World War II. Mechanicsburg, PA: Stackpole Books. ISBN 0-81173-514-1.
- Stockings, Craig (2009). Bardia: Myth, Reality and the Heirs of Anzac. Sydney: UNSW Press. ISBN 978-1-92141-025-3.
- Walker, Ian W. (2003). Iron Hulls, Iron Hearts: Mussolini's Elite Armoured Divisions in North Africa. Marlborough: Crowood. ISBN 1-86126-646-4.
- Wavell, Archibald (13 June 1946). Operations in the Middle East from August, 1939 to November, 1940. Wavell's Official Despatches. published in The London Gazette: (Supplement) no. 37609. pp. 2997–3006. 13 June 1946.
- Wavell, Archibald (25 June 1946). Operations in the Middle East from 7th December, 1940 to 7th February, 1941. Wavell's Official Despatches. published in The London Gazette: (Supplement) no. 37628. pp. 3261–3269. 25 June 1946.
- Wavell, Archibald (3 July 1946). Operations in the Middle East from 7th February, 1941 to 15th July, 1941. Wavell's Official Despatches. published in The London Gazette: (Supplement) no. 37638. pp. 3423–3444. 2 July 1946.
- Journals
- Sadkovich, James. J. (1991). "Of Myths and Men: Rommel and the Italians in North Africa". The International History Review XIII (2): 284–313. doi:10.1080/07075332.1991.9640582. ISSN 0707-5332. Retrieved 1 March 2015.
- Newspapers
- Percy, H. L. (23 January 1941). "British Capture 14,000 Men, push 100 miles beyond Tobruk". The Pittsburgh Press (Pittsburgh, US). Retrieved 11 April 2015.
- Theses
- Christie, Howard R. (1999). Fallen Eagles: The Italian 10th Army in the Opening Campaign in the Western Desert, June 1940 – December 1940 (MA). Fort Leavenworth, KS: U. S. Army Command and General Staff College. OCLC 465212715. A116763. Retrieved 25 March 2015.
- Websites
- "Appendix E, H.Q. Cyrenaica Command Intelligence Summary No. 6 (23 Feb 41) WO 169/1258". The National Archives. 23 February 1941. Retrieved 15 March 2015.
- Caruana, R. J. (1998). "Picchiatelli over Malta: Italian Stukas, 1940–1942". Retrieved 10 April 2015.
- Ganino, Nazzareno (26 July 2006). "A few memories of a POW and the Empress of Canada". Retrieved 2008-01-02.
- Gustafsson, H. "Biplane Fighter Aces from the Second World War". Håkan's Aviation Page. Retrieved 4 April 2015.
Further reading
- Books
- Buckingham, William F. (2012) [2008]. Tobruk: The Great Siege, 1941–42. The History Press. ISBN 978-0-75244-501-4.
- Churchill, Winston (1949). Their Finest Hour. The Second World War II (1st ed.). Houghton Mifflin.
- Coulthard-Clark, Chris (2001). The Encyclopaedia of Australia's Battles. Crow's Nest, NSW: Allen & Unwin. ISBN 1-86508-634-7.
- Grey, Jeffrey (2008) [1990]. A Military History of Australia (3rd ed.). Cambridge University Press. ISBN 978-0-51137-806-5.
- Roy, Kaushik (2011). The Indian Army in the Two World Wars. Leiden: BRILL. ISBN 9-00421-145-4.
- Long, Gavin (1961) [1952]. "6–12". To Benghazi. Australia in the War of 1939–1945, Series One (Army) I. Canberra: Australian War Memorial. OCLC 314648263.
- Montanelli, Indro (1982). L'Italia della disfatta (in Italian). Milano: Rizzoli editore. OCLC 252028214.
- Rickard, J. N. (2010). Politics of Command: Lieutenant-General A. G. L. McNaughton and the Canadian Army, 1939–1943. Buffalo, Toronto: University of Toronto Press. ISBN 1-44264-002-2.
- Wahlert, Glenn (2010) [2006]. The Western Desert Campaign, 1940–41. Big Sky Publishing. ISBN 978-0-97576-692-7.
- Wayne, Ralph (2008). Aces, Warriors and Wingmen. Mississauga, Ont: John Wiley & Sons. ISBN 1-28320-300-6.
- Journals
- "Battle of the Marmarica". Time Magazine (23 December 1940). 23 December 1940. ISSN 0040-781X. Retrieved 17 December 2007.
- Theses
- Dando, N. (2014). The Impact of Terrain on British Operations and Doctrine in North Africa 1940–1943 (PDF) (PhD). Plymouth University. OCLC 885436735. Retrieved 25 March 2015.
- Websites
- Paterson, Ian A. "History of the British 7th Armoured Division: Beda Fomm". Archived from the original on 2007-09-29. Retrieved 2008-01-02.
External links
| Wikimedia Commons has media related to Operation Compass. |
- La battaglia della Marmarica
- A few memories of Corporal Nazzareno Ganino of the Sabratha Division
- The Italian Army in Egypt during World War II
- The Engagement at Derna, AWM
- Animated Map of Operation Compass
- Operation Compass Desert War.net