Battle off Endau
| Battle off Endau | |||||||
|---|---|---|---|---|---|---|---|
| Part of Battle of Malaya | |||||||
.jpg) HMAS Vampire, seen here before the application of wartime camouflage, saw more action during the Malayan Campaign than any other warship.[1] | |||||||
| |||||||
| Belligerents | |||||||
|
|
| ||||||
| Commanders and leaders | |||||||
|
Shintarō Hashimoto Toshio Shimazaki |
| ||||||
| Units involved | |||||||
|
|
Naval: Air: No. 36 Squadron RAF No. 62 Squadron RAF No. 100 Squadron RAF No. 1 Squadron RAAF No. 8 Squadron RAAF | ||||||
| Strength | |||||||
|
1 light cruiser 6 destroyers 5 minesweepers 2 troopships[2] | 2 destroyers | ||||||
| Casualties and losses | |||||||
|
2 troopships damaged 1 destroyer beached[3] |
1 destroyer sunk 38 killed[4] 31-57 captured[3][5] | ||||||
| ||||||
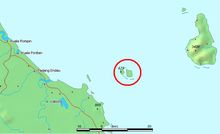
The Battle off Endau was a Second World War naval battle. It took place off Endau on 27 January 1942. Part of the Battle of Malaya, it was the first major naval engagement since the sinking of the battleship HMS Prince of Wales and the battlecruiser HMS Repulse, and the last effort by the Royal Navy to intercept Japanese convoy shipping around the Malay Peninsula.[6]
Two destroyers, HMS Thanet and HMAS Vampire were dispatched from Singapore Naval Base to break up Japanese landings on Endau.[7] Sailing under the cover of darkness, they were able to locate the convoy anchored there without being detected by land-based bombers. Despite inflicting damage, they were repulsed by the convoy's naval escorts, and HMS Thanet was sunk.
The Royal Air Force also failed to inflict significant damage, losing half of their total strength attacking the beachhead on 26 January,[5][6] while the Japanese lost only 9 aircraft.[8]
Background
The sinking of Prince of Wales and Repulse left the task of intercepting Japanese convoys in the Gulf of Siam to only seven submarines of the Royal Netherlands Navy,[9] with another three participating in the defence of Borneo.[10] Royal Navy ships were absent as most were escorting Allied convoys to and from Ceylon and the Dutch East Indies.[6] The Dutch recorded their first success when the troopship Awazisan Maru was sunk off Kota Bharu on 12 December 1941, probably by the HNLMS K XII.[11] On 24 December 1941, the HNLMS K XVI sank the destroyer Sagiri off the coast of Kuching, Borneo, the first Japanese warship to be sunk by torpedo.[12] Several other vessels were also damaged or sunk during the early weeks, but the cost was high for the Dutch submarines and it had little success.[13]
One American submarine, USS Seadragon, also intercepted Japanese convoys near Cam Ranh Bay, Indochina, but failed to sink any ships.[14] It was not until the Japanese landed troops on Endau that the Royal Navy was ordered to commit their vessels into action, albeit only two of them. By this time, the remaining Dutch submarines had been recalled for the Dutch East Indies campaign.[15]
Endau
On 20 January 1942, a Japanese convoy of 11 troopships departed Cam Ranh Bay, Indochina, to unload ground forces at Singora, of which two would proceed to Endau. The two transports, Kansai Maru and Kanbera Maru, were carrying troops of the 18th Division.[16] Personnel from the 96th Airfield Battalion were also on board, assigned with bringing the airfields of Kahang and Kluang into operation.[17] They were escorted by Destroyer Squadron 3, which consisted of the light cruiser Sendai, six Fubuki-class destroyers (Fubuki,[18] Hatsuyuki, Shirayuki,[19] Asagiri,[20] Amagiri & Yugiri[21]) and five minesweepers.[2]
An invasion of Mersing by beach landings was originally planned by the Japanese, but believing that the Allied defences there were formidable, they decided to land troops on Endau instead. Although ground forces captured Endau on 21 January, their strength was insufficient to break through the Allied Sungei-Mersing defence.[6][22] The Allied force defending the east coast of Johore was codenamed Eastforce, commanded by Brigadier Harold Taylor.[16]
Air attacks
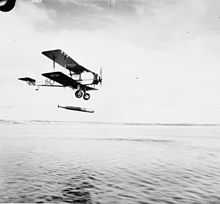
Malaya Command was aware that the Japanese force would soon be reinforced by naval convoy,[22] a suspicion confirmed on 26 January when two Royal Australian Air Force (RAAF) Lockheed Hudson aircraft sighted them 20 miles north of Endau.[6] Although they spotted the Japanese convoy at 0745, their radio transmissions were jammed, and news did not reach higher command until they landed in Singapore at 0920.[25] The RAF decided to attack the convoy with all available aircraft. Launching of any attack was delayed, however, as the Vickers Vildebeest and Fairey Albacore torpedo bombers of 36 Squadron and 100 Squadron RAF had been carrying out raids against targets on land, meaning that an attack could not be launched until that afternoon.[26] The decision to use the elderly Vildebeest biplanes against the ships in daylight came as a shock to the pilots,[24] who had been restricted to the relative safety of night sorties following the first day of the invasion.[24][27]
The first air attack was carried out by the Vildebeests of 36 and 100 Squadrons and the Hudsons of 1 Squadron and 8 Squadron RAAF.[17][22][26] Twelve Vildebeests (three from 36 Squadron), together with nine Lockheed Hudson bombers took off from Singapore in the early afternoon of January 26, with a fighter escort composed of twelve Brewster F2A Buffalos and nine Hawker Hurricanes.[28] Japanese landings on Endau had been in progress for over four hours by the time the planes arrived at 1500.[24] The Japanese naval force had air cover consisting of 19 Nakajima Ki-27s fighters and a single Nakajima Ki-44.[29] Despite heavy opposition, the two transports were bombed, and men and equipment on the beach were strafed.[30] Five Vildebeests were lost in the attack, including the commanding officer of 100 Squadron,[31] while one Ki-27 was shot down.[32]
A second wave set off from Singapore at 1615, consisting of seven Vildebeests and three Albacores of 36 Squadron and two Vildebeests of 100 Squadron. They arrived over Endau at 1730, but their escort of seven Hurricanes and four Buffalos were late and the British biplanes were set upon by the Japanese fighters before their escorts could reach them. Five Vildebeests, two Albacores and one Hurricane were lost from this wave.[33] Of the 72 aircrew from 36 and 100 Squadrons who participated in both raids, 27 were killed, seven were wounded and two were captured.[34] The returning pilots were congratulated by Air Vice-Marshal Paul Maltby, who promised them that further daylight attacks were unnecessary.[16][34]
A third raid, consisting of six unescorted Hudsons of 62 Squadron RAF, flying from Palembang, Sumatra, attacked shortly afterwards, losing two of their number to Japanese fighters.[35] A fourth raid, five Bristol Blenheims of 27 Squadron RAF set off from Palembang later in the day, but had only got as far as Singapore by sunset, so aborted the mission.[36]
Royal Navy
The Royal Navy received reports that an unescorted convoy was anchored on Endau.[37] HMAS Vampire and HMS Thanet were tasked with intercepting the convoy and breaking up the landings. Thanet was under the command of Lt Cdr Bernard Davies,[38] while Vampire was under Lt Cdr William Moran.[39] The destroyers departed Singapore Naval Base at 1630 and headed north for Seribuat Archipelago where there had been reports of another anchored Japanese convoy. Arriving at Seribuat at 0200 the next morning but encountering no Japanese vessels there, the destroyers headed for Endau.[3]
Japanese naval intelligence incorrectly reported Vampire and Thanet as cruisers, further exaggerating that there were British submarines in the area.[5] As a result, Destroyer Squadron 3 was recalled to intercept them; their original task was to escort convoys to Borneo, and were not covering the landings on Endau.[5]
Battle
While approaching Endau, Vampire and Thanet engaged what they believe was a destroyer at 0237, which was actually Japanese minesweeper W-4.[40][41] Vampire turned to port and launched two torpedoes at the minesweeper from about 600 metres but missed.[2] The Allied destroyers were able to elude the minesweeper due to poor visibility, and resumed their search for the transports. They altered course to southeast by east at 0313.[2] By then the Japanese minesweeper had alerted the convoy.[39]
At 0318, Vampire sighted the destroyer Shirayuki off the port bow.[2] Commander Moran ordered Thanet to alter course and fire her torpedoes.[2] Vampire launched her last torpedo and Thanet all four but none were successful.[14][40] Shortly thereafter, the cruiser Sendai, the destroyers Asagiri, Fubuki, Yugiri and minesweeper W-1 joined the firefight.[2] Both Allied destroyers opened fire with their 4-inch naval guns, retiring southeast at maximum speed.[14] The Japanese warships pursued them for some 40 minutes.[2]
Thanet was hit in the engine and boiler rooms at 0400.[42] Her speed was greatly reduced and an explosion wrecked the destroyer. Dead in the water, Thanet listed heavily to starboard and began to sink.[39] The Vampire laid a smokescreen in an effort to cover the sinking ship, but was illuminated by searchlights from Shirayuki and continuously attacked by Amagiri and Hatsuyuki.[5] HMS Thanet sank at 0415. The Vampire, still under attack and unable to pick up survivors, narrowly escaped undamaged and without casualties,[1] reaching Singapore Naval Base at 1000 that morning.[2]
Aftermath
Both troop transports, the Kansai Maru and Kanbera Maru were heavily damaged in the engagement, while one destroyer was reported beached.[3] Thirty-one survivors from HMS Thanet were picked up by the destroyer Shirayuki, of which 30 were handed over to Imperial Japanese Army troops on Endau the following day.[2] They were never seen again,[14] but are believed to have been executed in retaliation for losses sustained by the Japanese in an ambush by the Australian 2/18 Battalion, which occurred south of Mersing about the same time as the naval action off Endau.[2] Some 65 other survivors from Thanet managed to reach shore, out of an estimated 100-110.[2] Joined by downed Commonwealth pilots, they made their way to Singapore.[3]
Despite Japanese troops being reinforced by the convoy, Brigadier Taylor had been given orders from Lieutenant General Lewis Heath to withdraw Eastforce from Mersing on 25 January.[16] Johore was abandoned five days after the attacks on Endau.[2]
See also
References
- ↑ 1.0 1.1 Invasion of Malaya, ww2australia.gov.au
- ↑ 2.0 2.1 2.2 2.3 2.4 2.5 2.6 2.7 2.8 2.9 2.10 2.11 2.12 Action off Endau, Naval Historical Society of Australia, Mar 2006, retrieved 12 Nov 2013
- ↑ 3.0 3.1 3.2 3.3 3.4 F.HMS THANET, National Ex-Services Association, retrieved 2010-01-15
- ↑ HMS Thanet crew members list, forcez-survivors.org.uk, archived from the original on 19 January 2010, retrieved 2010-01-15
- ↑ 5.0 5.1 5.2 5.3 5.4 Paul S. Dull (2007), page 41
- ↑ 6.0 6.1 6.2 6.3 6.4 Paul S. Dull (2007), page 40
- ↑ H . M . S . T H A N E T ( D 2 9 ), Naval-History.net, archived from the original on 5 January 2010, retrieved 2010-01-16
- ↑ Malaya and Singapore 1939 to 1942, 100 Squadron Association - Royal Air Force, retrieved 26 Apr 2012
- ↑ Dutch Submarines: The submarine K XVI, Dutch Submarines, retrieved 24 Dec 2013
- ↑ Dutch Submarines: The submarine KXII, Dutch Submarines, archived from the original on 16 December 2010, retrieved 4 Jan 2011
- ↑ Roscoe 1949, p. 45. "And an unidentified Netherlands submarine sank the first Japanese warship to go down from torpedo fire in World War II (the destroyer Sagiri, sunk off Kuching, Borneo, on December 26, 1941)."
- ↑ Dutch submarines in Australian waters, Australian War Memorial, retrieved 2010-01-15
- ↑ 14.0 14.1 14.2 14.3 HIJMS SENDAI: Tabular Record of Movement, retrieved 2010-01-15
- ↑ Dutch Submarines: The submarine K XI, retrieved 2010-01-15
- ↑ 16.0 16.1 16.2 16.3 Britain's Greatest Defeat: Singapore 1942, Alan Warren, retrieved 2010-01-16
- ↑ 17.0 17.1 27 January 1942, The Second World War - A Day by Day Account, retrieved 2010-01-16
- ↑ IJN Fubuki: Tabular Record of Movement, retrieved 2010-01-15
- ↑ IJN Shirayuki: Tabular Record of Movement, retrieved 15 Dec 2013
- ↑ IJN Asagiri: Tabular Record of Movement, retrieved 2010-01-15
- ↑ IJN Yugiri: Tabular Record of Movement, retrieved 2010-01-15
- ↑ "As Air Headquarters Singapore believed that the Japanese convoy was nearing shallow water, the Vildebeestes were armed with bombs instead of torpedoes." Alan Warren, page 188
- ↑ 24.0 24.1 24.2 24.3 Warren 2007, p. 188.
- ↑ Shores, Cull and Izawa 1993, p. 18.
- ↑ 26.0 26.1 Shores, Cull and Izawa 1993, p. 19.
- ↑ Shores, Cull and Izawa 1992, pp. 83–84.
- ↑ Shores, Cull and Izawa 1993, pp. 19–20.
- ↑ Shores, Cull and Izawa 1993, p. 20.
- ↑ Dull 2007, pp. 40–41.
- ↑ "The Vildebeeste of No. 100 Squadron's Squadron Leader I.T.B. Rowlands exploded after probably receiving a direct hit from an anti-aircraft shell." Alan Warren, page 188
- ↑ Shores, Cull and Izawa 1993, pp. 22–29.
- ↑ Shores, Cull and Izawa 1993, pp. 29–37.
- ↑ 34.0 34.1 Alan Warren, page 189
- ↑ Shores, Cull and Izawa 1993, pp. 37–38.
- ↑ Shores, Cull and Izawa 1993, p. 38.
- ↑ Cassells, The Destroyers, p. 144
- ↑ Bernard Sydney Davies, RN, retrieved 2010-01-15
- ↑ 39.0 39.1 39.2 Hackett, Bob; Cundall, Peter (2009). "IJN Minesweeper W-1: Tabular Record of Movement". Combinedfleet.com. Archived from the original on 5 June 2011. Retrieved 29 May 2011.
- ↑ 40.0 40.1 Gill 1957, p. 559.
- ↑ Hackett, Bob; Cundall, Peter (2009). "IJN Minesweeper W-4: Tabular Record of Movement". combinedfleet.com. Retrieved 29 May 2011.
- ↑ Brown. Warship Losses of World War Two
Bibliography
- Dull, Paul S (2007). A battle history of the Imperial Japanese Navy, 1941-1945. Annapolis, Maryland, USA: Naval Institute Press. ISBN 1-59114-219-9.
- Gill, G. Hermon (1957). "Chapter 15: ABDA and ANZAC". Australia in the War of 1939–1945: Series Two Navy: Volume I: The Royal Australian Navy, 1939–1942. Canberra, Australia: Australian War Memorial. pp. 513–572.
- Shores, Christopher; Cull, Brian; Izawa, Yasuho (1992). Bloody Shambles: Volume One: The Drift to War to the Fall of Singapore. London: Grub Street. ISBN 0-948817-50-X.
- Shores, Christopher; Cull, Brian; Izawa, Yasuho (1993). Bloody Shambles: Volume Two: The Defence of Sumatra to the Fall of Burma. London: Grub Street. ISBN 0-948817-67-4.
- Warren, Alan (2007). Britain's Greatest Defeat: Singapore 1942. London: Continuum International Publishing Group. ISBN 1-85285-597-5.
- Roscoe, Theodore (1949). United States submarine operations in World War II. Naval Institute Press. ISBN 0-87021-731-3.