Battle of Mount Tumbledown
| Battle of Mount Tumbledown | |||||||
|---|---|---|---|---|---|---|---|
| Part of Falklands War | |||||||
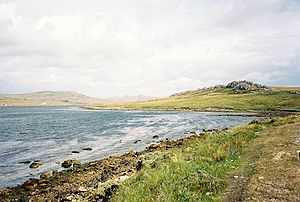 Mount Tumbledown, Two Sisters, and Wireless Ridge from Stanley Harbour | |||||||
| |||||||
| Belligerents | |||||||
|
|
| ||||||
| Commanders and leaders | |||||||
| Commander Carlos Robacio | Lt. Col. Michael Scott | ||||||
| Strength | |||||||
| 700 Argentine Marines + 200 infantrymen from Argentine Army | 641 Troops | ||||||
| Casualties and losses | |||||||
|
30 killed[1] 100 wounded[2] 30 captured[3] |
10 killed[4] 53 wounded[5] | ||||||
| The British capture of heights above Stanley leads to the surrender of the town shortly afterwards. | |||||||
The Battle of Mount Tumbledown was an engagement in the Falklands War, one of a series of battles that took place during the British advance towards Stanley.
Overview
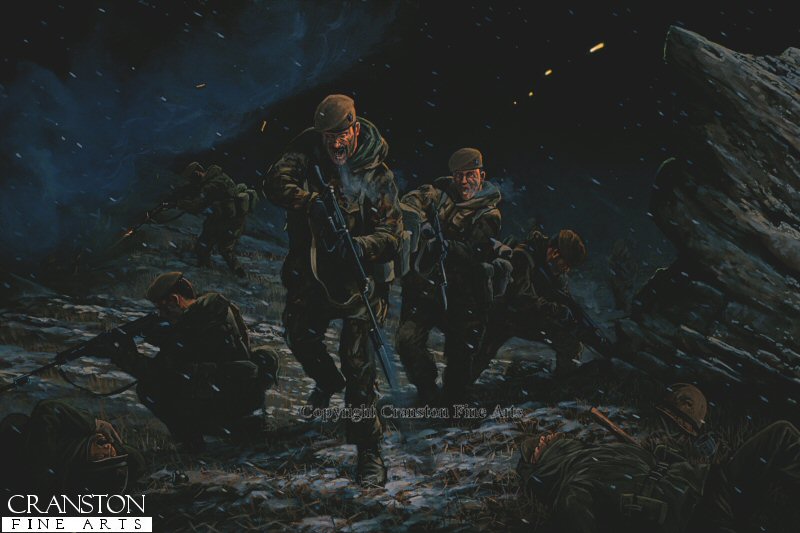
On the night of 13 June – 14 June 1982, the British launched an assault on Mount Tumbledown, one of the highest points near the town of Port Stanley, the capital and succeeded in driving Argentinian forces from the mountain. This close-quarters night battle was later dramatized in the BBC film Tumbledown.
The attacking British forces consisted of the 2nd Battalion, Scots Guards (2SG), mortar detachments from 42 Commando, Royal Marines and the 1st Battalion, 7th Duke of Edinburgh's Own Gurkha Rifles, (1/7 GR) as well as support from a troop of the Blues and Royals equipped with two Scorpion and two Scimitar armoured vehicles. The Argentinian forces defending the mountains were Commander Carlos Robacio's 5th Marine Infantry Battalion (BIM 5). The defending Argentines were already proving costly in lives. In the shelling that was directed by Sub-Lieutenant Marcelo de Marco of the 5th Marines from his observation post on Tumbledown Mountain, four Paras and one REME craftsman were killed on Mount Longdon and another seven Paratroopers were wounded and a Welsh Guardsman was killed while riding a motorbike in the Fitzroy-Stanley track.
Prior to the British landings, the Argentinian marine battalion had been brought up to brigade strength by a company of the Amphibious Engineers Company (CKIA), a heavy machine-gun company of the Headquarters Battalion (BICO), a battery of the 1st Marine Field Artillery Battalion (BIAC), and three Tigercat SAM batteries of the 1st Marine Anti-Aircraft Regiment, as well as a 2nd Marine Infantry Battalion platoon and a 3rd Marine Infantry Battalion platoon.
As part of the British plan, 1/7 GR was given the task of capturing the sub-hill of Mount William held by O Company, the 5th Marine Battalion's reserve, and then allowing the Welsh Guards through to seize Sapper Hill, the final obstacle before Stanley. The attack was supported by naval gunfire from HMS Active's 4.5 inch gun.
At the time of the battle, Ship-of-the-Line Lieutenant Eduardo Villarraza's N Company held Mount Tumbledown. Mount William was just south of Tumbledown and the Marine battalion's O Company under Ship-of-the-Line Lieutenant Ricardo Quiroga was on its lower slopes. Major Oscar Ramon Jaimet's B Company, 6th Regiment was in reserve behind N Company. Ship-of-the-Line Lieutenant Rodolfo Oscar Cionchi's M Company occupied Sapper Hill. The Argentinian defenders held firm under the British 'softening up' bombardment, which began at 7:30 local time. Major Jaimet later recalled:
I heard the cries of the wounded calling for their comrades, twelve men wounded before nightfall. We thought we had suffered before, but what luxury and comfort compared to this.[6]
During the battle, the 5th Marines Command Post took five direct hits, but Commander Robacio emerged unscathed.[7]
Early moves
On the morning of 13 June, the Scots Guards were moved by helicopter from their position at Bluff Cove to an assembly area near Goat Ridge, west of Mount Tumbledown. During this day, a dispatch rider from the 1st Welsh Guards Battalion was mortally wounded by Argentine shellfire directed from Tumbledown. The British plan called for a diversionary attack south of Mount Tumbledown by a small number of the Scots Guards, assisted by the four light tanks of the Blues and Royals, whilst the main attack came as a three-phase silent advance from the west of Mount Tumbledown.
In the first phase, G company would take the western end of the mountain. In the second phase, Left Flank (company) would pass through the area taken by G company to capture the centre of the summit. In the third phase, Right Flank would pass through Left Flank to secure the eastern end of Tumbledown.
A daytime assault was initially planned, but was postponed at the British battalion commander's request. In a meeting with his company commanders the consensus was that the long uphill assault across the harsh ground of Tumbledown would be suicidal in daylight.
Diversion
At 8:30 p.m. on 13 June the diversionary attack began. The 2nd Bn Scots Guards' Reconnaissance Platoon, commanded by Major Richard Bethell (a former SAS officer), and supported by four light tanks of the Blues and Royals, clashed with an Argentinian marine company in a delay position on the lower slopes of Mount William. On Mount William's southern slopes, one of the tanks was taken out of action by a booby trap.
The initial advance was unopposed, but a heavy firefight broke out when British troops made contact with Argentinian defences. The Argentinians opened fire, killing two British soldiers and wounding four others. After two hours of hard fighting, the company withdrew to its main defences and the British secured the position. Marine First Class Private José Luis Fazio fought against Bethell's force:
At about 2230 hours our battalion had its first intensive gun battle with British companies which appeared out of nowhere. I heard Private Roberto Barboza yell 'The English are here!' ... I remember our Operations Officer requested the artillery to assist at 23.00 with star shells. The close quarter battle was such that the Argentine artillery was unable to drop shells on to the British attackers. I was shooting, doing my work. I don't know if I killed anyone. We just fired our rifles, that's all. Contact was maintained for over an hour before battalion headquarters ordered Obra Company to fall back ... What we did not realise at the time was that at least a wounded Marine made his way to the amphibious engineer platoon position and hurled a grenade wounding a Major. Simultaneously the Major opened fire, killing him.[8]
Fearing a counter-attack, the British platoon withdrew into an undetected minefield, and were forced to abandon their dead.[9] Two men were wounded covering the withdrawal and four more were wounded by mines. The explosions prompted the Argentine Marine Major Antonio Pernías to order the 81 mm mortar platoon on Mount William and the longer-ranged 120mm mortars attached to 'C' Company, 3rd Infantry Regiment on Sapper Hill to open fire on the minefield and the likely withdrawal route of anyone attacking Mount William.[10] The barrage lasted for about forty minutes and more British casualties would have been inflicted if the mortar bombs had not landed on soft peat, which absorbed most of the power of the explosions.
Night attack

At 9 p.m., half an hour after the start of the diversionary attack, Major Iain Dalzel-Job's G Company started its advance of nearly two miles. Reaching its objective undetected, the company found the western end of the mountain undefended and occupied it easily, but later came under heavy shellfire that wounded Major Dalzel-Job in the head.[11] Major John Kiszely's Left Flank passed through them and reached the central region of the peak unopposed, but then came under heavy fire.[12]
The Argentinians, later learned to be of company strength, directed mortar, grenade, machine gun and small arms fire from very close range at the British company, killing three British soldiers. Marine Sub-Lieutenant Héctor Mino's 5th Platoon, Amphibious Engineer Company, held the rocks to the right of Marine Sub-Lieutenant Carlos Vázquez's 4th Platoon, 5th Marines. In the centre and to the left of the 4th Platoon were Second Lieutenant Óscar Silva's RI 4 platoon and Second Lieutenant Celestino Mosteirín's RI 12 platoon, which had recently fought on Goat Ridge and Mount Harriet.
For four or five hours, three platoons of Argentinian riflemen, machine gunners, and mortar men pinned the British down. To help identify the bunkers, the Guardsmen fired flares at the summit. The Guardsmen traded 66 mm rockets and 84 mm anti-tank rounds with the Argentinians, who were protected in their rock bunkers. The Argentinians refused to budge; the Guardsmen could hear some of the them shouting obscene phrases in English and even singing as they fought.[12]
Meanwhile, two Royal Navy frigates, HMS Yarmouth and Active, were pounding Tumbledown with their 4.5 inch guns. At one stage Lieutenant Colonel Michael Scott, (Commanding Officer of 2 SG), thought the battalion might have to withdraw and attack again the next night, The old nails were being bitten a bit, if we had been held on Tumbledown it might have encouraged them to keep on fighting.[12]
Left flank
The fighting was hard going for Left Flank. The Argentinians had well dug-in machine guns and snipers. At 2:30 a.m., however, a second British assault overwhelmed the men of Miño, Silva and Mosteirin but the bulk of Vazquez's platoon would continue fighting till about 7:00 am. The British troops swarmed over the mountaintop and killed or wounded Silva's men, at times fighting with fixed bayonets. Marine Private Jorge Sanchez recalled:
The fighting was sporadic, but at times fierce, as we tried to maintain our position. By this time we had ten or twelve dead including one officer [Second Lieutenant Oscar Silva, Argentine Army]. I hadn't fired directly at a British soldier, as they had been too hard to get a clear shot at. I can remember lying there with all this firing going over my head. They were everywhere. The platoon commander [Marine Sub-Lieutenant Carlos Daniel Vazquez] then called Private Ramon Rotela manning the 60 millimetre mortar and Rotela fired it straight up into the air so that the bombs landed on ourselves. At this point I had been up and in actual combat for over six hours. It was snowing and we were tired. Some of the guys had surrendered, but I didn't want to do this. I had only twenty rounds left and I decided to continue the fight from Mount William. I popped up, fired a rifle grenade in the direction of 8 to 10 British soldiers to keep their heads down, and then ran for the 2nd Platoon. I can remember saying some type of prayer hoping the British wouldn't shoot me in the back.[13]
Major Kiszely, who was to become a senior general after the war, was the first man into the Argentine position, personally shooting two Argentinian conscripts and bayoneting a third, his bayonet breaking in two. Seeing their company commander among the Argentinians inspired 14 and 15 Platoons to make the final dash across open ground to get within bayoneting distance of the remaining marines. Kiszely and six other Guardsmen suddenly found themselves standing on top of the mountain, looking down on Stanley which was under street lighting and vehicles could be seen moving along the roads. The Argentinians, in the form of Second Lieutenant Augusto La Madrid platoon from Major Jaimet's B Company and Marine Sub-Lieutenant Hector Miño's amphibious engineer platoon (rallied by First Lieutenant Waldemar Aquino and Sub-Lieutenant de Marco), now counter-attacked and a burst of machine gun fire from either the army or marine platoon injured three British men, including Lieutenant Alasdair Mitchell, commander of 15 Platoon. A bullet passed through the compass secured on Kiszely's belt. For his bayonet charge Major Kiszely was awarded the Military Cross.
Morning
By 6 a.m., Left Flank's attack had clearly stalled and had cost the British company seven men killed and 18 wounded. On the eastern half of the mountain the platoons of conscripts of La Madrid and Miño platoon, were still holding out, so Colonel Scott ordered Right Flank to push on to clear the final positions. Second Lieutenant La Madrid later described the fighting:
I went forward to make a reconnaissance and could see that the British had two machineguns and a missile launcher in action. I went through another gap in the rocks and was surprised by three men speaking in English behind and above me and firing over the top of me. I could see them with my night binoculars ... I took a rifle grenade and fired at where I had seen the first three men. I heard it explode and some shouts and cries of pain ... I ran back to my position and ordered my men to open fire. We stopped them, but they thinned out and came round our flanks ... They also engaged us with light mortars and missile launchers. This went on for a long time, and we suffered heavy casualties ... We started to run short of ammunition ... Also, I could see that we were outflanked, with the British behind us, so we were cut off from my company ... I reorganized and found that I was down to sixteen men. I started to retire ... I left six men in a line with one machinegun to cover our retreat, but really we were fighting all the time; we could not break contact. They came on us fast, and we fell back ... We eventually got through to Stanley, through what I would like to say was a perfect barrage fired by the Royal Artillery. We had to wait for breaks in the firing, but I still lost a man killed there.[14]
Major Simon Price sent 2 and 3 Platoons forward, preceded by a barrage of 66 mm rockets to clear the Argentine reinforcements. Major Price placed 1 Platoon high up in the rocks to provide fire support for the assault troops.
Lieutenant Robert Lawrence led 3 Platoon around to the right of the Argentinian platoons, hoping to take the Argentinians by surprise. They were detected, however, and the British were briefly pinned down by gunfire before a bayonet charge overwhelmed the Argentinian defenders. Lance-Corporal Graham Rennie of 3 Platoon later described the British attack:
Our assault was initiated by a Guardsman killing a sniper, which was followed by a volley of 66 mm anti-tank rounds. We ran forward in extended line, machine-gunners and riflemen firing from the hip to keep the enemy heads down, enabling us to cover the open ground in the shortest possible time. Halfway across the open ground 2 Platoon went to ground to give covering fire support, enabling us to gain a foothold on the enemy position. From then on we fought from crag to crag, rock to rock, taking out pockets of enemy and lone riflemen, all of whom resisted fiercely.[15]
As La Madrid withdrew after suffering reportedly five killed in the Argentine counterattack,[16] the platoons under Second Lieutenant Aldo Franco and Guillermo Robredo moved in from the eastern edge of the mountain to try to help La Madrid and Miño. Advancing out of the central region of Tumbledown Mountain, the British again came under heavy fire from the Argentinians, but by advancing in pairs under covering fire, they succeeded in clearing those RI 6 Company platoons as well, gaining firm control of the mountain's eastern side.[17]
Right Flank had achieved this at the cost of five wounded, including Lt. Lawrence. In his moment of victory on the eastern slopes, Lawrence was almost killed when a bullet fired by an Argentine sniper tore off the side of his head. He was awarded the Military Cross for bravery, but he spent a year in a wheelchair and was almost totally paralyzed. The Argentinian sniper (in fact Private Luis Jorge Bordón or Walter Ignacio Becerra, according to La Madrid[18]), armed with a FAL rifle, had helped cover the Argentinean retreat, firing shots at a Scout helicopter evacuating wounded off Tumbledown and injuring two men (including Guardsman Kenny Mains), before the Scots Guards mortally wounded him in a hail of gunfire.[17]
Aftermath
By 9:00 a.m., the Scots Guards had gained the high ground east of Tumbledown Mountain and the Gurkhas commenced deploying across the heavily shelled saddle from Tumbledown south to Mount William, which they took with the loss of 13 wounded. The 2nd Battalion Scots Guards had lost eight dead and 43 wounded. The Welsh Guards had lost one dead, the Royal Engineers had also lost one dead, and the Gurkhas had sustained altogether 13 wounded, including the artillery observation officer, Captain Keith Swinton. According to Dhanbahadur Rai, a Gurkha:
The Scots Guards were to attack Tumbledown, with the Gurkhas following behind. We were supposed to finish the attack and they would give us covering fire from Tumbledown ... During the night we followed the Scots Guards and then our CO told us to stop. The ground was like a valley when we stopped and afterwards the shelling started ... The headquarters and A Company had twelve wounded ... The next morning we started to move. The CO sahib and the anti-tank Milan Platoon commander and the FOO were just going up and they got a rifle shot. Our commanding sahib was shouting. He said, 'Look, Goli Ayo!' 'Get down! Someone fired!' Then the FOO was standing and looking and the second shot hit him in the chest.[19]
The Guards took 30 prisoners, several of them RI 6 soldiers. The bodies of 30 Argentine Army and Marine soldiers were found over the 5th Marine Battalion perimeter.
Unwilling to abandon the hill, Commander Carlos Robacio on Sapper Hill was planning to counter-attack and drive back the Guardsmen. Only the personal intervention of Colonel Félix Aguiar, the 10th Brigade Chief of Staff, brought the fighting to an end.[20] The 5th Marines worked their way back into Stanley, leaving the 2nd Platoon of Sub-Lieutenant Marcelo Davis and 3rd Platoon of Sub-Lieutenant Alejandro Koch of M Company to cover the retreat.
At the foot of the hill there was an enormous minefield. A group of Sappers went ahead to clear a path through the mines, but when the Welsh Guardsmen advanced they found Sapper Hill abandoned. The delay caused by the mines probably saved many lives.[21] The Argentine Marine companies had been deeply entrenched and were well equipped with heavy machine guns. To Guardsman Tracy Evens, the Sapper Hill positions looked impregnable:
We were led to an area that the company would rest at for the night, I still took in the fact the Argies had prepared Sapper Hill well, they had depth positions that would have made the task of taking it very hard.[22]
During the battle, Guardsman Philip Williams was knocked unconscious by an explosion, and left for dead. When he came to, the rest of the British soldiers had gone. Williams' parents were informed of his "death" and a memorial service held for him. After seven weeks he found his way back to civilization, to find himself accused of desertion by the media and fellow soldiers.[23] As the Guardsmen and Gurkhas consolidated their positions, the British lost a Volvo BV-202 tracked vehicle to a mine planted in the Tumbledown sector. "We ran over a mine. I went up through the roof and the vehicle went up and was turned right round by the explosion," recalled Major Brian Armitage.[24]
For the courage displayed in the attack, men from 2 SG were awarded one Distinguished Service Order, two Military Crosses, two Distinguished Conduct Medals (one posthumously) and two Military Medals. Men from 9 Para Squadron, Royal Engineers, were awarded two Military Medals and Captain Sam Drennan, the Army Air Corps Scout pilot who had picked up the injured soldiers under fire and a former Scots Guards NCO, received the Distinguished Flying Cross.
Carlos Robacio, BIM5 commander, was awarded the Argentine Nation to the Valour in Combat Medal and the battalion itself was decorated by the Argentine Congress in 2002 [25]
Due to his actions on both Two Sisters and Tumbledown, Private Oscar Ismael Poltronieri of La Madrid's platoon was awarded the Argentine Nation to the Heroic Valour in Combat Cross, Argentina's highest military decoration. He is the only conscript soldier in his nation's recent history who has received this honour.[26]
After the battle, Pipe Major James Riddell of 2 SG stood near the top of the mountain and played his bagpipes. He played a quick march he had composed "on the back of a fag packet" [cigarette pack],[27] during the battle, following a long tradition in which Pipe Majors were encouraged "to write tunes to commemorate any actions in which their regiments have been engaged".[28][29] He named the tune The Crags of Tumbledown Mountain. It was released as a single by the Pipes and Drums of 2SG a year later.[28]
Order of Battle
2nd Scots Guards
Battalion HQ
CO: Lieutenant Colonel Mike Scott
2iC: Major Mackay Dick
Chief of staff: Captain Bullough
Jefe de Operaciones: Captain Spicer
Jefe de Inteligencia: Captain Foster
Oficial de Señales de Regimiento: Captain Ellis
Anti-tank commander: Captain Campbell-Lamberton
Mortar commander: Captain Farrely
Adjudant del Jefe de Inteligencia: Lieutenant Bruce
Medical officer: Lieutenant Colonel Warsap
Adjudant del Jefe de Sanidad: Major Millar
Contador: Captain O´Keefe
Artillery commander: Major Gwyn
Commander forward observers: Captain Nicol
Adjudant to commander forward observers:Lieutenant Miller
Right Flank
Company HQ
Major Price
Captain Bryden
CSM Amos
CQMS Allender
Sgt Middlemass
Sgt Cakes
LSgt Baxter
LSgt Roy
LSgt Whittall
LSgt Wilson
LCpl Cocks
LCpl Collins
LCpl Fleck
LCpl Morling
LSgt Rogers
LCpl Skates
Pte Bottoms
Gdsm Gibb
Gdsm Hardstaff
Gdsm McKay
Gdsm Talman
1st Platoon
Second Lieutenant Dalrymple
Sgt Crawford
LSgt McGeorge
Lsgt Waterhouse
LCpl Campbell
LCpl Gray
LCpl Mathieson
LCpl McIntosh
LCpl Wright
Ppr Aitchison
Gdsm Alexander
Gdsm Bell
Gdsm Brand
Gdsm Broadfoot
Gdsm Cahillane
Gdsm Charlton
Gdsm Conn
Gdsm Coyle
Gdsm Craigen
Gdsm Dryburgh
Gdsm Good
Gdsm Graham
Gdsm Graham
Gdsm Greenshields
Gdsm Hall
Gdsm Hamilton
Gdsm Lawson
Gdsm Morrison
Gdsm O´Hara
2nd Platoon
Second Lieutenant Mathewson
Sgt Robertson
LSgt Bradley
LSgt Hatton
LCpl Bainbridge
LCpl Bathke
LCpl Brown
LCpl McKinna
LCpl Richardson
LCpl Sinclair
Gdsm Aitchison
Gdsm Cahillane
Gdsm Cameron
Gdsm Deeley
Gdsm Duff
Gdsm Fox
Gdsm Graham
Gdsm Heenan
Gdsm Innes
Gdsm Jacobs
Gdsm Jeffrey
Gdsm Kelly
Gdsm Loggie
Gdsm Louden
Gdsm McGuiness
Gdsm Smith
3rd Platoon
Lieutenant Lawrence
Sgt Jackson
LSgt Greig
LSgt Marsden
LSgt McDemid
LCpl Reekie
LCpl Rennie
LCpl Simpson
Gdsm Backhouse
Gdsm Brand
Gdsm Clarck
Gdsm Clough
Ppr Ellwood
Gdsm Gibson
Gdsm Gilfillan
Gdsm Gilmour
Gdsm Harkness
Gdsm Hill
Gdsm McEntaggart
Gdsm McMaster
Gdsm Morton
Gdsm O'Reilly
Gdsm Pengelly
Gdsm Purdie
Gdsm Reading
Gdsm Sutherland
Gdsm Taylor
Gdsm Walkingshaw
Machine Guns Platoon
Comando de Sección
Captain Campbell-Lamerton
CSgt Shand
Gdsm Dukes
Ppr McDonald
Gdsm McDowall
Group 1
Sgt Marr
LCpl McCabe
LCpl Urquhart
Gdsm Cameron
Gdsm Crawford
Gdsm Kluzniak
Gdsm McKay
Gdsm Miller
Gdsm Saunders
Group 2
Sgt Oldham
LSgt Walker
LCpl Allen
LCpl McChesney
Gdsm Barret
Gdsm Fagan
Gdsm Lugton
Gdsm Martin
Gdsm Marshall
Gdsm Paton
Group 3
Sgt Tasker
LCpl Blair
LCpl Winfield
Gdsm Cartmell
Gdsm Cheape
Gdsm Jackson
Gdsm McConnachie
Gdsm Mutch
Left Flank
Company HQ
Major Kiszely
Captain Grimston
CSM Nicol
CQMS Hill
Sergeant Matthew
Sergeant Taylor
LSgt Simpson
Lance corporal Galloway
Lance corporal MacColl
Lance corporal Murley
Lance corporal Thomson
Gdsm Archibald
Gdsm Graham
Soldado Martin
Gdsm Martin
Gdsm McRobb
Gdsm Porter
Private Queen
Ppr Rodger
Ppr Spencer
Gnr. Bailey. L/Bdr Frape.
13th Platoon
Second Lieutenant Stuart
Sgt Simeon
LSg Davidson
LSgt McGuinness
LCpl Carle
LCpl Eyre
LCpl Hart
LCpl MacLean
LCpl Main
LCpl Relfold
Gdsm Brown
Gdsm Cheyne
Gdsm Denton
Gdsm Douglas
Gdsm Fleming
Gdsm Glasper
Gdsm Johnston
Gdsm Malcolmson
Gdsm Murfitt
Gdsm Osborn
Gdsm Reynolds
Gdsm Ridgment
Gdsm Rogers
Gdsm Robinson
Gdsm Shaw
Gdsm Silver
Gdsm Smith
Gdsm Tanbira
Gdsm Wilkie
14th Platoon
Lieutenant Fraser
Sgt Gavaghan
LSgt Dayson
LSgt Martin
LSgt Nash
LCpl Bay
LCpl Cameron
LCpl Coventry
LCpl Greenlees
LCpl Stenton
LCpl Timperley
Gdsm Blackburn
Gdsm Brackstone
Gdsm Bryden
Gdsm Campbell
Gdsm Cape
Gdsm Dagget
Gdsm Denholm
Gdsm Horan
Gdsm Jackson
Gdsm McGeough
Gdsm McKay
Gdsm McLellan
Gdsm McQueen
Gdsm Montgomery
Gdsm Slanel
Gdsm Stewart
Gdsm Tait
Gdsm Traynor
Ppr Utting
15th Platoon
Lieutenant Michell
Sgt Jackson
LSgt Dalgleish
LSgt Guthrie
LSgt Mitchell
LCpl Croockdake
LCpl Hinds
LCpl Tyler
LCpl Wilson
Gdsm Allen
Gdsm Binnie
Gdsm Boyes
Gdsm Brown
Gdsm Campbell
Gdsm Findlay
Gdsm Forrest
Gdsm Gordon
Gdsm Hamilton
Gdsm Litterick
Gdsm MacKenzie
Gdsm Michell
Gdsm McFarlane
Gdsm Peters
Gdsm Richardson
Gdsm Rutherfordv
Gdsm Regan
Gdsm Smart
Gdsm Stirling
Gdsm Taggart
Mortar Platoon
Comando de sección
Captain Farrelly
CSgt Buckley
Cdsm McDonald
Ppr Sutherland
Gdsm Wood
C/S 51
Sgt Pitcaithly
LSgt Gill
LSgt Miller
LCpl Perry
Gdsm Blair
Gdsm Brown
Gdsm Chase
Gdsm Farmer
Gdsm Forbes
Gdsm Hutton
Gdsm Little
Gdsm Queinn
Gdsm Thomson
C/S 52
Sgt Hamel
LSgt Noble
LSgt Shepherd
LCpl Wolff
Gdsm Collins
Gdsm Cruickshank
Gdsm Davidson
Gdsm Johnstone
Gdsm MacFayden
Gdsm Payne
Gdsm Somerville
Gdsm Spence
Gdsm Turner
C/S 53
LSgt Corbett
LSgt Fisher
LSgt Harrison
LCpl Harper
LCpl Jones
LCpl Shannon
Gdsm Davies
Gdsm Green
Gdsm Jones
Gdsm Mumford
Gdsm Ponting
Gdsm Thomson
G Company
Company HQ
Major Dalzel Job
Captain Pollock
CSM McKay
CQMS Stirling
Sgt Wilson
LSgt MacKinnon
LSgt Minto
LSgt Samson
LSgt Williams
LCpl Buchan
LCpl Douglas
LCpl Galvin
Gdsm Belford
Gdsm Bradley
Soldado Corbett
Gdsm Kirkpatrick
Gdsm Mains
Gdsm Ripley
Pte Stewart
Gdsm Webster
7th Platoon
Lieutenant Joynson
Sgt Anderson
LSgt Hanson
LSgt Mackeinze
LSgt Scott
LCpl Bunyan
LCpl Catchpole
LCpl Gott
LCpl Young
Gdsm Battersby
Gdsm Baxter
Gdsm Campbell
Gdsm Conway
Gdsm Flynn
Gdsm Gillespie
Gdsm Glover
Gdsm Henson
Gdsm Khan
Gdsm Lettice
Gdsm Magee
Gdsm Malcolmson
Gdsm Mitchell
Gdsm Murdoch
Gdsm MacAskill
Gdsm McKay
Gdsm McLeod
Gdsm McWilliams
Gdsm Smith
Gdsm Ward
Gdsm Welsh
8th Platoon
Second Lieutenant Page
Sgt Morcom
Sgt Gribble
LSgt Douglas
LSgt Holmes
LCpl Batty
LCpl Greenhalgh
LCpl Morrison
Gdsm Clegg
Gdsm Crawford
Gdsm Dick
Gdsm Gillanders
Gdsm Graham
Gdsm Grundy
Gdsm Henderson
Gdsm Houston
Gdsm Hunter
Gdsm Hutton
Gdsm Little
Gdsm McKay
Gdsm Matthews
Gdsm McLaren
Gdsm McMillan
Gdsm O´Brien
Gdsm Reid
Gdsm Rumney
Gdsm Thompson
Gdsm Whittingham
Gdsm Williams
9th Platoon
Lieutenant Blount
Sgt MacDonald
LSgt Ferguson
LSgt Patterson
LSgt Scott
LCpl Keers
LCpl Overton
LCpl Turnbull
LCpl Vest
Gdsm Campbell
Gdsm Desley
Gdsm Dunlop
Gdsm Gilchrist
Gdsm Herrity
Gdsm Hoggan
Gdsm Hunt
Gdsm Hutchins
Gdsm Lindsay
Gdsm McGovern
Gdsm McKinnon
Gdsm McLaren
Gdsm McLaughlan
Gdsm Murphy
Gdsm Reid
Gdsm Spalding
Gdsm Shaw
Gdsm Thomson
Gdsm Wards
Gdsm Watts
Tumbledown after the war
- On May 30, 1988, was the premiere of ´Tumbledown´ film, directed by Richard Eyre, which is based on the experiences of the Lieutenant Robert Lawrence, who was severely wounded during combat. Obtained, among others, the award from the Royal Television Society Best Actor for the brilliant performance by Colin Firth in the role of Lieutenant Lawrence.
- During 2012 the Argentine journalist Nicolas Kasanzew wrote a tango called ´The Carlos Daniel Vazquez's Thermopylae´, which is sung by Carlos Longoni.[30]
- In place of fighting a cross was set up in tribute to the soldiers who gave their lives in that place.
- Two British artists have depicted combat into two paintings, one of Mark Churms[31] and the other Terence Cuneo.[32]
-In Britain an association of Families and Veterans Combat Mount Tumbledown was created.
- An Ode had also been written in honour of the fallen:
´It was the Guardsmen of the Crown
Who scaled the Heights of Tumbledown
And fought that night a bloody fight
To see victory by dawn's first light.
From crag to crag amongst the rock,
They skirmished on, numbed by shock.
Through shell and mortar fire they moved,
Till at last the ground they'd proved
Port Stanley lay there...just ahead,
As they began to count their dead.
But where the glory, where the pride,
Of those eight brave men who died?
They who made that lonely sacrifice
And through each death paid the total price
In their final and heroic act,
Did surely speed the warring parties pact.
Each one who there his life laid down,
Saved countless others from their own unknown.
So those of you who live to talk,
Let your pride hover as does the hawk.
And never let men these acts forget,
Nor the memory of our dead neglect,
But once returned across this vast sea,
Remember then just what it was to be....
A Scots Guardsman. ´
References
- ↑ Falklands hero hails Magaret Thatcher’s leadership
- ↑ Falklands hero hails Magaret Thatcher’s leadership
- ↑ Falklands hero hails Magaret Thatcher’s leadership
- ↑ Falklands hero hails Magaret Thatcher’s leadership
- ↑ Falklands hero hails Magaret Thatcher’s leadership
- ↑ Razor's Edge, Hugh Bicheno, p. 288, Phoenix, 2007
- ↑ (The Sinking of the Belgrano, Arthur Gavshon and Desmond Rice pg. 47)
- ↑ Nick van der Bijl, Victory in the Falklands, p.199, Pen and Sword, 2007
- ↑ http://www.britains smallwars.com/Falklands/Tumbledown.htm
- ↑ Nine battles to Stanley, Nicholas Van der Bijl, p.190, Leo Cooper, 30/09/1999
- ↑ Attenshun! Scots Guards hotel is opening (wait for it ..) now The Scotsman, 10 March 2007
- ↑ 12.0 12.1 12.2 Patrick Bishop and John Witherow, The Winter War: Falklands Conflict, p. 133
- ↑ Nick van der Bijl, Victory in the Falklands, pp. 208-209, Pen and Sword, 2007
- ↑ The Fight for the Malvinas, Martin Middlebrook, pp. 261-262, Viking, 1989
- ↑ 5th Infantry Brigade in the Falklands 1982, Nicholas Van der Bijl, David Aldea, page 200, Leo Cooper, 2003
- ↑ Malvinas: La Defensa de Puerto Argentino, Oscar Luis Jofre & Félix Roberto Aguiar, page 262, Editorial Sudamericana, 1987
- ↑ 17.0 17.1 Hugh Bicheno (2007). Razor's Edge. Phoenix. p. 309.
- ↑ http://www.lanacion.com.ar/1362425-un-heroe-todos-los-heroes Un héroe, todos los héroes lanacion.com, 03/04/2011
- ↑ The Gurkhas: Special Force, Chris Bellamy, p. ?, Hachette, 2011
- ↑ Malvinas: La Defensa de Puerto Argentino, Oscar Luis Jofre & Félix Roberto Aguiar, page 275, Editorial Sudamericana, 1987
- ↑ "Robacio, who came in for criticism from some British officers ... had total command of N Company and the Army platoons involved, and deserves credit for doing all that was possible to limit British gains ... His positioning of heavy weapons on Sapper Hill before the Argentine surrender provided a defensive barrier that would only have been breached at heavy cost in men and equipment." Van Der Bijl, Victory in the Falklands, p. 211
- ↑ Day of Surrender.
- ↑ Philip Williams and M.S. Power: Summer Soldier, Bloomsbury, 1991. (cover notes)
- ↑ Our Falklands war: The Men of The Task Force Tell Their Story, Geoffrey Underwood, p.70, Maritime Books, 1983
- ↑ Honor al valor en combate y Batallón benemérito
- ↑ Middlebrook, Martin (1990). The fight for the "Malvinas": the Argentine forces in the Falklands War. Penguin books, p. 239. ISBN 0-14-010767-3
- ↑ Sharkey Ward (1992). Sea Harrier over the Falklands: a maverick at war. Leo Cooper. p. 266. ISBN 0-85052-305-2.
- ↑ 28.0 28.1 The gramophone, Volume 60, Issue 2, page 1089, 1983
- ↑ Piping Times, Volume 55 No.1 (October 2002) includes a photo of P/M Riddell playing his bagpipes on top of Mount Tumbledown. Piping Times, Volume 55 No.2 (November 2002) contains a Riddell's handwritten copy of the music.
- ↑ http://www.youtube.com/watch?v=4kJt_GV4FPc
- ↑ http://www.military-art.com/mall/images/800s/dhm0750.jpg
- ↑ http://www.military-art.com/mall/images/800s/dhm0892.jpg
- Sky News: Return to the Falklands
- In his first interview in 20 years, Robert Lawrence tells Mark Townsend how the trauma of battle reshaped his life
- As part of his journey of reconciliation Mike Seers travels to Argentina to interview Marine artillery fire controllers and gunners whom he fought against
- Reassessing the Fighting Performance of the Argentine 5th Marines
- Taken from the diary of Guardsman Tracy Evens
| ||||||||||||||||||||||||||