Battle of Beda Fomm
| ||||||||||||||||||||||||||||||||
| ||||||||||||||||||||||||||||||||
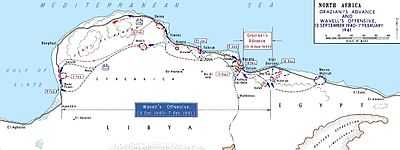

The rapid British advance during Operation Compass (9 December 1940 – 9 February 1941) forced the Italian 10th Army to evacuate Cyrenaica, the eastern province of Libya. In late January, the British learned that the Italians were retreating along the Litoranea Balbo (Via Balbia) from Benghazi. The 7th Armoured Division (Major-General Sir Michael O'Moore Creagh) was dispatched to intercept the remnants of the 10th Army by moving through the desert, south of the Jebel Akhdar (Green Mountain) via Msus and Antelat as the 6th Australian Division pursued the Italians along the coast road, north of the jebel. The terrain was hard going for the British tanks and Combe Force (Lieutenant-Colonel J. F. B. Combe), a flying column of wheeled vehicles, was sent ahead across the chord of the jebel.
Late on 5 February, Combe Force arrived at the Via Balbia south of Benghazi and set up road blocks near Sidi Saleh, about 32 kilometres (20 mi) north of Ajedabia and 48 kilometres (30 mi) south-west of Antelat. The leading elements of the 10th Army arrived thirty minutes later and were blocked. Next day the Italians attacked to break through the road block and continued into 7 February. With British reinforcements arriving and the Australians pressing down the road from Benghazi, the 10th Army surrendered. From Benghazi–Agedabia, the British took 25,000 prisoners, captured 107 tanks and 93 guns of the totals for Operation Compass of 133,298 men, 420 tanks and 845 guns.
On 9 February, Churchill ordered the advance to stop and troops to be dispatched to Greece to take part in the Greco-Italian War; Operation Marita, a German attack through Macedonia was thought imminent. The British were unable to continue beyond El Agheila anyway, because of vehicle breakdowns, exhaustion and the effect of the much longer supply transport distance from the base in Egypt. A few thousand men of the 10th Army escaped the disaster in Cyrenaica but the 5th Army in Tripolitania had four divisions. The Sirte, Tmed Hassan and Buerat strongholds were reinforced from Italy, which brought the 10th and 5th armies up to about 150,000 men. German reinforcements were sent to Libya to form a blocking detachment (Sperrverband) under Directive 22 (11 January), these being the first units of the Afrika Korps (Generalleutnant Erwin Rommel).
Background
Libya
Cyrenaica (Libya) had been an Italian colony since the Italo-Turkish War (1911–1912). With Tunisia, a part of French North Africa to the west and Egypt to the east, the Italians prepared to defend both frontiers through a North Africa Supreme Headquarters, under the command of the Governor-General of Italian Libya, Marshal of the Air Force, Italo Balbo. Supreme Headquarters had the 5th Army (General Italo Gariboldi) and the 10th Army (General Mario Berti) which in mid-1940 had nine metropolitan divisions of about 13,000 men each, three Blackshirt and two Libyan divisions with 8,000 men each. Italian army divisions had been reorganised in the late 1930s, from three regiments each to two and reservists were recalled in 1939, along with the usual call-up of conscripts.[1]
Morale was considered to be high and the army had recent experience of military operations. The Italian navy had prospered under the Fascist regime, which had paid for fast, well-built and well-armed ships and a large submarine fleet but the navy lacked experience and training. The air force had been ready for war in 1936 but had stagnated by 1939 and was not considered by the British to be capable of maintaining a high rate of operations. The 5th Army with eight divisions was based in Tripolitania, the western half of Libya opposite Tunisia and the 10th Army with six infantry divisions, held Cyrenaica in the east. When war was declared, the 10th Army deployed the 1st Libyan Division Sibelle on the frontier from Giarabub to Sidi Omar and XXI Corps from Sidi Omar to the coast, Bardia and Tobruk. The XXII Corps moved south-west of Tobruk, to act as a counter-attack force.[1]
Egypt
The British had based forces in Egypt since 1882 but these were greatly reduced by the terms of the Anglo-Egyptian Treaty of 1936. The small British and Commonwealth force garrisoned the Suez Canal and the Red Sea route. The canal was vital to British communications with its Far Eastern and Indian Ocean territories. In mid-1939, Lieutenant-General Archibald Wavell was appointed General Officer Commanding-in-Chief (GOC-in-C) of the new Middle East Command, over the Mediterranean and Middle East theatres. Until the Franco-Axis armistice, the French divisions in Tunisia faced the Italian 5th Army on the western Libyan border. In Libya, the Royal Army had about 215,000 men and in Egypt, the British had about 36,000 troops, with another 27,500 men training in Palestine.[2]
British forces included the Mobile Division (Egypt) (Major-General Percy Hobart), one of only two British armoured training formations, which in mid-1939 was renamed Armoured Division (Egypt) (on 16 February 1940, it became the 7th Armoured Division). The Egypt–Libya border was defended by the Egyptian Fronter Force and in June 1940, the headquarters of the 6th Infantry Division (Major-General Richard O'Connor) took over command in the Western Desert, with instructions to drive back the Italians from their frontier posts and dominate the hinterland if war began. The 7th Armoured Division less the 7th Armoured Brigade, assembled at Mersa Matruh and sent the 7th Support Group forward towards the frontier as a covering force, where the RAF also moved most of its bombers; Malta was also reinforced.[3]
The HQ of the 6th Infantry Division, which lacked complete and fully trained units, was renamed the Western Desert Force on 17 June. In Tunisia, the French had eight divisions, capable only of limited operations and in Syria wwere three poorly armed and trained divisions, about 40,000 troops and border guards, on occupation duties against the civilian population. Italian land and air forces in Libya, greatly outnumbered the British in Egypt but suffered from poor morale and were handicapped by some inferior equipment. In Italian East Africa were another 130,000 Italian and African troops with 400 guns, 200 light tanks and 20,000 lorries; Italy declared war from 11 June 1940.[4]
Terrain
The Western Desert was about 240 miles (390 km) wide, from Mersa Matruh in Egypt to Gazala on the Libyan coast, along Via Balbia, the only paved road. The Sand Sea 150 miles (240 km) inland marked the southern limit of the desert at its widest at Giarabub and Siwa; in British parlance, Western Desert came to include eastern Cyrenaica in Libya. From the coast, extending inland lies a raised, flat plain of stony desert about 91–152 metres (300–500 ft) above sea level, that runs 200–300 kilometres (120–190 mi) in depth until the Sand Sea.[5] Scorpions, vipers and flies populated the region, which was inhabited by a small number of Bedouin nomads. Bedouin tracks linked wells and the easier traversed ground; navigation was by sun, star, compass and "desert sense", good perception of the environment gained by experience. (When the Italian invasion of Egypt began in September 1940, the Maletti Group got lost leaving Sidi Omar, disappeared and had to be found by aircraft.) In spring and summer, days are miserably hot and the nights are bitter cold.[6] The Sirocco (Gibleh or Ghibli), a hot desert wind, blows clouds of fine sand, which reduces visibility to a few metres and coats eyes, lungs, machinery, food and equipment; motor vehicles and aircraft need special oil filters and the barren ground means that supplies for military operations, have to be transported from outside.[7]
Prelude
Battle of Bardia

Bardia fell between 14 December and 5 January; the British lost 456 Australian infantry casualties and 17 of 23 tanks, for 40,000 Italian casualties and prisoners, more than 400 guns, 130 tanks and hundreds of lorries. At dawn on 21 January, Australian infantry broke into Tobruk and made a path for 18 British I tanks. The Australians pressed on and captured half of the Tobruk defences by nightfall. The Australians took 25,000 prisoners, 208 guns and 87 tanks, for a loss of 355 Australian and 45 British troops.[8] The 7th Armoured Division drove 160 kilometres (100 mi) towards Derna and the Special Armored Brigade (Brigata Corazzata Speciale, BCS or Babini Group, after the commander General Valentino Babini) with about 300 tanks, at Mechili. On 24 January, the 4th Armoured Brigade engaged tanks of the Babini Group on the Derna–Mechili track. The British knocked out nine Italian tanks and lost one cruiser and six light tanks.[9]
The 2/11th Battalion engaged the 60th Division Sabratha and Bersaglieri companies of the Babini Group at Derna airfield on 25 January and made slow progress, while under attack from Italian bombers and modern fighters.[10] In the Derna–Giovanni Berta area, also held by the 60th Division Sabratha and Bersaglieri companies of the Babini Group, the Italians managed to counter-attack around Wadi Derna, ambushed the 6th Australian Cavalry Regiment and took the survivors prisoner. The advance of other units south of the wadi threatened the Babini Group with encirclement and it disengaged on the night of 26/27 January. From 26–28 January, the British tanks bogged in heavy rain. The 4th Armoured Brigade gave up the pursuit due to mud, rain, breakdowns and fuel shortage, being down to fifty operational cruiser tanks and the Italians retreated from Derna on 29 January.[11]
Italian defensive preparations
The Italians in Libya were dependent on Europe for supplies, which were moved by road in Libya. After the success of Operation Compass (December 1940 – February 1941), the Italians retreated from Benghazi, leaving only the port of Tripoli, which had a maximum capacity of four troopships or five cargo ships at once, about 46,000 tonnes (45,000 long tons) per month. The Via Balbia from Tripoli to Benghazi was 970 kilometres (600 mi) long, could flood and had become vulnerable to attacks by the Desert Air Force (DAF), when the British advance brought it into range. Driving on desert tracks to avoid the road, increased vehicle wear and led to more accidents.[12] The Babini Group had managed to avoid destruction at Mechili on 24 January but the inferiority of the Italian tanks had been demonstrated and it was believed that they were substantially outnumbered (possibly due to British attempts at deception with a dummy tank regiment). The 10th Army still had about 100 medium and 200 light tanks, about half being serviceable.[13]
Rumours began to circulate about British intrigues in Tunisia and Algeria and the exploits of the Long Range Desert Group, French émigré forces and Senussi rebels, added to Italian apprehensions about the western and southern approaches to Tripolitania.[13] It had soon become clear to Graziani that the British were going to advance beyond Tobruk and the Jebel Akhdar, intending to capture all of Cyrenaica. On 1 February, he reported to Mussolini that he intended to save the rest of the 10th Army by withdrawing to Sirte, where Gariboldi, the commander in Tripoli had been ordered to prepare defences. On 3 February, General Giuseppe Tellera took over command in Cyrenaica, after Graziani sacked Berti, with orders to command the retreat. The Australians had caught up with the Italians on 31 January, 6 miles (9.7 km) west of Derna and air reconnaissance reported indications of a general withdrawal.[14]
British preparations and plan

In late January 1941, the British learned that the Italians were evacuating Cyrenaica along the Via Balbia through Benghazi. The 7th Armoured Division (Major-General Sir Michael O'Moore Creagh) was dispatched to intercept the remnants of the 10th Army. The division was to travel inland via Msus and Antelat, as the 6th Australian Division pursued the Italians along the coast road north of the Jebel Akhdar. The rugged terrain was hard going for the tanks and Creagh took a bold decision to send Combe Force (Lieutenant-Colonel J. F. B. Combe), an improvised flying column of wheeled vehicles, south-west across the chord of the jebel. The force consisted of an armoured car squadron from each of 11th Hussars and King's Dragoon Guards, 2nd Rifle Brigade, an RAF armoured car squadron, anti-tank guns from 3rd Regiment Royal Horse Artillery (RHA), C Battery 4th RHA and the 106th (Lancashire Hussars) Regiment RHA, with nine Bofors 37 mm anti-tank guns portée.[15][16]
Battle
4–5 February
At dawn on 4 February, the 11th Hussars left Mechili over ground which had not been reconnoitred on the ground, to avoid alerting the Italians. Low-flying air reconnaissance had reported that the going was difficult and for the first 50 miles (80 km) the route was the worst yet encountered in the desert. By 3:00 p.m. armoured cars had reached Msus, 94 miles (151 km) away, where the garrison left hurriedly and some cars followed up another 30 miles (48 km) to Antelat. By dawn on 5 February, the rest of the division had reached Msus. Creagh had been informed of air reconnaissance that revealed the 10th Army retreating and O'Connor ordered that the advance be pressed to cut off the Italian retreat. Creagh sent Combe Force ahead, to block the Via Balbia between Benghazi and Agedabia as quickly as possible and to follow on to the south-west with the tracked vehicles, rather than westwards to Soluch.[17]

Combe Force reached Antelat during the morning and by 12:30 p.m. had observers overlooking the Via Balbia west of Beda Fomm and Sidi Saleh, about 32 kilometres (20 mi) north of Ajedabia and 48 kilometres (30 mi) south-west of Antelat, with the rest of the force following on. An Italian convoy drove up about thirty minutes later and was engaged by the artillery, anti-tank guns and armoured cars, the column was thrown into confusion and many prisoners were taken. In the afternoon, the Rifle Brigade got across the Via Balbia, despite Italian resistance and for the rest of the day, 10th Army columns arrived and made piecemeal attacks, losing many vehicles and prisoners.[15]
The 4th Armoured Brigade reached Antelat by 4:30 p.m. and moved towards Beda Fomm, where the tank going was said to be good and attacked the Italian columns at points 3 miles (4.8 km) apart, to create maximum confusion. The first attack caught the Italians stationary and by dusk had destroyed many vehicles and taken 1,000 prisoners. Italian vehicle movements around Ghemines and air reconnaissance, showed a measure of co-ordination and that reinforcements were arriving.[15] The 7th Armoured Brigade, down to one tank regiment and most of the Support Group, had driven west from Msus to capture Scledeima. Creagh was informed that much of the 10th Army was already south of Ghemines, who ordered the brigade quickly to drive on Antelat, leaving the Support Group behind. At dawn on 6 February, the Support group captured Scledeima Fort, then occupied Soluch and sent patrols towards Ghemines and Benghazi.[18] In the Jebel Akhdar, the 6th Australian Division advanced down the Via Balbia, the 17th Australian Brigade leap-frogging a battalion to Slonta, where the 19th Australian Brigade, using the rest of the divisional transport and captured petrol passed by. The brigade reached Barce, despite mines and roadblocks on 5 February and got to Benghazi before night on 6 February, despite more mines and heavy rain.[18]
6–7 February
During the morning of 6 February, the 10th Army continued its attempts to force the passage of the Via Balbia against the 4th Armoured Brigade, while Combe Force maintained the block to the south. The 2nd Royal Tank Regiment (2nd RTR) began the day in occupation of the Pimple, a low round hillock west of Beda Fomm, from where the road could be watched both ways; further west were 2 miles (3.2 km) of flat sands, which merged with the beach. The 2nd RTR was to stop 10th Army columns on the road with attacks from the east, with the 19 cruiser and seven light tanks still operational. To the north, the 7th Hussars with a cruiser and 29 light tanks made several attempts to find the north end of the Italian column to attack from both sides of the road. A squadron of light tanks from the 3rd Hussars watched tracks leading north to Soluch and Scledeima from Antelat, which left seven cruisers and six light tanks to attack from the east, north of the 2nd RTR. Italian medium tanks mixed in with the columns kept the light tanks at a distance but they managed to cause much damage and sow confusion.[19]
Attempts to break through led by tanks began against the 2nd RTR at 7:30 a.m. and vehicles which left the road for the dunes to the west, were destroyed and 350 prisoners taken. The weather turned to rain as more Italian columns arrived and were engaged by the cruisers and light tanks harried the column, where there were no Italian tanks. By noon, forty Italian medium tanks had been knocked out, about fifty were left and the 4th Armoured Brigade was down to fifteen cruisers. More Italian reinforcements arrived in the afternoon, when the only British reserve was eleven tanks of the 1st Royal Tank Regiment (1st RTR), which had been delayed from Msus by lack of petrol. The 1st RTR arrived early in the afternoon, by when the Italians had retaken the Pimple and were pressing eastwards.[20]
The 2nd RTR re-captured the Pimple and the 1st RTR arrived in time to intercept Italian tanks breaking out just to the north as several Italian vehicles and thirty tanks got past the Pimple. Combe Force had faced well-organised attacks with artillery and tank support, which had been repulsed by C Battery RHA and nine Bofors guns of the 106th RHA. Italian infantry used wrecked tanks as cover for their advance, while many more lost hope and surrendered. During the night, some tanks from the Pimple arrived and four were knocked out by mines and gunfire, four got through with some lorries and the rest gave up.[20]
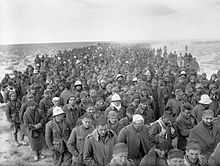
At dawn on 7 February, the 10th Army made a last attempt to escape, with an attack by thirty tanks leading a lorry convoy straight down the Via Balbia. The tanks broke through the first companies of the Rifle Brigade and the commander of C Battery was allowed to fire on targets in the area and eleven anti-tank guns knocked out the tanks. The Rifle Brigade fought on and stopped the Italian infantry advance, at which the Italians began to surrender. In the north, the 4th Armoured Brigade had surrounded another Italian group and at 9:00 a.m. all resistance ceased. The Australians had reached El Magrun 15 miles (24 km) south of Ghemines and half-way to the Pimple and the 19th Australian Brigade Group was ferried forward with all speed. The Beda Fomm area had become a 15-mile (24 km) line of destroyed or abandoned lorries, about 100 guns, about 100 knocked out or captured tanks and about 25,000 prisoners, including Tellera, who had been mortally wounded, the rest of the 10th Army staff and Bergonzoli the XXIII Corps commander.[21] The 11th Hussars were sent westwards to Agedabia and then on to El Agheila to round up stragglers.[22]
Aftermath
Analysis
| Place | POW | Tanks | Guns | ||
|---|---|---|---|---|---|
| Sidi Barrani | 38,289 | 73 | 297 | ||
| Sidi Omar | 900 | 0 | 8 | ||
| Bardia | 42,000 | 130 | 275 | ||
| Tobruk | 25,000 | 87 | 208 | ||
| Mechili | 100 | 13 | 0 | ||
| Derna Benghazi | 2,000 | 10 | 24 | ||
| Benghazi Agedabia | 25,000 | 107 | 93 | ||
| Total | 133,298 | 420 | 845 | ||
The British plan to trap the 10th Army had succeeded, despite the British being outnumbered 4:1 in medium tanks, most of the Italian tanks being new, while the British tanks had covered more than 1,000 miles (1,600 km) since the beginning of Operation Compass. The speed of the dash from Mechili surprised the Italians, despite the obvious danger of such a move, especially when the British reached Msus on 4 February. Had the Italians on the Via Balbia been prepared for a road-block and made an organised attack, the 10th Army might have escaped. The British took a gamble with the provision of fuel and supplies, which were capable only of sustaining a short operation and narrowly succeeded. The British were unable to continue beyond El Agheila, due to broken-down and worn out vehicles and on 9 February, Churchill ordered the advance to stop and troops to be dispatched to Greece, to take part in the Greco-Italian War.[24]
Only a few thousand men of the 10th Army had escaped the disaster in Cyrenaica but the 5th Army had four divisions in Tripolitania and the Italians reinforced the Sirte, Tmed Hassan and Buerat strongholds from Italy, which brought the total of Italian soldiers in Tripolitania to about 150,000 men.[25] The first troops of the Deutsches Afrikakorps (DAK), landed in Tripolitania on 11 February, as part of Operation Sonnenblume (Sunflower). With the arrival of the DAK (General Erwin Rommel), the Axis rout was ended and the British faced a better-equipped and led opponent, during a period of temporary weakness.[26] On 25 March 1941, General Italo Gariboldi replaced Marshal Rodolfo Graziani who had requested to be relieved.[27]
Casualties
The British had advanced 800 kilometres (500 mi), destroyed or captured about 400 tanks and 845–1,290 artillery pieces, taken 133,298 Libyan and Italian prisoners of war, besides a vast quantity of other war material. The prisoners included 22 generals and the Italian general staff recorded 960 guns of all types lost. The British and Commonwealth forces suffered 500 dead and 1,373 wounded and 55 missing during Operation Compass, a portion of which were incurred at Beda Fomm.[28]
Order of battle
| 5th and 10th armies: 10 June 1940, 10th Army: 13 September | Western Desert Force:10 June, 9 December | |
|---|---|
Forward at Sidi Barrani with operations on the Libyan-Egyptian Border
Located in Tobruk
Commander: General Annibale Bergonzoli
invasion of Egypt)
invasion)
Infantry Division)
invasion)
Infantry Division)
Infantry Division)
under control of 10th Army)
Western Desert Force Commander-in-Chief, Middle East: General Sir Archibald Wavell
11 December 1940)
| |
Notes
- ↑ The Western Desert Force consisted of about 31,000 soldiers, 120 guns, 275 tanks and sixty armoured cars. The 10th Army in Egypt consisted of 80,000 troops. 250 guns and 125 tanks. The 4th Indian Division was exchanged with the 6th Australian Division for the pursuit after the first part of Operation Compass and reinforcements reached the 10th Army before Beda Fomm.[31]
Footnotes
- ↑ 1.0 1.1 Playfair et al. 1954, pp. 38–39, 92.
- ↑ Playfair et al. 1954, pp. 19, 93.
- ↑ Playfair et al. 1954, pp. 32, 93, 97–98, 375.
- ↑ Playfair et al. 1954, pp. 32, 93, 97, 100, 375.
- ↑ Luck 1989, p. 92.
- ↑ Playfair et al. 1954, pp. 116, 115.
- ↑ Lewin 1998, p. 149.
- ↑ Playfair et al. 1954, pp. 282–293.
- ↑ Latimer 2013, p. 65.
- ↑ Playfair et al. 1954, p. 353.
- ↑ Playfair et al. 1954, p. 354.
- ↑ Creveld 1977, pp. 182–187.
- ↑ 13.0 13.1 Playfair et al. 1954, pp. 353–354.
- ↑ Playfair et al. 1954, pp. 354, 356.
- ↑ 15.0 15.1 15.2 Playfair et al. 1954, p. 358.
- ↑ Macksey 1971, p. 135.
- ↑ Playfair et al. 1954, pp. 357–358.
- ↑ 18.0 18.1 Playfair et al. 1954, p. 359.
- ↑ Playfair et al. 1954, pp. 359–360.
- ↑ 20.0 20.1 Playfair et al. 1954, pp. 359–361.
- ↑ Playfair et al. 1954, p. 361.
- ↑ Macksey 1971, pp. 151, 155.
- ↑ CCIS 1941.
- ↑ Playfair et al. 1954, pp. 362, 371.
- ↑ Sadkovich 1991, p. 293.
- ↑ Bierman & Smith 2002, p. 50.
- ↑ Playfair et al. 1954, p. 368.
- ↑ Playfair et al. 1954, pp. 361–362.
- ↑ Christie 1999, pp. 65, 68–78, 82.
- ↑ Playfair et al. 1954, p. 265, 271.
- ↑ Christie 1999, p. 86.
References
- Books
- Bierman, John; Smith, Colin (2002). The Battle of Alamein: Turning Point, World War II. New York: Viking. ISBN 0-670-03040-6.
- Creveld, M. van (1977). Supplying War: Logistics from Wallenstein to Patton. Cambridge: Cambridge University Press. ISBN 0-521-29793-1.
- Latimer, Jon (2013) [2000]. Operation Compass 1940: Wavell's Whirlwind Offensive. Oxford: Osprey. ISBN 1-85532-967-0.
- Lewin, Ronald (1998) [1968]. Rommel As Military Commander. New York: B&N Books. ISBN 978-0-7607-0861-3.
- Luck, Hans von (1989). Panzer Commander: The Memoirs of Colonel Hans von Luck. New York: Dell (Random House). ISBN 0-440-20802-5.
- Macksey, Major Kenneth (1971). Beda Fomm: The Classic Victory. Ballantine's Illustrated History of the Violent Century (Battle Book 22). New York: Ballantine Books. OCLC 473687868.
- Playfair, Major-General I. S. O.; with Stitt RN, Commander G. M. S.; Molony, Brigadier C. J. C. & Toomer, Air Vice-Marshal S. E. (1954). Butler, J. R. M., ed. The Mediterranean and Middle East: The Early Successes Against Italy (to May 1941). History of the Second World War, United Kingdom Military Series I. London: HMSO. OCLC 888934805.
- Journals
- Sadkovich, James. J. (1991). "Of Myths and Men: Rommel and the Italians in North Africa". The International History Review XIII (2): 284–313. doi:10.1080/07075332.1991.9640582. ISSN 0707-5332. Retrieved 1 March 2015.
- Theses
- Christie, Howard R. (1999). Fallen Eagles: The Italian 10th Army in the Opening Campaign in the Western Desert, June 1940 – December 1940 (MA). Fort Leavenworth, KS: U. S. Army Command and General Staff College. OCLC 465212715. A116763. Retrieved 18 March 2015.
- Websites
- "Appendix E, H.Q. Cyrenaica Command Intelligence Summary No. 6 (23 Feb 41) WO 169/1258". The National Archives. 23 February 1941. Retrieved 15 March 2015.
Further reading
- Arthur, Douglas (2000). Desert Watch: A Story of the Battle of Beda Fomm. Bedale: Blaisdon. ISBN 978-1-902838-01-4.
- Bierwirth, J. G. (1994). Beda Fomm: An Operational Analysis (MAAS). Command and General Staff College, School of Advanced Military Studies Monograph. Fort Leavenworth, KS: U.S. Army Command and General Staff College. OCLC 41972642. Docket ADA 284686. Retrieved 28 March 2015.
- Dando, N. (2014). The Impact of Terrain on British Operations and Doctrine in North Africa 1940–1943 (PDF) (PhD). Plymouth University. OCLC 885436735. Retrieved 25 March 2015.
External links
| Wikimedia Commons has media related to Battle of Beda Fomm. |