Ordnance QF 18-pounder
| Ordnance QF 18 pounder | |
|---|---|
 Australian gun crew in action in the Ypres sector, 28 September 1917 | |
| Type | Field gun |
| Place of origin |
|
| Service history | |
| In service | 1904–1945 (UK) |
| Used by |
|
| Wars |
First World War[1] Third Afghan War Russian Civil War Irish Civil War Waziristan 1936-37 Continuation War Second World War |
| Production history | |
| Designer |
Armstrong Whitworth Vickers Royal Arsenal |
| Designed | 1901 |
| Manufacturer |
Armstrong Whitworth |
| Produced | 1903–1940 |
| Number built |
approx. 10,469 (Mk I & II)[2] |
| Specifications | |
| Weight |
1.282 tonnes 2,825 lb (1,281 kg) |
| Barrel length | 7 ft 8 in (2.34 m)[3] |
| Width | 6 ft 3 in (1.91 m) |
| Crew | 6[4] |
|
| |
| Shell |
18.5 lb (8.4 kg) projectile. 23 lb (10 kg) including case. Armour piercing Smoke Gas Star Incendiary Shrapnel shell High explosive |
| Calibre | 3.3in (83.8mm) |
| Recoil |
41 in (1.0 m) (Mk I - II); 26 in (0.66 m) to 48 in (1.2 m) (Mk III - V) |
| Carriage |
pole trail (Mk I & II) box trail (Mk III & IV) split trail (Mk V) |
| Elevation |
-5° to +16°(Mk I & II) +30°[5] (Mk III) +37°(Mk IV & V)[6] |
| Traverse |
4.5° left and right (Mk I - IV) 25° left and right (Mk V) |
| Rate of fire |
20 rpm (max);[7] 4 rpm (sustained)[8][9] |
| Muzzle velocity |
1,615 ft/s (492 m/s) (Mk I & II)[3] 1,615 ft/s (492 m/s) (Mk IV)[10] |
| Effective firing range |
6,525 yd (5,966 m) Mk I & II 7,800 yd (7,100 m) with trail dug in 9,300 yd (8,500 m) (Mk III, IV & V) 11,100 yd (10,100 m) (streamlined HE Shell Mk IC) |
The Ordnance QF 18 pounder,[11] or simply 18-pounder Gun, was the standard British Empire field gun of the World War I era. It formed the backbone of the Royal Field Artillery during the war, and was produced in large numbers. It was used by British and Empire Forces in all the main theatres, and by British troops in Russia in 1919. Its calibre (84 mm) and hence shell weight were greater than those of the equivalent field guns in French (75 mm) and German (77 mm) service. It was generally horse drawn until mechanisation in the 1930s.
The first versions were introduced in 1904 and later versions remained in service with British forces until early 1942. During the interwar period the 18-pounder formed the basis of early versions of the equally famous Ordnance QF 25 pounder, which would form the basis of the British artillery forces during and after World War II, in much the same fashion as the 18-pounder had during World War I.
History
During the Second Boer War the British government realised its field artillery was being overtaken by more modern "quick firing" guns of other major powers, and investigated replacements for its existing field gun, the BL 15 pounder 7 cwt. In 1900 General Sir Henry Brackenbury, the then Director-General of Ordnance, sent officers to visit European gun makers. At Rheinische Metallwaren und Machinenfabrik in Düsseldorf, they found a quick firing gun designed by Heinrich Ehrhardt with a recoil system that totally absorbed all the recoil of firing, 108 guns plus spares, were secretly purchased and entered service as the Ordnance QF 15 pounder in June 1901.[12]
At the same time,the British Cabinet ordered Field Marshal Lord Roberts, the Commander-in-Chief in South Africa, to send home artillery brigade and battery commanders "selected for their eminence and experience" to form an Equipment Committee. The committee was chaired by General Sir George Marshall, who had been artillery commander in South Africa.[13] It formed in January 1901 with a wide ranging area of study from horse-drawn mobile guns and the larger more static field guns, to harness design, and even binoculars.[14] They swiftly established the "conditions to be fulfilled by proposed new equipment"; the most important were the "weight behind the team", then ballistics, rapidity of fire, weight of shell, provision of shield and number of rounds carried.[15]
British gun manufacturers were invited to propose designs. Of the many entries, five for the horse artillery gun and three for the field gun were selected and their makers invited to submit a "specimen". These were tested in 1902, but none were found suitable for service although they all had good features. The makers were called to a conference and agreed to collaborate to produce a composite design. This used the Armstrong gun, Vickers' recoil system, and Royal Ordnance Factory's sighting and elevating gear and ammunition carrying. Reduced wheel size from 5 ft (1.5 m) to 4 ft 8 in (1.42 m) was also accepted (it had been a matter the Equipment Committee had to investigate) which saved weight. Four Artillery batteries of the composite design took part in trials of in 1903, and the new 18-pounder design was accepted.[16]
The 18-pounder was used on all fronts during the First World War. It remained in service during the inter-war period. Starting in 1938, carriages Marks IV and V were converted to 25 Pounder Ordnance QF Mark 1 on Carriage Mark 1. 18-pounder Guns served with the British Expeditionary Force in France in the Second World War and were used in other theatres as well as for training or beach defence.
Description


The 18-pounder was a quick-firing horse-drawn field gun designed to be towed behind a limber and six horses. The gun barrel was wire bound nickel-steel with a single-motion screw breech with a cartridge extractor. It fired a fixed round of shell and cartridge fixed together, which was known as "quick firing" in British terminology. The lower carriage comprised a single hollow steel trail fixed to the centre of the axle-tree. The limited traverse saddle supported the elevating mass and a shield. Traverse controls were on the left and elevation on the right of the saddle. Recoil was by a hydraulic buffer with telescopic running-up springs to return the barrel to its firing position.
The Equipment Committee's conditions required tangent sights (i.e. direct fire) with the option of a telescope. However, the 18-pounder entered service with rocking bar (also called "bar and drum") sights - open sights with the option of a telescope on the left and a range scale (in yards) on the right of the cradle. These arrangements also incorporated independent line of sight, meaning that the sights could remain laid on the target while the barrel was elevated or depressed. A clinometer was provided for indirect fire when the sight was aimed using a gun-arc (a refined version of the expedient devices used in South Africa) and aiming posts in line horizontally with the target.
However, in 1906 indirect fire goniometric sights were adopted, consisting of an alidade mounted on a circular scale graduated in degrees that was mounted on the shield. In 1910 the Number 3 Dial Sight, a refined version with a telescope and compass, replaced the goniometer. The rocking bar and telescope were retained for direct fire, as was the range scale on the right in spite of a clinometer being part of the Dial Sight mount.
In 1910, after three years of trials, the German Goertz panoramic sight was selected as the Number 7 Dial Sight. This, with its sight mount that again included a sight clinometer, replaced the No 3. However, resolving various issues, notably with the sight and mount carrying case mounted on the shield, meant that the Number 7 sight did not enter service until early in 1914.[17]
Unusually for a 20th-century British gun, the 18-pounder retained two man laying throughout its life, elevation (in yards) was set on a range scale on the righthand side of the cradle. The Equipment Committee had also insisted on better methods of fuze setting, important because until late in 1914 it only had time fuzed ammunition. A hand held mechanical fuze setter was developed, and in early 1914 a "fuze indicator" was introduced, this converted the range into a fuse setting.
Mk I Gun on Mk I Carriage

The Ordnance Quick Firing 18-pounder Mark I gun barrel was wire-wound for one-third of its length, chosen as it was lighter, stronger and cheaper to manufacture than a fully built-up barrel.[18] A jacket was shrunk over the wire and "A" tube. The Mk I gun and Mk I carriage were accepted into service on 30 June 1904.
The narrow single-pole trail design of the Carriages Mk I and II were suited to towing by teams of horses, but constrained downward motion of the breech, and thus limited the gun's range to 6525 yards in normal use. The range could be increased to 7800 yards by "digging in" the end of the pole trail to increase elevation.[7] Its distinguishing feature was the barrel, significantly longer than the 13-pdr's and, unlike the 13-pdr, the barrel was significantly longer than the recuperator housing above it.
Mk II Gun on Mk I Carriage
The original gun design was quickly replaced in production from 1906 by the "rationalized" Mark II gun for ease of relining : the exterior of the inner "A" tube was slightly tapered, and was inserted into a matching tapered jacket by hydraulic pressure.[19]
Mark I and II guns were still in use in the post-World War I era, and some even saw combat in the Far East in World War II.
Mk II Gun on High-angle Anti-aircraft mounting
In early 1915 a number of 18-pounder guns were mounted on pedestals, with the addition of a second recuperator and retaining catch for the cartridge case at high angle, in an attempt to come up with a workable anti-aircraft gun. The gun's relatively low muzzle velocity, and the unsatisfactory ballistic characteristics of its shrapnel shell at high angles, made it a marginal performer in such a role.[20] However, by sleeving the barrel down to 3 inches (76 mm) and mating the 18-pounder cartridge with the 13-pounder's shell, the successful QF 13 pounder 9 cwt anti-aircraft gun was produced with the necessary high muzzle velocity.
The early versions of 18-pounder anti-aircraft guns remained in service, apparently only in the home defense of Britain. 35 were in service in Britain in June 1916[21] and 56 at the end of World War I.[22] After the war they were converted back to field gun use by removing the cartridge retaining catch.[20]
Mk II Gun on Mk I Carriage with armoured oil reservoir on recuperator
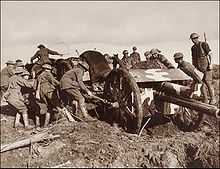
Battlefield experience in 1914 and 1915 showed up the weakness of the original recuperator springs (which returned the barrel to firing position after recoil) and loss of oil in the recuperator under intense firing. Poor quality of wartime manufacture of the springs was also a factor.[23] Spring shortages due to breakages meant guns remained in the firing line and had to be "run up" - have the barrel moved forward into its firing position - by hand, hence slowing the rate of fire.[24] A temporary preventive measure was the addition of a distinctive armoured box-shaped oil reservoir to the front end of the recuperator to maintain the oil supply and extend spring life. This modification is visible in many photographs of 18-pdrs in action on the Western Front right up to the end of World War I.
Mk I* and II Carriage
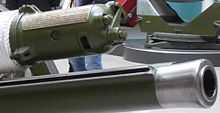
The recuperator spring problem was rectified with the new Mk II carriage officially introduced in the field in November 1916 with a hydro-pneumatic recuperator design which replaced the recuperator springs and could be fitted into the existing spring housing by battery officers in the field.[25] It is identified by the 10-inch (250 mm) torpedo-shaped extension on the recuperator, which made the recuperator assembly nearly as long as the barrel and hence altered the equipment profile. Converted existing carriages were designated Mk I*. The Mk II carriage also incorporated a longer cradle.[23]
In about 1917 all 18-pounder started being fitted with a new calibrating range scale. This allowed the gun's muzzle velocity to be set on it and automatically corrected the range for the difference between the actual muzzle velocity and the standard one.
Mk III gun on High-angle Carriage
An experimental Mk III gun was developed in 1916. It had a semi-automatic horizontal sliding block breech, with the recoil mechanism below rather than above the gun barrel. The high-angle mounting may have been an experimental dual anti-aircraft and field carriage. The design did not enter service.[26]
Mk IV Gun on Mk III & Mk IV Carriage
![]() Media related to QF 18 pounder Mk IV at Wikimedia Commons
Media related to QF 18 pounder Mk IV at Wikimedia Commons
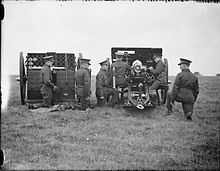
The major variant was the Mark IV gun on Mk IV carriage. The Mk IV gun started testing in 1916 mounted on a new Mk III carriage with box trail. This eliminated the original central pole trail, which had restricted elevation, allowing increased elevation to 37.5 degrees and hence increased maximum range from 6525 to 9300 yards with the 2 charge shell.
Mk III carriage was quickly superseded by Mk IV carriage as the standard field carriage.
Mk III and IV carriages incorporated a new variable-recoil hydro-pneumatic system and moved from above to below the gun barrel. The new single-motion "Asbury breech" allowed for higher rates of fire and a Welin tapered screw adopted for the breech. A single battery of the Mk IV gun on the early Mk III carriage was serving with 4th Army when the First World War ended.[27] The new gun and carriage was in effect a new weapon but as the calibre and ammunition remained the same it was referred to as part of the 18 pr development cycle until the calibre was phased out.
By 1919 the standard British field gun was the 18 pounder Mk IV gun on Mk IV carriage but Britain still possessed many of the older Marks.
Inter-War Period
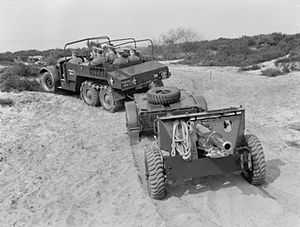
The Mk V carriage with split trail entered service in 1923, it allowed 25 degrees left and right traverse without moving the trail and up to 37.5 degrees elevation.
In 1925, some guns were experimentally fitted on a Medium tank chassis as self-propelled artillery (the "Birch Gun"),[27] the Birch gun was used for the exercises of the Experimental Mechanized Force in 1927-1928.
The Mk IV ordnance was modified. In the Mk IVA the A tube and wire were replaced by an autofrettaged loose liner. The Mk IVB was the same with minor modifications, most notably 3 shoulders instead of 2. A Mk V ordnance was designed but does not appear to have entered service.[28]
In the 1930s, as the British Army started to fully mechanise, all guns were converted to mechanised towing. Initially this was by fitting heavy wooden wheels with solid rubber tyres, the carriages becoming Mks IIITR, IVR and VR. Subsequently wooden wheels were replaced by new axles, steel wheels, pneumatic tyres and modern brakes. However, unlike other guns 18-pdr was not converted to Probert pattern calibrating sights.
Introduction of a new streamlined shell, Mk 1C, with a 4/7.5 crh increased maximum range to 11,100 yards with Mks III, IV and V carriages.[29]
Starting in 1938, Mk IV and V carriages were used for the new Ordnance QF 25-pdr Mk 1. This was a conversion from the 18-pdr Mk IV fitted with a sliding block breech. The calibre increased from 84 mm to 87.6 mm by changing the liner.
Production
By the outbreak of war in 1914, 1225 guns had been produced, including 99 in India.[30] UK production was by Armstrong Whitworth, Vickers and Woolwich Ordnance factory. In World War I these were joined by Beardmore, and, in the US, Bethlehem Steel. In the latter part of the war component assemblies were produced by various other companies.
Total wartime production 1914–1918 was 9908 guns and 6926 carriages.[31] Limited production of both guns and carriages continued between the wars and some carriages for use with 25-pdr Mk 1 were produced in the early part of World War II.
Combat use
World War I
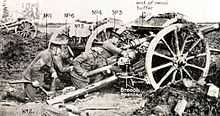
Throughout World War I, the 18-pounder was operated by the Royal Field Artillery as the standard field gun. Some Royal Horse Artillery batteries were also re-equipped with it as their 13 pounders proved unsuited to the prevalent trench warfare.

The gun and its 2-wheeled ammunition limber were towed by a team of six vanner horses (light draught) in pairs - lead pair, centre pair, limber pair. A driver rode the left horse of each pair. The 2-wheeled ammunition limber was hooked up to the horses and the trail of the gun was hooked up to the limber, so the total weight of the gun and trail were supported on 4 wheels. The gun detachment all rode into action either on their own horses or on the limber and wagons, led by the No. 1 (the detachment commander, a Sergeant) on his own horse.[32] In early actions of the war the ammunition limber was positioned on the left of the gun, and ammunition was passed from there to the loader, but as the war progressed and larger quantities of ammunition were fired ammunition was dumped in quantity at prepared positions next to gun pits. In addition each section (two guns) had two additional ammunition limbers available towed together by their own team.
Initially, British Regular Army and Canadian infantry divisions were equipped with three field artillery brigades each with three batteries of six 18-pounders (for a total of 54 per division), and a brigade of 4.5 inch howitzers. However, by the end of September 1914 all reserve guns (25% above the establishment entitlements as decided by the Mowat Committee in 1901) had been delivered to France, although new production orders had been placed on the outbreak of war. However, there were insufficient guns to equip brigades of New Army, Territorial Force and other Dominion divisions, so their batteries had only four guns (total 36 per division) and at Gallopoli Australian and New Zealand divisions had fewer brigades.[33] In 1916 the decision was taken on the Western Front that all batteries should have six guns.
From February 1917, all divisions were standardised with two artillery brigades each with three batteries (named A, B and C) of six 18-pounders (total 36 per division) and one battery (D) of six 4.5 inch howitzers (total 12 per division). The remaining 18 guns from Regular divisions were transferred to Army control in Army Field Artillery Brigades, to be available for more flexible deployment.
1914
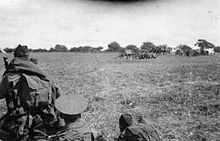
When World War I began, British field guns (13 pounder and 18 pounder) were equipped solely with shrapnel shells, with an approximate 3-1 ratio of field guns to field howitzers (5 inch and 4.5 inch).
The 18-pounder shrapnel shell contained 374 small spherical bullets. A time fuze was set to initiate the shell in the air in front of the target. This blew off the shell nose and fired the bullets forward in a cone like a shotgun : they were effective up to 300 yards from the burst. For maximum effect from the cone of bullets the angle of descent of the shell had to be flat and not plunging. At a theoretical maximum 20 rounds per minute it could deliver 7,480 bullets per minute at a far greater range than machine-guns. The gunners and officers of Regular Army field artillery batteries were expert at closely supporting the "fire and movement" tactics of the infantry with accurate shrapnel fire.
Shrapnel was effective against troops in the open, including those serving guns without gun shields. They remained effective throughout the war against opportunity targets such as working parties. They were used for wire cutting and most importantly in the creeping barrage where they prevented defenders from manning their trench parapets during a British assault. In this respect they were perhaps the key element in the British artillery doctrine of neutralizing defenders during an assault instead of trying to destroy the enemy in their defences before an attack.[citation needed] Primacy of neutralizing defenders became the distinguishing characteristic of British artillery for the remainder of the 20th Century.[citation needed]
The first trial high-explosive TNT rounds were fired in action on 31 October 1914 by 70th Battery, 34th Brigade RFA and 54th Battery, 39th Brigade RFA on the Ypres front and were quite successful, demonstrating both that they could destroy enemy guns and kill troops. From then on Britain increasingly supplied 18-pounders with high-explosive shells.
A major lesson learned in 1914 was that the early British doctrine of positioning field guns in open or semi-open positions made them vulnerable to enemy artillery fire, and subsequently more use would be made of available sheltered and hidden positions for firing. This made the role of the Observing Officer crucial for 18 pounder batteries engaging targets as they could no longer rely on direct line of sight.[34] These officers suffered high casualties. It is instructive to compare the photograph of the 18-pounder gun in the open at the 1914 Battle of the Marne with that below of the gun almost hidden in a pit at the Second Battle of Bullecourt in 1917.
1915

With Britain now attacking on the Western Front from 1915 onwards, barrages were used to neutralize defenders during an attack (first used some 15 years earlier). 18-pounder fire was also used to cut enemy barbed-wire obstacles, and high explosive shells to inflict damage on defensive works. From 1916 light and medium mortars were increasingly used to blow aside barbed wire obstacles.
The 18-pounder continued to be used as a general-purpose light gun in other theatres, such as on Gallipoli where it was manhandled up onto the tops of steep hills such as the "400 Plateau", "Bolton's Hill" and "Russell's Top"[35] because of the lack of a modern mountain gun and shortage of field howitzers. The 18-pounder could attack lightly protected troops by destroying the parapets of trenches, small houses, and barricades. But its relatively flat high velocity trajectory meant that it could not reach an enemy sheltering out of the direct line of sight, in dips in the ground, on reverse slopes (such as the Quadrilateral east of Ginchy on the Somme) or in deep trenches or cellars. It lacked the power to demolish fortifications. However, it could neutralize defenders with HE or shrapnel.
Nevertheless in the first 10 months of the war 3628 18-pdrs were ordered and only 530 4.5-inch Howitzers. Heavier guns were being collected from the farthest corners of the Empire and by June 1915 orders had been placed for 274 new heavy guns and howitzers from 60-pdr Gun to 15-inch Howitzer and a new 6-inch Howitzer designed. However, by June 1915 it had also become clear that Germany was reducing the proportion of field guns (to 3.5 per 1000 bayonets) and increasing that of heavier guns and howitzers (to 1.7 per 1000 bayonets) with one third of their artillery being 15 cm or more.[36] Britain had no choice but increase the amount of heavy artillery but did not plan to reduce the scale of field artillery because of the need for what would later be called 'close support'. Nevertheless a de facto decrease had happened due to expansion limiting field batteries to 4 guns.
British planners considered they would need a 2-1 ratio for a successful offensive while the French believed they needed 1-1.[37] General Farndale justified the retention of 2-1 field artillery as "Field guns were essential to attack targets close to our own troops and to play their part in the tactical plan".[38]
During 1915 18-pdr ammunition production was equally divided between HE and shrapnel but expenditure was mostly shrapnel, 88% in September and November.[39]
1916

Field artillery (both 18-pounder and 4.5 inch howitzer) was used successfully during the pre-Zero fire in the Battle of the Somme in late June-early July 1916, when the British heavy artillery damaged German defensive works and forced troops into the open to rebuild them they were successfully fired on with shrapnel.[40] The use of field guns to provide a covering fire barrage that neutralized the enemy during the infantry advance was used and improved during the Battle of the Somme, forcing the enemy to remain in shelters while the infantry advanced immediately behind the bursting shells : "... It is therefore of the first importance that in all cases the infantry must advance right under the field artillery barrage, which must not uncover the first objective until the infantry are within 50 yards of it".[41] The small bursting range of the shell was an advantage in this case, as advancing troops could approach close to it. The 18-pounder's role was spelled out following the Somme battles "... primarily in barrage fire, repelling attacks in the open, raking communications, wire cutting and sometimes for neutralising guns within their reach, destroying breast-works and barriers with HE and preventing repair work on defenses beyond the reach of infantry weapons"[42]
18-pounder ammunition requirements were predominantly shrapnel during 1916, although in the latter part of the year it shifted back to equality between HE and shrapnel.[39] In July 1916 standard contract prices for UK produced shells were 12 shillings and 6 pence (62.5 pence in modern terms) for HE and 18 shillings and 6 pence for shrapnel. US and Canadian prices were significantly higher. The lowest price achieved for 18-pounder HE shells was 8 shillings and 11 pence (44.8 pence) later in 1916.[43]
1917

The January 1917 "Artillery in Offensive Operations" estimated 18-pounders needed 7.5 shrapnel rounds + 5% HE per yard of front at medium range to cut barbed wire defences, and 20 rounds of HE to destroy trenches in enfilade. Destruction of trenches frontally was generally estimated as requiring twice the enfilade amount. It was estimated that an 18-pounder would fire 200 rounds per day in an "all out" offensive.[44] It expressed a preference for shrapnel with a long corrector in creeping barrages due to its high number of "man-killing missiles" and its smoke cloud (shrapnel shells were designed to produce a white puff of smoke on bursting, originally as an aid to gunnery spotting). HE was viewed as not providing this necessary visual screen but could be considered for use in creeping and back-barrages in conjunction with smoke shell, but smoke shell was considered "still in its infancy".[45]
In its February 1917 Technical Notes on 18 pounder Barrages, GHQ stated shrapnel and HE barrages would normally cover to a depth of 200 yards and expressed its preference for timed shrapnel (T.S.) for creeping barrages, due partly to shrapnel directing its force forward hence being safer for those following especially if it fell short. 50% air bursts and 50% percussion (bursting on contact) was considered optimal except on "very bad ground" where percussion rounds would mostly be wasted. HE with its lateral bursting was considered more dangerous to advancing troops (as they were assumed to be in a line abreast) than shrapnel if it burst short, but lateral bursts were considered to have less effect on the enemy as they had less "forward effect". HE with delay was difficult for advancing troops to stay close behind as it burst 30-40 yards beyond the point of initial contact. HE without delay was assessed as effective only if it burst actually in the enemy trench. With a proper barrage program and fuze setting, timed shrapnel creeping barrage was considered optimal.[46] British regular army field gunners were already proficient in accurately timed low shrapnel bursts in 1914, as demonstrated in the early battles, but few remained by early 1917 and many gunners were relatively new recruits and inexperienced; HE had only been in use with 18-pounders for two years, so this note perhaps reflects a desire to stick with a proven method for which they could still draw on a nucleus of experts. Shrapnel appears to have been favoured for creeping barrages and a mix of shrapnel and HE for standing barrages and other tasks.
The British advance in pursuit of the German army in early 1917 as it withdrew to stronger positions on the Hindenburg Line brought a brief resumption of mobile warfare, and from the experience GHQ emphasised the need to get all light weaponry as far forward as possible to support infantry, and that "Covering fire of 18-pounders and 4.5 inch howitzers can not be too far exploited" [i.e. should be exploited as much as possible]. It also warned "There was tendency, due to trench warfare, among C.R.A.s to attempt to control individual batteries. Brigade or group commanders should be given a task and allowed to carry it out".[47]

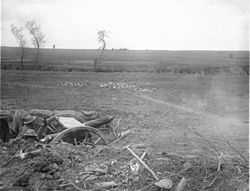
At the opening of the Battle of Arras on 9 April 1917 the order was for 18-pounders to fire 50% HE and 50% shrapnel in the creeping barrage ahead of the advancing infantry, with one gun for every 20 yards of front. While a few commanders varied this slightly, such as Brigadier-General Tudor, CRA of 9th Division, who chose 75% HE and 25% smoke, the opening was notable for the first use of a coordinated fireplan across the whole front of several armies, with a common strategy linking infantry with artillery and coordinating the advance of various types of artillery. For instance, the 18-pounders were to move forward when the infantry reached their Phase 2 objective and the 60 pounders and 6 inch howitzers would move forward to take their vacated firing positions. This contrasted with the Somme where individual Corps and Division commanders used their own fire plans and assault tactics.[48]
For the Third Battle of Ypres in July 1917 the plan was for wire cutting to be done by mortars and howitzers, "to conceal the strength of the field guns". 1,098 18-pounders, one for every 15 yards on average,[49] would include shrapnel in firing a creeping barrage starting close to the British trenches and moving forward at 100 yards in 4 minutes. Field batteries were to advance beyond no-mansland as the priority was to protect the infantry while they were "consolidating on their objectives" (i.e. gaining and holding new advanced positions).[50]
In the opening barrage for the first phase on 31 July, the Battle of Pilckem Ridge, 2/3s of the 18-pounders fired in the creeping barrage at four rounds per minute and 1/3 fired in the standing barrage on the German second line.[51] The barrage was generally successful but as the weather deteriorated and tracks turned to mud and shellholes filled with water it became nearly impossible for guns to advance in support of the infantry as planned.[52]
For the opening barrage at the Battle of Menin Road on 20 September the ratio of medium/heavy artillery to field artillery reached 1 - 1.5 for the first time, reflecting more heavy guns rather than fewer field guns. 18-pounders were to fire 50%-50% shrapnel and HE with 25% of the HE fuzes set to delay.[53] Hence the previous doubts about HE appear to have been overcome, and for the lifting barrage for the Battle of Cambrai on 20 November (this was chosen rather than a creeping barrage) the 18-pounders were to fire equal proportions of shrapnel, HE and smoke, with the precise smoke usage depending on weather conditions at the time.[54]
A total of 47,992,000 18-pounder rounds were manufactured in 1917 and 38,068,000 were fired,[55] (38% of its total for the whole war) indicating the extent to which the artillery war escalated in 1917. 18-pounder ammunition requirements in 1917 were generally equal quantities of shrapnel and HE.[39]
1918
18-pounders were used effectively in the spring of 1918 against attacking German troops during their Spring Offensive. However, the effectiveness of the German fire plan on 21 March caused many casualties amongst the gunners, and in too many case batteries were unable to withdraw before being overrun. Nevertheless on 4 April the Germans made their final attempt to break the British line having advanced to the area of Villers Bretonneux held by 14th and 18th Divisions, reinforced by the 16th and 39th divisional artilleries although batteries were understrength through losses. By mid-morning obervers were engaging massed German infantry but these pressed forward and reached just east of Hamel. Brigadier-General Edward Harding-Newman, CRA of 14 Division issued the following order "This attack must and can be stopped by artillery fire. If any battery can no longer effectively stop the enemy from its present position, it will at once move forward to a position on the crest, to engage the enemy over open sights. It is essential that the artillery hold the line and they will do so." Fire from several RFA brigades mostly with 18-pounder batteries stepped the German advance, including some from 16 Division that deployed forward to the crest and observers from 177 Brigade RFA using Hamel church tower. This action effectively ended the German advance.[56]
For the successful British attack at the Battle of Amiens on 4 July there was one 18-pounder per 25 yards of front, supplemented by machine-guns, and they fired a barrage of 60% shrapnel, 30% HE and 10% smoke 200 yards ahead of the advancing troops.[57]
In the first half of 1918 18-pounder ammunition requirements were predominantly (about 60%) shrapnel, moving back to equality between shrapnel and HE in the final months of the war. Chemical and smoke shells were each around 5% of the total.[39]
By the end of World War I the modern "empty battlefield" was evolving, with troops learning to avoid open spaces, and the light field gun was becoming obsolete, with an increasing use of light machine-guns, light mortars and field howitzers which with their high trajectory were able to drop shells onto even deeply sheltered enemy troops on reverse slopes which field guns could not reach. The 18-pounder Mk IV, with its box trail which allowed it to fire in a high trajectory, had began its evolution into the more versatile 25 pounder gun-howitzer.
At the Armistice there were 3,162 18-pounders in service on the Western Front and it had fired approximately 99,397,670 rounds.[39]
Between The Wars
After the Armistice in 1918, some British and Canadian 18-pounders, including a battery transported portee, were in the British Army of the Rhine in the Rhineland. It also served with British and Canadian forces in North Russia in 1918-9 and with the Canadian Siberian Expeditionary Force.[58][59]
In 1919 it served with 7, 16, 21 and 217 Bdes RFA in the Third Afghan War,[60] in operations in Mesopotamia 1920-21, and Waziristan 1936-37.[58]
World War II
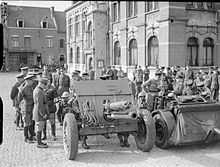
During World War II the 18 pdr was used by Territorial Army regiments in the British Expeditionary Force in 1940, where 216 guns were lost. This left the British Army with 126 guns in UK and 130 in the rest of the world, according to a stocktake in July 1940. 611 18-pounder were converted to 25-pounders before the war, and 829 during it.
It was used in East Africa by British and South African regiments,[61][62] the North African Campaign, in the Far East until replaced by the 25-pounder, especially in Malaya where a number of British Field Regiments had them and by 965 Beach Defence Battery in Hong Kong.[63] At the Battle of Kota Bharu some of the first shots of the Pacific War were fired by an Indian Army manned 18-pounder.
Irish Service
The 18-pdr was introduced to the Irish National Army in 1922 on the foundation of the state. It was first used by National Army Gunners to bombard the Four Courts in Dublin from 28 June 1922, as part of the Battle of Dublin. The departing British Forces were criticised for the lack of training they had imparted to the gunners of the infant Irish artillery corps, and for providing shells intended to destroy barbed wire rather than the normal HE shells. The marks of the shell fire can still be seen on the walls of the Four Courts. The 18-pdr played an important role throughout the Irish Civil War, being instrumental in the fighting in Munster alongside the Rolls-Royce Armoured Car. The nine 18-pdr guns were used in the infantry support role until grouped together to form an artillery corps in March 1923.
With the establishment of the Defence Forces in 1924, the 18-pdr was the only artillery weapon in Irish service, forming the 1st and 2nd Field Batteries of the Artillery Corps. By the following year 25 18-pdr guns were on hand and 3 more were delivered in 1933. Additional equipment received by the army in 1941 included 4 18-pdr guns. The regular armys field batteries re-equip with the 25 pounder in 1949 but 37 18-pdr guns were still in use with the reserve FCA. The guns remained in FCA service until the late 1970s when they were replaced by the 25-pdr and 120 mm mortars.
Some examples remain preserved, including several in Collins Barracks, Cork, in Mc Kee Barracks, Dublin and two Mk IV guns in Aiken Barracks Dundalk.
Finnish Service
Britain sold 30 Mk 2 guns on Mk 2 carriages with pneumatic tyres to Finland during the Winter War, but they arrived too late to be used during that combat. They were used as "84 K/18" during the Continuation War by Field Artillery Regiment 8, 17th Division.[64]
Extended specification

- Gun
- Length: 9 ft 6 in (2.90 m)
- weight: 9 cwt
- Rifling: 18 grooves (Mks I, II, IV)
- Twist: 1 in 30 (Mks I, II, IV)
- Barrel Life: 12,000 to 15,000 rounds
- Carriage
- weight: 24 cwt (Mk V 27 cwt)
- Width: 6 ft 3 in (1.91 m)
- recoil: 41 inches fixed (carriage Mk I, II); 26 - 48 inches variable (carriage Mk IV, Mk V)
- Elevation: -5° to +16° (carriage Mk I & II with pole trail), +30° (carriage Mk III box trail), +37°
(carriage Mk IV box trail & Mk V split trail)
- Traverse: 4.5° left and right (Carriage Mk I - IV); 25° left and right (carriage Mk V)
- Gunshield: proof against shrapnel and rifle fire (500 yds)
- Limber
- Capacity: 24 shells
- weight: 14 cwt
World War I Ammunition
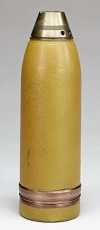
18-pounder ammunition was a fixed round (i.e. the shell and brass cartridge case were loaded as a single unit, much like a large rifle cartridge), and fitted with a nose fuze. The normal service round was "Full Charge", a "Reduced Charge" round was available for training. Double base propellant (nitroglycerine and nitrocellulose) was used, Cordite Mark 1 was the standard propellant when the gun was first introduced into service. By 1914 this cordite had been replaced by Cordite MD. During World War I this was replaced by a revised formulation that was easier to produce called Cordite RDB.[65]
Until September 1914 the only 18-pounder issued shell was shrapnel, fitted with a No. 80 "Time & Percussion" fuze (based on a Krupp design). The timer was set to open the shell and fire the bullets forward before it hit the ground. No 80 Fuze was an igniferous type of time fuze (as were most World War I time fuzes), meaning it burnt a gunpowder at a known rate to give a time from firing to fuze functioning. The shell did not burst, but projected spherical lead-antimony bullets forward in a cone, these bullets were effective up to 300 yards from the burst. 18-pounder carried 374 of the 41/pound size bullets. The fuze was designed to function as close as 50 yards from the muzzle if required, in order to eliminate the need for case shot. Observing shrapnel bursts was difficult, and after many experiments gunpowder pellets were added to the tube between the fuze and the gunpowder ejecting charge in the base of the shell in order to emit a puff of smoke, this had the added advantage of widening the cone of the bullet spread.
A star shell with a time fuze (No 25) had been developed and small stocks were held before the war but it was not routine issue.
Pre-war experiments with 18-pounder HE shells had been inconclusive in terms of their benefits. However, the first month of World War I showed that they were worth having and the first HE rounds arrived in September 1914. This was a different shape to the existing shrapnel shell so a new Mark 2 shrapnel shell was introduced to ensure ballistic compatibility. The original shrapnel shells had a relatively blunt ogive - 1.5 circular radius head (crh), the newer ones were 2 crh.
In 1914 the standard HE used by UK artillery was Lyddite, a formulation based on picric acid, this was a powerful explosive but expensive. TNT was introduced, but this too was expensive, particularly in its pure form required for shells so eventually Amatol was adopted. This was a mixture of ammonium nitrate and lower quality TNT, various proportions were used but eventually 80% ammonium nitrate and 20% TNT became standard. The parallel inside walls of the shell made it suitable for filling using pre-formed blocks of explosive as well as pouring.[66]
Other types of shell were also introduced, although not as extensively as they were for howitzers and heavier guns. White phosphorus smoke shells became available in small quantities in 1916, and in 1918 chemical and incendiary shells were provided. The latter were a shrapnel type shell using thermite pellets, although a black powder incendiary shell for AA use against Zeppelins was introduced in 1916.[67]
 |
 |
 |
 |
 | |
This shell does not have the red band around the neck, indicating it has not been filled |
The red band indicates it has been filled. The green band indicates it is filled with amatol or trotyl (in British use TNT was known as Trotyl). HE filling was initially pure TNT (1914), later TNT/Amatol mixture.[70] Filling weight 13 oz (368 gm) Propellant weight 1 lb 8.8 oz (694 gm) Cordite[71] Total round Length 21.75 inches |
375 balls, lead antimony, 41 balls to pound[72] |
Propellant weight 1 lb 6.9 oz (650 gm) Cordite[71] Length 21.75 inches |
World War II Ammunition
After World War I the variety of ammunition was reduced although an armour piercing HE shell was developed. The main change was introduction of a new streamlined HE shell, 4/7.5 crh, giving a significant improvement in range. In the 1930s the new generation of double base propellant, Cordite W, was also adopted.
-

18-pdr rounds in British service in 1939. 'Reduced' means a reduced propelling charge. Older rounds were also available. Fuze No 115 was a streamlined version of No 106. Armour-piercing shell had a base fuze, No 12.
See also
- 75 mm Gun M1917 US version
- 7.7 cm FK 96 n.A.
- 7.7 cm FK 16 German equivalent : German equivalent but firing a lighter shell
- 76 mm divisional gun M1902 Russian equivalent
- Canon de 75 modèle 1897 French equivalent but firing a lighter shell
- List of field guns
Surviving examples

- Royal Artillery Museum, Woolwich, London
- Imperial War Museum, London.[73]
- Canadian War Museum, Ottawa
- The Central Museum of The Royal Regiment of Canadian Artillery, Shilo Manitoba
- Collins Barracks, Cork, Ireland
- Australian War Memorial, Canberra
- Royal Australian Artillery Museum, North Head, Sydney, Australia
- South African National Museum of Military History, Johannesburg, South Africa
- Mk 2 gun on Mk 2 carriage with pneumatic tyres (Finnish 84 K/18) on display at the Finnish Artillery Museum (Suomen tykistömuseo), Hämeenlinna, Finland
References
Notes
- ↑ Smith, Colin (2006). Singapore Burning. Penguin. p. 132. ISBN 0-14-101036-3.
- ↑ Clarke, pg. 33
- ↑ 3.0 3.1 Hogg & Thurston, pg. 81
- ↑ 6 men operated the gun in action. Another 4 were responsible for ammunition supply, and they were usually based behind the gun lines, only meeting the gun crew when they went forward with ammunition. Hence the full complement was 10 men.
- ↑ Hogg & Thurston, pg. 83
- ↑ Hall December 1973
- ↑ 7.0 7.1 Farndale 1986, pg. 1
- ↑ Farndale 1986, pg. 159. Following the experience of the Battle of the Somme the 18 pounder was limited from January 1917 to 4 rounds per minute, as the barrel and recoil mechanism could not stand more. "And this rate should only be maintained for short periods" : "Artillery in Offensive Operations", 11. Rate of Fire and Depth of Lifts.
- ↑ This limitation appears to have been an inevitable result of the new warfare rather than reflecting any inherent design flaw in the 18 pounder, as German staff were coming to the same conclusions with their own guns : "The guns' greatest enemy is... our own rapid fire... no gun barrel can resist a too prolonged barrage fire. Barrage fire must be rapid, but it must only last a few minutes; it should not be recommenced except in a case of need". "Instructions - Artillery Fighting on the Somme - Part II"
- ↑ Major D Hall, December 1973 quotes 1,640 ft/s (500 m/s)
for Mk IV. Hogg & Thurston quote 1615. Other sources quote 1625 and 1632. Maximum muzzle velocity of Mk IV was apparently fractionally higher than Mk II, and appears to have been related to usage of more modern ammunition post-WWI. - ↑ British military traditionally denoted smaller ordnance by the weight of its standard projectile, in this case approximately 18 pounds (8.2 kg)
- ↑ Headlam, p.13
- ↑ Headlam, p.73
- ↑ Headlam, Appendix B
- ↑ Headlam, Appendix C
- ↑ Headlam, pp. 73–74
- ↑ Headlam, p. 97 and 105
- ↑ Hall, June 1973
- ↑ Pages 5 & 6 in "Handbook of the 18-PR. Q.F. GUN - Land Service", 1913
- ↑ 20.0 20.1 Hogg & Thurston, p.84
- ↑ Farndale 1986, p.397
- ↑ Routledge, p.27
- ↑ 23.0 23.1 Hogg & Thurston, p.80
- ↑ Farndale 1986, p.135
- ↑ Hogg & Thurston, p.80. They state that the modification was actually being made "some time before this".
- ↑ Hogg & Thurston, p.86
- ↑ 27.0 27.1 Clarke, p.39
- ↑ Range Table for Ordnance QF, 18-pr Mks I to V 2CRH Shrapnel, 4/7.5 CRH HE, 1929
- ↑ Range Table for Ordnance QF, 18-pr Mks I to IV 2CRH Shrapnel, 4/7.5 CRH HE, 1929
- ↑ Hogg
- ↑ The Official History of the Ministry of Munitions, Volume X, The Supply of Munitions, Part 1 Guns
- ↑ Clarke, pg. 46
- ↑ David Horner, "The Gunners - A History of Australian Artillery", 1995, Chapter 5
- ↑ Farndale 1986, pg. 332
- ↑ CEW Bean describes this in detail in "THE OFFICIAL HISTORY OF AUSTRALIA IN THE WAR OF 1914-1918 Volume II" Chapter 3. 11th Edition, published by Angus & Robertson, Sydney, 1941
- ↑ Official History of the Ministry of Munitions Volume X Part I pg 7
- ↑ Farndale 1986, pg. 116
- ↑ Farndale 1986, pg. 333
- ↑ 39.0 39.1 39.2 39.3 39.4 Official History of the Ministry of Munitions Volume X Part II Gun Ammunition: General
- ↑ Farndale 1986, pg. 144
- ↑ Farndale 1986, pg/ 150. Quoting MGRA Fourth Army Major-General Birch's memorandum during the battle.
- ↑ Farndale 1986, pg. 158. Quoting War Office Artillery Notes No. 4 - Artillery in Offensive Operations, January 1917.
- ↑ Official History of the Ministry of Munitions Volume X Part III Gun Ammunition: Shell Manufacture
- ↑ "Artillery in Offensive Operations", Appendix IV, January 1917
- ↑ "Artillery in Offensive Operations", 13. Ammunition for the Field Artillery Barrage, January 1917
- ↑ Technical notes on 18 pounder Barrages. February 1917.
- ↑ Additional Points Brought Out in Open Fighting up to April 7, 1917.
- ↑ Farndale 1986, pg. 166, 171-172
- ↑ Farndale 1986, pg. 199
- ↑ Farndale 1986, pg. 197. Quoting the plan issued by Major-General Uniacke, MGRA 5th Army on 30th June 1917.
- ↑ Farndale 1986, pg. 201
- ↑ Farndale 1986, pg. 203
- ↑ Farndale 1986, pg. 205-206
- ↑ Farndale 1986, pg. 219
- ↑ Farndale 1986, pg. 206
- ↑ Farndale 1986, pg. 277-279
- ↑ Farndale 1986, pg. 284
- ↑ 58.0 58.1 Hughes
- ↑ Colonel GWL Nicholson, "The Gunners of Canada - The History of the Royal Regiment of Canadian Artillery", Volume 1 1534-1919, 1967
- ↑ General Staff Branch, Army HQ India, "The Third Afghan War 1919 Official Account", 1926
- ↑ Farndale 1996
- ↑ Northling, Commandant CJ, Ultima Ratio Regum - Artillery History of South Africa, 1987
- ↑ Farndale 2002
- ↑ Jaeger Platoon: Finnish Army 1918 - 1945. Artillery Part 3: Light Field Guns (75 mm - 84 mm)
- ↑ Official History of the Ministry of Munitions, Volume X The Supply of Munitions, Part IV Gun Ammunition: Explosives
- ↑ Official History of the Ministry of Munitions, Volume X The Supply of Munitions, Part II Gun Ammunition: General
- ↑ Official History of the Ministry of Munitions, Volume X The Supply of Munitions, Part III Gun Ammunition: Shell Manufacture
- ↑ Imperial War Museum. "Shell 18pdr HE (MUN 546)". IWM Collections Search. Retrieved 8 March 2013.
- ↑ Imperial War Museum. "18pdr HE Fixed Round (MUN 500)". IWM Collections Search. Retrieved 8 March 2013.
- ↑ Clarke 2004, page 17
- ↑ 71.0 71.1 Hogg & Thurston 1972, page 240
- ↑ 375 balls, 41/lb is for Shrapnel shells Mk II and later. "Treatise on Ammunition" 10th edition. War Office, 1915.
- ↑ Imperial War Museum (2013). "18 pdr QF Gun Mk II, Pattern 1904 (ORD 104)". IWM Collections Search. Retrieved 10 March 2013.
Bibliography
- Handbook of the 18-PR. Q.F. GUN - Land Service 1913
- "History of the Ministry of Munitions", 1922. Volume X : The Supply of Munitions. Facsimile reprint by Imperial War Museum and Naval & Military Press, 2008. ISBN 1-84734-884-X
- Dale Clarke, "British Artillery 1914-1919. Field Army Artillery.", Osprey Publishing, 2004, ISBN 1-84176-688-7
- General Sir Martin Farndale, History of the Royal Regiment of Artillery. Western Front 1914-18. London: Royal Artillery Institution, 1986. ISBN 1-870114-00-0
- General Sir Martin Farndale, The History of the Royal Regiment of Artillery - The Years of Defeat 1939-41, 1996.
- General Sir Martin Farndale, "The History of the Royal Regiment of Artillery - The Far East Theatre 1941-45", 2002.
- Major-General Sir John Headlam, "The History of the Royal Artillery - from the Indian Mutiny to the Great War", Volume II (1899–1914), Royal Artillery Institution (Woolwich), 1937. Facsimile reprint by Naval & Military Press, 2005. ISBN 978-1-84574-043-6
- Ian Hogg & L.F. Thurston, "British Artillery Weapons & Ammunition 1914 - 1918", Ian Allan, 1972
- Ian Hogg, "Allied Artillery of World War One", 1998, ISBN 1-86126-104-7
- Major General B.P. Hughes, "The History of the Royal Regiment of Artillery - Between the Wars 1919-39", 1992, ISBN 0-08-040984-9
- Brigadier N.W. Routledge, "History of the Royal Regiment of Artillery. Anti-Aircraft Artillery, 1914-55", Brassey's, 1994, ISBN 1-85753-099-3
Further reading
- V Plüskow, "Instructions - Artillery Fighting on the Somme - Part II". Captured German document by Staff of the 11th A.C., H.Q., Sept 16, 1916. Reprinted in US War Department Notes on Recent Operations, July 1917. Provided online by Combined Arms Research Library
- "Additional Points Brought Out in Open Fighting up to April 7, 1917" General Headquarters, 10 April, 1917. Reprinted in US War Department Notes on Recent Operations, July 1917. Provided online by Combined Arms Research Library
- GHQ Artillery circular No. 5, March 26 1917. Technical notes on 18 pounder Barrages. Reprinted in "Field Artillery Notes No. 7". US Army War College, August 1917. Provided online by Combined Arms Research Library
- "Counter-Battery Work" Artillery Notes No. 3 February 1918. Redistributed by US Army War College April 1918. Provided online by Combined Arms Research Library
- "Artillery in Offensive Operations" GHQ Artillery Notes No. 4 January/February 1917. Redistributed by US Army War College August 1917. Provided online by Combined Arms Research Library
- Nigel F Evans, British Artillery in World War 2. 18-Pdr Gun
- General Sir Martin Farndale, History of the Royal Regiment of Artillery : Forgotten Fronts and the Home Base 1914-18. London: The Royal Artillery Institution, 1988. ISBN 1-870114-05-1
- Terry Gander, "The British 18-pounder QF Field Gun", Airfix, August 1980
- Hall, Major D, "Field Artillery of the British Army 1860-1960 Part II, 1900-1914" in The South African Military History Society. Military History Journal - Vol 2 No 5, June 1973
- Hall, Major D, "Field Artillery of the British Army 1860-1960 Part III, 1914-1960" in The South African Military History Society. Military History Journal - Vol 2 No 6, December 1973
- Lieutenant-Colonel C N F Broad DSO, R.A., THE DEVELOPMENT OF ARTILLERY TACTICS 1914 - 1918 PART I Reprint from The Journal of the Royal Artillery, May, 1922
- Lieutenant-Colonel C N F Broad DSO, R.A., THE DEVELOPMENT OF ARTILLERY TACTICS 1914 - 1918 PART II Reprint from The Journal of the Royal Artillery, June, 1922
- Douglas T Hamilton, "Shrapnel Shell Manufacture. A Comprehensive Treatise". New York: Industrial Press, 1915. Ch. 10-12 : Specifications and manufacturing method for British 18-pounder Shrapnel shell, Fuzes, Cartridge, Primer.
- Douglas T Hamilton, "High-explosive shell manufacture; a comprehensive treatise". New York: Industrial Press, 1916. Ch. 4, 9 : Specifications and manufacturing method for British 18-pounder High-explosive shell, Fuzes, Cartridge, Primer.
External links
| Wikimedia Commons has media related to QF 18 pounder. |
| ||||||||||||||||||||||||||||||||||||||||||||||||||||
| |||||||||||||||||||||||