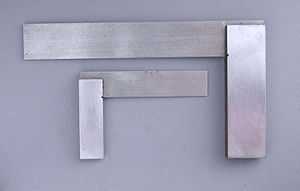
Machinist square

A machinist square or engineer's square is the metalworkers' equivalent of a try square. It consists of a steel blade inserted and either welded or pinned into a heavier body at an angle of 90°. In the accompanying image, there is evidence of pinning at the intersection of the blade and body: the heads of three pins are visible as dark circles. A small notch has been added to the inside corner of the square to prevent small particles from accumulating and affecting the square's reading. This notch is typical of machinist squares and is occasionally found on carpentry squares as well.
Use
In use, the body is aligned against the one edge of the object and the blade is presented to the end or body of the object. If the end is being checked, then a strong light source behind the square will show any mismatch between the blade of the square and the end of the object. The purpose of this action is to either check for squareness or to mark out the body of the workpiece.
Accuracy
Machinist squares can have a linear error of no greater than 0.0002 in/in.[1] Squares must be occasionally checked for accuracy. The four disk method is one way to verify overall squareness. However, it cannot detect bent blades.
There are several different International or National standards that Engineer's Squares are manufactures to, two main ones being: - BS 939. (British Standards). - DIN 875-1 (German/Euro standards).
Under both these standards there are basic dimensions set out for blade/body length ratio, and cross sections of both, as well as different types of squares such as those with a solid body and an inserted blade, or those with a single piece blade and body being precision ground with another plate attached to the base of this to provide a square 'butt' to reference to.
Also under these standards there are different grades of accuracy that a square can be made and sold to. It usually relates to a deviation of 'X' amount of blade lean Vs height of measurement usually done at the top of the blade. This also assumes that the blade and body widths are both perfectly parallel making for a true reading along the blade length and inside and outside the square.
Typically there are A or B grade squares made and sold. B grade being perfectly serviceable for most general use where accuracy is required in a workshop situation. The better A grade squares are typically used in applications where a higher grade of accuracy is required, in a toolroom for example, or for checking other squares for square, or for making jigs and fixtures where supreme accuracy is needed.
The simplest method of checking a low grade square for accuracy is to draw a line across a board with a flat face and straight edge, then flip the square over 180 degrees and see if the blade aligns with the line just drawn. Any error is multiplied by two and show ups as a wedge or taper comparison.
The ultimate method of mechanically calibrating a try square or similar is with a cylindrical master square sitting on a granite or cast iron surface plate that is flat. By nature of their construction a cylindrical master square cannot help but sit at a perfect 90 degree angle to the flat surface. A square to be tested can be presented to the master and feeler gauges used with a light behind the gap to get a reading of deviation. This method if done cleanly, correctly and accurately can find errors down to 10 µm or less, but it is very hard to find feeler gauges below this thickness to get a definite reading. At those sort of tolerances one must remember that the realm of practicality in general use is being surpassed, with ill placed heat from one's fingers for only a few seconds being sufficient to distort the square blade more than 10 µm on squares above 8 in (20 cm) tall for example. Meaning care and good judgement should be exercised to get a good reading and be realistic about the results.
Other methods of calibration are available. This can involve modern technology by using a CMM (Coordinate Measuring Machine) for example. Or perhaps a vertical machining center with a dial gauge in it.
References
- ↑ Horner, Ken (2007), Essential Guide to the Steel Square: Facts, Short-Cuts, and Problem-Solving Secrets for Carpenters, Woodworkers & Builders, Fox Chapel Publishing, p. 31, ISBN 978-1-56523-342-3.
| |||||||||||||||||||||||||||||||
