Second Battle of El Alamein
From Wikipedia, the free encyclopedia
|
|
This article needs additional citations for verification. Please help improve this article by adding reliable references. Unsourced material may be challenged and removed. (February 2008) |
|
||||||||||||||||||||||||||||||
|
||||||||||||||||||||||||||||||
|
||||||||||||||||||||||||||||||

The Second Battle of El Alamein marked a major turning point in the Western Desert Campaign of World War II. The battle lasted from October 23 to November 5, 1942. Following the First Battle of El Alamein, which had stalled the Axis advance, Lieutenant-General Bernard Montgomery took command of the British Eighth Army from General Claude Auchinleck in August 1942.
Success in the battle turned the tide in the North African Campaign. Allied victory at El Alamein ended Axis hopes of occupying Egypt, controlling access to the Suez Canal, and gaining access to the Middle Eastern oil fields. The defeat at El Alamein marked the end of Axis expansion in Africa.
Contents |
[edit] Prelude
- Further information: Second Battle of El Alamein order of battle
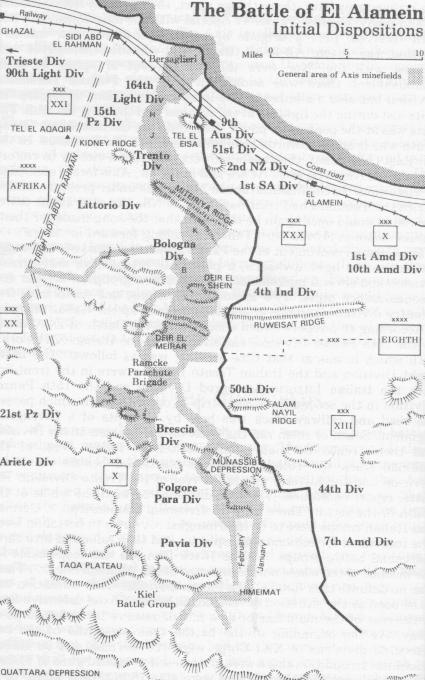
By July 1942, after its success at the Battle of Gazala, the Italo-German Panzer Armee Afrika, comprising German and Italian infantry and mechanized units under Field Marshal Rommel, had struck deep into Egypt, threatening the British Commonwealth forces' vital supply line across the Suez Canal. General Auchinleck withdrew the Eighth Army to within 50 miles of Alexandria to a point where the Qattara Depression came to within 40 miles of El Alamein on the coast. This gave the defenders secure flanks, because the depression was impassable by tanks, and left a relatively short front to defend. Here the Axis advance was halted in the First Battle of El Alamein in early-July.
Eighth Army counter-offensives during July were unsuccessful as Rommel decided to dig in to allow his exhausted troops to regroup. At the end of July, Auchinleck called off all offensive action with a view to rebuilding the army’s strength. In early August during a visit to Cairo by the British Prime Minister Winston Churchill and General Sir Alan Brooke, the British Chief of the Imperial General Staff, Auchinleck was replaced as C-in-C Middle East by General Sir Harold Alexander. Lieutenant-General William Gott was to take command of Eighth Army but was killed soon after being chosen, when the transport plane he was travelling in was shot down by Luftwaffe fighters and Lieutenant-General Bernard Montgomery became Eighth Army commander.
Faced with overextended supply lines and a relative lack of reinforcements, yet well aware of massive allied reinforcements in men and material due to arrive, Rommel decided to strike at the Allies while their build-up was still not complete. This attack spearheaded by the two armoured divisions of Afrika Korps and a force made of the reconnaissance units of Panzer Armee Afrika on 30 August 1942 was brought to a stop at Alam el Halfa ridge and Point 102. The attack failed in this second battle at the Alamein line, better known as the Battle of Alam el Halfa (commonly but incorreclty Alam Halfa); expecting a counter-attack by Montgomery's Eighth Army, Panzer Armee Afrika dug in.
The factors, which favoured the Eighth Army defensive plan in the First Battle of El Alamein, the short front line and the secure flanks, now favoured the Italo-German defenders.[15] Furthermore, Rommel had plenty of time to prepare his defensive positions and lay extensive minefields (approximately half a million mines)[16] and barbed wire. Eighth Army would have to make a frontal attack against well-prepared positions and Alexander and Montgomery were determined, first, to establish a superiority of forces sufficient not only to achieve a breakthrough but also to exploit it and destroy Panzer Armee Afrika. In all the previous swings of the pendulum in the Western Desert since 1941 neither side had ever had the strength after achieving victory in an offensive battle to exploit it decisively: the losing side had always been able to withdraw and regroup closer to their main supply bases.
After six more weeks of building up their forces, Eighth Army was ready to strike. 220,000 men and 1,100 tanks under Montgomery made their move against the 115,000 men and 559 tanks of Panzer Armee Afrika.
[edit] Allied plan
With Operation Lightfoot, Montgomery hoped to cut two corridors through the Axis minefields in the north. Armour would then pass through and defeat the German armour. Diversionary attacks at Ruweisat Ridge in the centre and also the south of the line would keep the rest of the Axis forces from moving northwards. Montgomery expected a twelve-day battle in three stages: the break-in, the dog-fight and the final break of the enemy.[17]
For the first night of the offensive, Montgomery planned that four infantry divisions from Oliver Leese's XXX Corps would advance on a 16 miles (26 km) front to an objective codenamed Oxalic Line, overrunning the forward Axis defences. Engineers would meanwhile clear and mark two lanes through the minefields, through which the armoured divisions from Herbert Lumsden's X Corps would pass to gain the Skinflint Report Line (where they would check and report their progress), and the Pierson Bound (where they would rally and temporarily consolidate their position) in the depths of the Axis defences until the infantry battle had been won.[17]
The Commonwealth forces practised a number of deceptions in the months prior to the battle to wrong-foot the Axis command, not only as to the exact whereabouts of the forthcoming battle, but as to when the battle was likely to occur. This operation was codenamed Operation Bertram. In September, they dumped waste materials (discarded packing cases etc.) under camouflage nets in the northern sector, making them appear to be ammunition or ration dumps. The Axis naturally noticed these, but as no offensive action immediately followed and the "dumps" did not change in appearance over time, they subsequently ignored them. This allowed Eighth Army to build up supplies in the forward area unnoticed by the Axis, by replacing the rubbish with ammunition, petrol or rations at night. Meanwhile, a dummy pipeline was built, the construction of which would lead the Axis to believe the attack would occur much later than it in fact did, and much further south. To further the illusion, dummy tanks consisting of plywood frames placed over jeeps were constructed and deployed in the south. In a reverse feint, the tanks destined for battle in the north were disguised as supply lorries by placing removable plywood superstructures over them.[citation needed]
[edit] Axis plan

With the failure of the Axis offensive at Alam el Halfa, the Axis forces were seriously depleted. The German and Italian armies were over-stretched and exhausted and relying on captured Allied supplies and equipment. In spite of Rommel's successes the situation was quickly turning against him as no major reinforcements were being sent to him yet the British Commonwealth forces were being re-supplied with men and materials from the United Kingdom, India, Australia and New Zealand, and Sherman tanks and trucks from the USA. Rommel continued to request equipment, supplies and fuel but the main focus of the German war machine was on the Eastern Front and very limited supplies reached North Africa.
Rommel knew full well that the British Commonwealth Forces would soon be strong enough to launch an offensive against his army. His only hope now relied on the German forces fighting in the Battle of Stalingrad quickly defeating the Soviet forces and moving south through the Trans-Caucasus and threatening Persia (Iran) and the Middle East.
This would require large numbers of British Commonwealth forces to be sent from the Egyptian front to reinforce British forces in Persia, leading to the postponement of any British Commonwealth offensive against his Army.
Using this pause Rommel could urge the German High Command to reinforce his forces for the eventual link-up between Panzer Armee Afrika and the German armies battling their way through southern Russia enabling them to finally defeat the British and Commonwealth armies in North Africa and the Middle East.
In the meantime, his forces were dug in and waiting for the eventual attack by the British Commonwealth forces or the defeat of the Soviet Army at Stalingrad. They had laid around half a million mines, most being Teller anti-tank mines with some smaller anti-personnel mines (such as the S-mine), in two enormous fields that were referred to as the Devil's gardens.[18][19] (Many of these mines were of British origin, captured at Tobruk.) In order to lure enemy vehicles into the minefileds, the Italians had a trick of dragging an axle and tyres through the fields using a long rope to create what appeared to be well-used tracks.[20]
Rommel alternated German and Italian infantry formations in the forward lines. Rommel's reserves consisted of two German Panzer divisions and one motor infantry division, and an Italian force of the same nominal size. Because the Allied deception measures had confused the Axis as to the point of attack, Rommel's defence plan spread his forces along the entire front in the belief that Montgomery would apply equal pressure along the whole front, probing for a weakness. He also believed that after this the main blow would come in the south. When the main thrust came, he believed he could manoeuvre his troops faster than the Allies to concentrate his defences at the battle's centre of gravity. However, having concentrated his defence, he would not be able to move his forces again because of lack of fuel.[21]
[edit] The Battle
The Battle of El Alamein is usually divided into five phases, consisting of the break-in (October 23-24), the crumbling (October 24-25), the counter (October 26-28), Operation Supercharge (November 1-2) and the breakout (November 3-7). No name is given to the period from October 29 to the 30th when the battle was at a standstill.
[edit] Phase One: The Break-In
At 9.40p.m.[22] on a calm, clear evening under the bright sky of a full moon, Operation Lightfoot began but not with a 1000 gun barrage as in popular belief nor with all guns firing at the same time. The fire plan had been carefully planned so that all 882 guns from the Field and Medium batteries' first rounds would land across the entire 40 mile front at the same time[23]. After twenty minutes of heavy general bombardment, the guns switched to precision targets in support of the advancing infantry.[24]The shelling plan continued for five and a half hours, by the end of which each gun had fired about 600 rounds.
There was a reason for the name Operation Lightfoot; the infantry had to attack first. Many of the anti-tank mines would not be tripped by soldiers running over them since they were too light (hence the code-name). As the infantry advanced, engineers had to clear a path for the tanks coming up in the rear. Each stretch of land cleared of mines was to be 24 feet wide, which was just enough to get tanks through in single file. The engineers had to clear a five-mile route through the 'Devil’s Gardens'. It was a difficult task which failed because of the depth of the Axis minefields.
At 10 p.m., the four infantry divisions of XXX Corps began to move. The objective was an imaginary line in the desert where the strongest enemy defences were situated. Once the infantry reached the first minefields, the mine sweepers, including Reconnaissance Corps troops and sappers) moved in to create a passage for the armoured divisions of X Corps. At 2 a.m., the first of the 500 tanks crawled forward. By 4 a.m. the lead tanks were in the minefields, where they stirred up so much dust that there was no visibility at all, and traffic jams developed as the tanks got bogged down.
Meanwhile, 7th Armoured Division (with 1 Free French Brigade under command) from Brian Horrocks's XIII Corps made a feinting attack to the south, with the aim of engaging and pinning the 21st Panzer Division and the Ariete Division and at Ruweisat Ridge. However, this attack was repulsed by the Folgore and Ramcke paratrooper brigades and the Keil Group.[25][26] Further north along the front, the 44th and 50th divisions achieved limited gains at heavy cost against determined resistance from the Pavia and Brescia divisions and elements of the Folgore.[27] The Indian 4th Infantry Division was similarly intended to occupy the Italian Bologna Division in the centre.[citation needed]
[edit] Phase Two: The Crumbling
The morning of Saturday 24 October brought disaster for the German headquarters. The accuracy of the barrage destroyed German communications and Georg Stumme, who commanded the Axis forces while Rommel was in Germany, died of a heart attack. Temporary command was given to Major-General Ritter von Thoma.
Meanwhile, XXX Corps had only dented the first minefields because of the depth of Rommel's defence[17]. Not enough of the minefields had been cleared to enable X Corps to pass through. The armour was held at Oxalic[17] and all day long artillery and the Allied Desert Air Force, making over 1,000 sorties, attacked Axis positions to aid the 'crumbling' of the Axis forces.
Panzer units counter-attacked the 51st Highland Division just after sunrise, only to be stopped in their tracks. By 4:00 p.m. there was little progress. At dusk, with the sun at their backs, Axis tanks from the 15th Panzer Division and Italian Littorio Divisions swung out from the Kidney feature, often wrongly called a ridge, whereas it was a depression, to engage the 1st Armoured Division and the first major tank battle of El Alamein was joined. Over 100 tanks were involved in this battle and by dark, half were destroyed while neither position was altered.
D Plus 2: Sunday, October 25, 1942 The initial thrust had ended by Sunday. Both armies had been fighting non-stop for two days. The Allies had advanced through the minefields in the west to make a six mile wide and five mile deep inroad. They now sat atop Miteriya Ridge in the southeast, but at the same time Axis forces were firmly entrenched in most of their original battle positions and the battle was at a standstill. Hence, Montgomery ordered an end to conflict in the south (releasing 7th Armoured Division to move north to join X Corps) and the evacuation of Miteriya Ridge. The battlefield would be concentrated at the Kidney feature and Tel el Eisa until a breakthrough occurred. It was to be a gruesome seven days.
By early morning, the Axis forces launched a series of attacks using 15th Panzer and Littorio divisions. The Panzer Armee was probing for a weakness, but found none. When the sun set, the Allied infantry went on the attack. Around midnight, 51st Division launched three attacks, but no one knew exactly where they were. Pandemonium and carnage ensued, resulting in the loss of over 500 Allied troops, and leaving only one officer among the attacking forces.
While the 51st Highland Division was operating around Kidney, the Australians were attacking Point 29, a 20 foot high Axis artillery observation post southwest of Tel el Eisa, in an attempt to surround an Axis salient on the coast containing the German 164th Light Division and large numbers of Italian infantry.[28] This was the new northern thrust Montgomery had devised earlier in the day, and was to be the scene of heated battle for some days. The Australian 26 Brigade attacked at midnight, the air force dropped 115 tons of bombs and the Allies took the position and 240 prisoners. Fighting continued in this area for the next week, as the Axis tried to recover the small hill that was so vital to their defence.
[edit] Phase Three: The Counter
D Plus 3: Monday, October 26, 1942
Rommel returned to North Africa on the evening of 25 October and immediately assessed the battle. He found that the Italian Trento Division had lost half its infantry, 164th Light Division had lost two battalions, most other groups were under strength, all men were on half rations, a large number were sick, and the entire Axis army had only enough fuel for three days.
The offensive was stalled. Churchill railed, "Is it really impossible to find a general who can win a battle?"[citation needed] A counterattack began at 3 p.m. against Point 29 near Tel el Eisa. Rommel was convinced by this time that the main assault would be in the north[29] and was determined to retake Point 29, moving all the tanks from around the Kidney feature to the battle site. Air and ground power poured into the area as Rommel moved the 21st Panzer and Ariete Divisions up from the south along the Rahman Track. This turned out to be a mistake. The British held the position and Rommel's troops could not retire for lack of fuel, and were therefore stuck on open ground at the mercy of air attacks.
However, back at the Kidney feature, the British failed to take advantage of the missing tanks. Each time they tried to move forward they were stopped by anti-tank guns.
On a brighter note for the British, Beaufort torpedo bombers of No. 42 Squadron RAF, attached to No. 47 Squadron[30] sank the tanker Proserpina at Tobruk, which was the last hope for resupplying Rommel's army.
D Plus 4: Tuesday, October 27, 1942
By this time, the main battle was concentrated around Tel el Aqqaqir and the Kidney feature. A battlegroup of 2nd Battalion, The Rifle Brigade, of 1st Armoured Division G and H Troops, with 239 Anti-Tank Battery, Royal Artillery was at a position codenamed Snipe, southwest of Kidney. The stand at Snipe is a legendary episode of the Battle of El Alamein. Lucas-Phillips, in his Alamein records that:[page # needed]
"The desert was quivering with heat. The gun detachments and the platoons squatted in their pits and trenches, the sweat running in rivers down their dust-caked faces. There was a terrible stench. The flies swarmed in black clouds upon the dead bodies and excreta and tormented the wounded. The place was strewn with burning tanks and carriers, wrecked guns and vehicles, and over all drifted the smoke and the dust from bursting high explosives and from the blasts of guns."
Mortar and shell fire was constant all day long. Around 4 p.m., British tanks accidentally opened fire against their own position causing casualties. At 5 p.m., Rommel launched his major attack. German and Italian tanks moved forward. With only four guns in operation, 239 Battery was able to score continual broad-side hits against forty tanks of 21st Panzer Division, knocking out thirty-seven of them. The remaining three withdrew and a new assault was launched. All but nine tanks in this assault were also destroyed. The Germans gave up on this assault and the British battlegroup was withdrawn that evening. Its CO, Lieutenant-Colonel Victor Buller Turner was awarded the Victoria Cross. Only one anti-tank gun, from 239 Battery, was brought back.[31]
D Plus 5-6: Wednesday, Thursday, October 28-29, 1942
The Australians were to continue pushing northwest beyond Tel el Eisa to an enemy-held location south of the railway known as "Thompson's Post" to force a breakthrough along the coast road. The German 125th Regiment and a small battalion of 7th Bersaglieri Regiment sent to reinforce the sector were attacked by Australian soldiers. Many of them were riding Valentines of 46th Royal Tank Regiment, which mines and anti-tank guns soon brought to grief. The Australians suffered 200 casualties in that attack.[32] Although the Italian anti-tank gunners fought fiercely, all were killed or died of wounds, except for 20 wounded men who were captured the following morning. The German soldier has impressed the world, Rommel wrote in a plaque dedicated to the Bersaglieri. However the Italian Bersaglieri soldier has impressed the German soldier.[33]
By the end of the day, the British had 800 tanks still in operation, while the Axis had 148 German and 187 Italian tanks. With the tanker Luisiano sunk outside Tobruk harbor, Rommel told his commanders, "It will be quite impossible for us to disengage from the enemy. There is no gasoline for such a manoeuvre. We have only one choice and that is to fight to the end at Alamein."[citation needed]
D Plus 7-9: Friday-Sunday, October 30 - November 1, 1942
The night of October 30 saw a continuation of previous plans, with the Australians attacking. This was their third attempt to reach the paved road, which they took that night. On the 31 October Rommel launched four retaliatory attacks against "Thompson's Post". The fighting was intense and often hand to hand, but no ground was gained by the Axis forces. On Sunday, November 1 Rommel tried to dislodge the Australians once again, but the brutal, desperate fighting resulted in nothing but lost men and equipment. By now, it had become obvious to Rommel that the battle was lost. He began to plan the retreat and anticipated retiring to Fuka, some 50 miles (80 km) west. Ironically, 1,200 tons of fuel arrived, but it was too late and had to be blown up.[citation needed]
[edit] Phase Four: Operation Supercharge
This phase of the battle began on November 2 at 1 a.m., with the objective of destroying enemy armour, forcing the enemy to fight in the open, reducing the Axis stock of petrol, attacking and occupying enemy supply routes, and causing the disintegration of the enemy army. The intensity and the destruction in Supercharge were greater than anything witnessed so far during this battle. The objective of this operation was Tel el Aqqaqir along the Rahman Track, the base of the Axis defence.
This attack started with a seven hour aerial bombardment focused on Tel el Aqqaqir and Sidi Abd el Rahman, followed by a four and a half hour barrage of 360 guns firing 15,000 shells. The initial thrust of Supercharge was to be carried out by 151st (Durham) and 152nd (Seaforth and Camerons) Brigades supported by British 9th Armoured Brigade all at the time under command of 2nd New Zealand division, as also was 133rd Royal Sussex Brigade and 23rd Armoured Brigade, less 40th and 46th Royal Tank Regiments. The New Zealand Division's commander, Freyburg, had tried to free his division of this chore, as they were under strength and had lost a brigade; the New Zealand contribution to SUPERCHARGE was 5th Brigade with 28th (Maori) Battalion attached to 151st Brigade.
The infantry gained most of their objectives, but as with Operation Lightfoot on the first day of the battle, lanes could not be cleared through the minefields until night was almost over.
9th Armoured Brigade started its approach march at 8pm from El Alamein railway station on the 1 November with around 130 tanks; it arrived at its start line with only 94 tanks[34].
The brigade was to have started its attack towards Tel el Aqqaqir at 5.45a.m. behind a barrage; however, the attack was postponed for 30 minutes while the brigade regrouped on Currie's orders[35]. At 6.15 a.m., half an hour before dawn, the three regiments of the brigade advanced towards the gunline[36]
We all realise that for armour to attack a wall of guns sounds like another Balaclava, it is properly an infantry job. But there are no more infantry available. So our armour must do it.
—Lieutenant General Sir Bernard Freyberg[37]
Brigadier Currie had tried to get the brigade out of doing this job stating that he believed the brigade would be attacking on too wide a front with no reserves and that they will most likely take 50 percent losses.[37]
The reply came from Freyberg that Montgomery[37]
...was aware of the risk and has accepted the possibility of losing 100% casualties in 9th Armoured Brigade to make the break, but in view of the promise of immediate following through of 1st Armoured Division, the risk was not considered as great as all that.
The German and Italian anti-tank guns (mostly Pak38 and Italian 47mm guns[38], along with 24 of the formidable 88mm flak guns[37]) opened fire upon the charging tanks silhouetted by the rising sun. German tanks, which had penetrated between the Warwickshire Yeomanry and Royal Wiltshire Yeomanry also caused many casualties.
The Axis gun screen started to inflict a steady amount of damage upon the charging tanks but was unable to stop them; over the course of the next half an hour around 35 guns were destroyed and several hundred prisoners taken.
The brigade had started the attack with 94 tanks and was reduced to only 24 runners (although many were recoverable[36]) and of the 400 tank crew involved in the attack 230 were killed, wounded or captured.[39]
If the British armour owed any debt to the infantry, the debt was paid by 9th Armoured in heroism and blood.
—Bernard Montgomery, referring to the British Armour's mistakes during the First Battle of El Alamein
After the Brigade's action, Brigadier Gentry of 6th New Zealand Brigade went ahead to survey the scene. On seeing Brigadier Currie asleep on a stretcher, he approached him saying, "Sorry to wake you John, but I'd like to know where your tanks are?" Currie waved his hand at a group of tanks around him, replying "There they are". Gentry was puzzled. "I don't mean your headquarters tanks, I mean your armoured regiments. Where are they?" Currie waved his arm and again replied, "There are my armoured regiments, Bill" [40].
The brigade had sacrificed itself upon the gun line and caused great damage but had failed to create the gap for the 1st Armoured Division to pass through; however, the attack as expected[36] brought down the weight of the German and Italian tank reserve. At 11a.m. on 2 November The remains of 15th Panzer, 21st Panzer and Littorio Armoured Divisions counterattacked 1st Armoured Division and the remains of 9th Armoured Brigade which by that time had dug in with a screen of anti-tank guns and artillery together with intensive air support. The counter-attack failed under a blanket of shells and bombs, resulting in a loss of some 100 tanks.[39]
The resulting fighting was later termed, the "Hammering of the Panzers". Although tank losses were approximately equal, this represented only a portion of the total British armour, but most of Rommel's tanks.
Rommel called up Ariete from the south to join the defence around Tel el Aqqaqir in the last stand of Panzer Armee Afrika. By nightfall, the Axis had only thirty-two tanks operating along the entire front. With a rearguard fighting desperately at Tel el Aqqaqir, Rommel began the withdrawal to Fuka.
[edit] Phase Five: The Break-Out
Erwin Rommel sent a message to Hitler explaining his untenable position and seeking permission to withdraw, but Rommel was told to stand fast. Von Thoma, who had been promoted to Lieutenant-General on 1 November, told him, "I've just been around the battlefield. 15th Panzer's got ten tanks left, 21st Panzer only fourteen and Littorio seventeen." Rommel read him Hitler's message, so von Thoma left to take command at the head of the Afrika Korps.[citation needed]
When 150 British tanks came after the remaining members of the nearly vanquished 15th and 21st Panzers, Von Thoma stood with his men. He was in the command tank where the two panzer formations joined, and remained there until the last tank was destroyed. At the end, when all was lost, Von Thoma stood alone beside his burning tank at the spot that was to become known as the "panzer graveyard".[citation needed]
Despite the desperate situation, Rommel's men stood their ground. Entire units were destroyed, but the remnants continued to fight. A 12 miles (19 km)-wide hole had been cut in the Axis line. "If we stay put here, the army won't last three days... If I do obey the Fuhrer's order, then there's the danger that my own troops won't obey me... My men come first!"[citation needed] Rommel ordered the massive retreat against Hitler's orders.[41] However, owing to insufficient transportation, most of the Italian infantry formations were abandoned and left stranded to their fate.[42][43]
D Plus 12, November 4, 1942
On November 4, the final assaults were underway. The 1st , 7th and 10th Armoured Divisions passed through the German lines and towards the open desert. The Allies had won the battle. The Axis were in retreat. This day saw the liquidation of Ariete Division, Littorio Division and Trieste Motorised Division. Ariete Armoured Division, under General Francesco Arena, fought valiantly at El Alamein effectively thwarting Allied plans to encircle and completely destroy the German forces. Berlin radio claimed that in this sector the "British were made to pay for their penetration with enormous losses in men and material. The Italians fought to the last man."[44] Having dismissed the Italians, Private Sid Martindale, 1st Battalion Argyll & Sutherland Highlanders, meanwhile noted that 25th Bologna Infantry Division who had taken the full weight of the British armoured attack had fought bravely:
The more we advanced the more we realized that the Italians did not have much fight on them after putting up a strong resistance to our overwhelming advance and they started surrendering to our lead troops in droves. There was not much action to see but we came across lots of burnt out Italian tanks that had been destroyed by our tanks. I had never seen a battlefield before and the site of so many dead was sickening.[45]
Bologna and the remainder of Trento Division, tried to fight their way out of Alamein and marched in the desert without water, food or transport before surrendering exhausted and dying from dehydration.[46]It was reported that Colonel Dall'Olio, commanding Bologna, surrendered saying, "We are not firing because we haven't the desire but because we have spent every round."[citation needed] In a symbolic act of final defiance no one in Bologna raised their hands. Harry Zinder of Time magazine noted that the Italians fought better than had been expected, and commented that for the Italians:
It was a terrific letdown by their German allies. They had fought a good fight. In the south, the famed Folgore parachute division fought to the last round of ammunition. Two armoured divisions and a motorised division, which had been interspersed among the German formations, thought they would be allowed to retire gracefully with Rommel's 21st, 15th and 19th [sic][47]light. But even that was denied them. When it became obvious to Rommel that there would be little chance to hold anything between El Daba and the frontier, his Panzers dissolved, disintegrated and turned tail, leaving the Italians to fight a rear-guard action.[48]
 Allied Forces attack: 10pm October 23rd |
 Axis Armoured Divisions counterattack: 6pm October 24th |
 Allies attempt to break through: Night of October 25th |
 Axis counterattack and attack by 9th Australian Division: Afternoon of October 25th |
 Folgore Parachutist Division attacked from three directions: 10:30pm October 25th until 3am October 26th |
 Allies advance- 51st Highland Division takes Kidney Ridge- Littorio Armoured Division counterattacks: 5pm October 26th |
 Both sides redeploy their Forces: Night of October 26th to October 27th |
 Axis fails to retake Kidney Ridge: 8am October 27th |
 Allies attempt to push back Trento Division: October 28th |
 Rommel redeploys his forces: October 29th |
 Operation Supercharge begins- 9th Australian fails to break through: 11pm October 31st, 1942. |
 Tank Battle of Tell el Aqqaqir: 9am November 2nd; Axis forces begin retreat: 10pm November 2nd |
 Axis forces prepare to fall back: November 3rd |
 Axis forces halt their retreat: November 3rd |
 Allied forces break through: 7am November 4th; Trento, Bologna and Ariete Divisions destroyed- Axis forces flee |
[edit] Analysis of the battle
It may almost be said, "Before Alamein we never had a victory. After Alamein we never had a defeat."
– Winston Churchill.[49]
Montgomery had always envisioned the battle as being one of attrition, similar to those fought in the Great War and had correctly predicted both the length of the battle and the number of Allied casualties [50]. Commonwealth artillery was superbly handled but armour was handled very badly by Montgomery who showed no deep appreciation of what armour could and couldn't do. Commonwealth air support was excellent in contrast to the Luftwaffe and Regia Aeronautica who offered little or no support to ground forces, preferring to engage in air-to-air combat.
In the end the Allies' victory was all but total. Axis casualties of 37,000 amounted to over 30% of their total force. Allied casualties of 13,500 were by comparison a remarkably small proportion of their total force.[51] The effective strength of Panzer Armee Afrika after the battle amounted to some 5,000 troops, 20 tanks, 20 anti-tank guns and 50 field guns.[51]
El Alamein was the first great offensive against the Germans in which the Allies were victorious. Winston Churchill famously summed up the battle on 10 November 1942 with the words, "This is not the end, it is not even the beginning of the end. But it is, perhaps, the end of the beginning."[52] It was Montgomery's greatest triumph; he took the title "Viscount Montgomery of Alamein" when he was raised to the peerage.
[edit] Aftermath
[edit] Rommel chased west of Sirte
Once again, the Axis made a fighting withdrawal to El Agheila. Twice before, in 1940 and 1941, British and Commonwealth forces had advanced to El Agheila but no further. On the first occasion Wavell's offensive in 1940 had failed when with his lines of supply overstretched, political decisions intervened to withdraw troops to fight in Greece and East Africa while his opponents were reinforced with the Afrika Korps. In 1941 Auchinleck and Ritchie's forces once again reached El Agheila with ragged supply lines and exhausted formations and were pushed back. This time, however, it was Rommel's troops which found themselves fought out and with few replacements while prior to the battle Montgomery had focused his planners intensely on the question of how to create supply lines to provide the Eighth Army with the 2,400 tonnes of supply it needed each day.[53]
Huge quantities of engineering materials and equipment had been collected to repair the destroyed transport infrastructure. This was so successful that the railway line between El Alamein and Fort Capuzzo, despite having been blown up in over 200 separate places, was quickly put into commission and in the month after Eighth Army reached Capuzzo carried 133,000 tons of supplies.[54] The port of Benghasi was handling 3,000 tons a day by the end of December when it had been thought that, after two years of almost constant destructive effort, its extreme capacity would be 800 tons.[54]
Mindful of Rommel's previous successful counter-strokes from El Agheila Montgomery paused in front of the Axis line for three weeks to concentrate his strung out forces and prepare an assault.[55] On 11 December Montgomery launched the 51st Highland Division along the line of the coast road with 7th Armoured Division on their left. On 12 December 2nd New Zealand Division started a deep flanking sweep around Rommel's flank in an attempt to cut off his line of retreat.[56] The Highland Division was severely damaged by skilfully designed defences while 7th Armoured met stiff resistance from the Ariete Combat Group (the remains of the Ariete Armoured Division).
Rommel's army had lost roughly 75,000 men, a thousand guns and 500 tanks and needed time to re-form so he decided to husband what remained of his weakened forces and withdraw.[57] By 15 December the New Zealanders were on the coast road but the firm terrain allowed Rommel to break his forces into smaller units and withdraw off-road through the gaps between the New Zealanders' positions.[58]
Rommel conducted a text-book retreat, destroying all equipment and infrastructure left behind[59] and peppering the land behind him with mines and booby traps to keep the following Eighth Army at arm's length.[60] Eighth Army reached Sirte on 25 December but west of Sirte they were forced to pause once again to consolidate their strung out formations in order to deal with the defensive line Rommel had created at Wadi Zemzem near Buerat 230 miles (370 km) east of Tripoli.[61] Rommel, concerned that his army would be completely enveloped and destroyed if he once again halted to face the Eighth Army, had, with the agreement of Field Marshal Bastico, sent a request to the Italian Commando Supremo ("High Command") in Rome to withdraw all the way to Tunisia where the terrain would better suit a defensive action and where he could link with the Axis army forming there in response to the Operation Torch landings. However, Mussolini's reply on 19 December was that the Panzerarmee must resist to the last man at Buerat.[58]
[edit] Tripoli falls to Eighth Army
On 15 January 1943 General Montgomery launched the 51st (Highland) Division against Rommel's defences while sending 2nd New Zealand Division and 7th Armoured Divisions around the inland flank of the Axis line. Weakened by the withdrawal of 21st Panzer Division to Tunisia to strengthen von Arnim's Fifth Panzer Army[62], once again Rommel was forced to conduct a fighting retreat. Tripoli, some 150 miles (240 km) miles further on, with its major port facilities, was taken on 23 January as Rommel continued to withdraw to the French-built southern defenses of Tunisia, the Mareth Line.
[edit] Rommel links with von Arnim in Tunisia
Rommel was by this time in contact with Hans-Jürgen von Arnim's Fifth Panzer Army which had been fighting the Tunisia Campaign against the multi-national British First Army in northern Tunisia since shortly after Operation Torch the previous autumn. Hitler was determined to retain hold of Tunisia and Rommel finally started to receive replacement men and materials. The Axis now faced a war on two fronts with Eighth Army approaching from the east and the British, French and Americans of First Army from the west. Rommel's German-Italian Panzer Army was re-designated Italian First Army under General Giovanni Messe while Rommel assumed command of the new Army Group Africa, responsible for both fronts.
[edit] 18th Army Group formed under Alexander
Similarly the two Allied armies were placed under 18th Army Group with Harold Alexander in command. However, the hope of a rapid conclusion to the campaign against the Axis forces was thwarted at the Battle of the Kasserine Pass in the second half of February when Rommel struck a costly blow against the inexperienced U.S. II Corps and destroyed their ability to make an early thrust east to the coast to cut off the Italian First Army's line of supply from Tunis and isolate it from von Arnim's forces in the north.
[edit] Significance
Rommel did not lose hope in Africa until the end of the Tunisia Campaign. Even so, El Alamein was a significant Allied victory and the most decisive with respect to closing of a war front. After three years the African theatre was cleared of Axis forces and the Allies could look northward to the Mediterranean.
[edit] See also
[edit] Footnotes
- ^ Playfair, p.9 - 1,029 tanks ready for action, consisting of: 170 M3 Grant, 252 M4 Sherman, 216 Crusader II, 78 Crusader III, 119 M3 Stuart (aka Honey), 194 Valentine. Playfair also notes that 200 tanks were available as replacements and over 1,000 tanks were in workshops being repaired, overhauled or modified.
- ^ Playfair, p.9
- ^ Playfair, p.9 - breaks down into 552 x 2-Pounders, 849 x 6-Pounders
- ^ Buffetaut, p.95
- ^ Playfair, pp.9-11 - broken down into 31 x Panzer II, 85 x Panzer III (short 50mm gun), 88 x Panzer III (long 50mm gun), 8 x Panzer IV (short 75mm gun), 30 x Panzer IV (long 75mm gun), 7 x Command tanks, 278 x M13/40 Variants, 20 x "light" tanks. Playfair notes that another 23 German tanks were under repair but these have been excluded from the above total
- ^ Playfair, p.3
- ^ Playfair, p.10 - 68 x 7.65cm, 290 x 5cm Pak 38, 138 x 88 Flak guns
- ^ a b c d e f g h i Playfair, p.78
- ^ Carver and Playfair state nearly 500 tanks taken out of action, while Barr claims at least 332
- ^ Playfair, p.78 - breaks the Allied casualties down: British Troops 58%, Australians 22%, New Zealanders 10%, South Afrians 6%, Indians 1%, Allies 3%
- ^ a b c Barr, Niall, p.404
- ^ a b Watson, p.27
- ^ a b Barr, p.404, he states these losses as Axis tanks and guns and does not break them down between German and Italian.
- ^ Watson, p.27, claims 450 Axis tanks were destroyed, but does not break them down between German and Italian.
- ^ Bierman & Smith (2002), p.255
- ^ Bierman & Smith (2002), p.255
- ^ a b c d Dear (2005), p.254
- ^ name="D254"
- ^ Bierman & Smith (2002), p.255
- ^ Bierman & Smith (2002), p.255
- ^ Watson (2007), p.20
- ^ Mead, Richard, p.304
- ^ Barr, Niall, p.308
- ^ Clifford, Alexander, p.307
- ^ Bierman & Smith (2002), Chapters 22-24
- ^ Bauer (2000), pp.366-368
- ^ Bauer (2000), p.368
- ^ Clifford, Alexander p.308
- ^ Watson (2007), p.23
- ^ Hally, James J (1980). The Squadrons of the Royal Air Force. Tonbridge: Air Britain. ISBN 0851300839.
- ^ Lucas Phillips (1962), p. 296
- ^ Johnston, Dr. Mark (23 October, 2002). The Battle of El Alamein, 23 October 1942. Remembering 1942. Australian War Memorial, Canberra. Retrieved on 2008-04-15.
- ^ El Alamein 2 (in Italian). Ardito2000 website. Retrieved on 2008-04-15.
- ^ Playfair, p.66
- ^ Barr, Niall. p.387
- ^ a b c Playfair, p.67
- ^ a b c d Barr, Niall. p.386
- ^ Walker, Ronald p.395
- ^ a b Watson (2007), p.24
- ^ Lucas-Phillips (1962), p.358
- ^ Watson (2007), p. 12
- ^ Bierman & Smith (2002), Chapter 27
- ^ Bauer (2000), p.372
- ^ Desert War, Note (11): Statement issued by the German Government on 6 November 1942. spartacus.schoolnet.co.uk. Retrieved on 2007-12-22.
- ^ Spirit, Martin; Martindale, Sid (2005). Sid's War: The Story of an Argyll at War. Retrieved on 2008-01-27.
- ^ Watson (2007), p.27
- ^ Presumably a confused reference to the 90th Light Division. There was no 19th Light Division on the German Order of Battle
- ^ Zinder, Harry. "A Pint of Water per Man". Time Magazine (16 November 1942).
- ^ The Hinge of Fate, Winston Churchill, Pg 603. The Yale Book of Quotations By Fred Shapiro, Page 154.
- ^ Hamilton, Nigel (2004). "Montgomery, Bernard Law", Oxford Dictionary of National Biography. Oxford University Press.
- ^ a b Watson (2007), p.27
- ^ See Churchill Centre: Quotations of Churchill
- ^ Clifford, Alexander p.317
- ^ a b Clifford, Alexander p.318
- ^ Watson (2007), p.39
- ^ Watson (2007), p.42
- ^ Clifford, Alexander p.319
- ^ a b Watson (2007), p.43
- ^ Clifford, Alexander p.322
- ^ Clifford, Alexander p.320
- ^ Clifford, Alexander pp.325-327
- ^ Watson (2007), p.44
[edit] Sources
- Barr, Niall [2004] (2005). Pendulum of War: The Three Battles of El Alamein. Woodstock, NY: Overlook Press. ISBN 978-1585677382.
- Bauer, Eddy; Young, Peter (general editor) [1979] (2000). The History of World War II, Revised edition, London, UK: Orbis Publishing. ISBN 1-85605-552-3.
- Bierman, John; Smith, Colin [2002] (2003). War without hate : the desert campaign of 1940-1943, New edition, New York: Penguin Books. ISBN 978-0142003947.
- Buffetaut, Yves(1995);Operation Supercharge-La seconde bataille d'El Alamein; Histoire Et Collections
- Carver, Field Marshal Lord [1962] (2000). El Alamein, New edition, Ware, Herts. UK: Wordsworth Editions. ISBN 978-1840222203.
- Clifford, Alexander (1943). Three against Rommel. London: George G. Harrap.
- Dear, I. C. B. (ed) [1995] (2005). The Oxford Companion to World War II. Oxford University Press. ISBN 978-0-19-280666-6.
- Latimer, Jon (2002). Alamein. London: John Murray. ISBN 978-0719562037.
- Lucas-Phillips, C.E. (1962). Alamein. London: Heinemann. OCLC 3510044.
- Mead, Richard (2007). Churchill's Lions: A biographical guide to the key British generals of World War II. Stroud (UK): Spellmount, 544 pages. ISBN 978-1-86227-431-0.
- Playfair, Major-General I.S.O.; Brigadier C.J.C Molony, Captain F.C. Flynn, R.N. and Group Captain T.P. Gleave, C.B.E. [1966] (2004). History Of The Second World War: The Mediterranean and Middle East, volume 4: The Destruction of the Axis Forces in Africa, United Kingdom Military Series. Uckfield, UK: Naval & Military Press. ISBN 1-84574-068-8.
- Rommel, Erwin; with Basil Liddell-Hart [1953] (1982). The Rommel Papers. New York: Da Capo Press. ISBN 978-0306801570.
- Walker, Ian W. (2006). Iron Hulls, Iron Hearts; Mussolini's Elite Armoured Divisions in North Africa. Ramsbury: The Crowood Press. ISBN 1-86126-646-4.
- Walker, Ronald (1967). The Official History of New Zealand in the Second World War 1939–1945: Alam Halfa and Alamein. Wellington, NZ: Historical Publications Branch.
- Watson, Bruce Allen [1999] (2007). Exit Rommel: The Tunisian Campaign, 1942-43. Mechanicsburg PA: Stackpole. ISBN 0-81173-381-5.
[edit] External links
- The fate of the Italians in the battle as reported by TIME MAGAZINE
- The war time memories of Pvt. Sid Martindale 1st Battalion Argyll & Sutherland Highlanders
- Official History of Australia in the Second World War Volume III - Tobruk and El Alamein Chapters 14 -15
- The 3rd Hussars (9th Armoured Brigade) at El Alamein
- Royal Engineers Museum Royal Engineers and Second World War (Deception and mine clearance at El Alamein)
- The History of the British 7th Armoured Division
- El Alamein
- El Alamein in Egypt Today (where to stay etc)

