| Battle of the Somme | |||||||
|---|---|---|---|---|---|---|---|
| Part of the Western Front (First World War) | |||||||
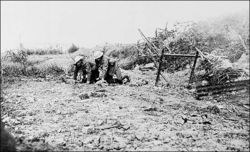
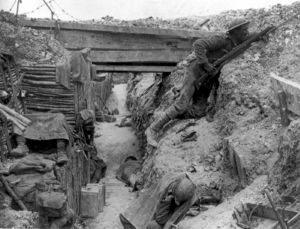 Men of the 11th Battalion, The Cheshire Regiment, near La Boisselle, July 1916. |
|||||||
|
|||||||
| Combatants | |||||||
|
|||||||
| Commanders | |||||||
| Strength | |||||||
| 13 British and 11 French divisions (initial) 51 British and 48 French divisions (final) |
10½ divisions (initial) 50 divisions (final) |
||||||
| Casualties | |||||||
| 419,654 British Empire 204,253 French 623,907 total (of which 146,431 killed or missing) 100 tanks and 782 RFC aircraft destroyed |
434,500 total [1] (of which 164,055 killed or missing) |
||||||
- For other uses of "Battle of the Somme", see Battle of the Somme (disambiguation).
While Verdun would bite deep in the national consciousness of France for generations, the Somme would have the same effect on generations of Britons. The battle is best remembered for its first day, 1 July 1916, on which the British suffered 57,470 casualties, including 19,240 dead — the bloodiest day in the history of the British Army to this day. As terrible as the battle was for the British Empire troops who suffered there, it naturally affected the other nationalities as well. One German officer famously described it as "the muddy grave of the German field army." By the end of the battle, the British had learnt many lessons in modern warfare while the Germans had suffered irreplaceable losses. British historian Sir James Edmonds stated, "It is not too much to claim that the foundations of the final victory on the Western Front were laid by the Somme offensive of 1916."
For the first time the home front in Britain was exposed to the horrors of modern war with the release of the propaganda film The Battle of the Somme, which used actual footage from the first days of the battle.
Contents |
Prelude
The Allied war strategy for 1916 was largely formulated during a conference at Chantilly held between 6 December and 8 December 1915, when it was decided that for the next year, simultaneous offensives were to be be mounted by the Russians in the East, the Italians (who had by now joined the Entente) in the Alps and the Anglo-French on the Western Front, thereby assailing the Central Powers from all sides.
In late December 1915, General Sir Douglas Haig had replaced General Sir John French as Commander-in-Chief of the British Expeditionary Force (BEF). Haig favoured a British offensive in Flanders — it was close to BEF supply routes via the Channel ports and had a strategic goal of driving the Germans from the North Sea coast of Belgium, from which their U-boats were menacing Britain. However, though there was no formal arrangement, the British were as yet the junior partner on the Western Front and had to comply with French policy. In January 1916, the French commander, General Joseph Joffre, had agreed to the BEF making their main effort in Flanders, but after further discussions in February, the decision was reached to mount a combined offensive where the French and British armies met astride the Somme River in Picardy.
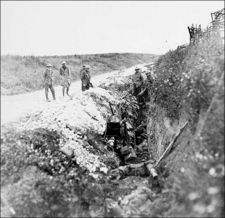
The 1916 Battle of the Somme was one of the largest battles of the First World War. With more than one million casualties it was also one of the bloodiest battles in human history. The Allied forces attempted to break through the German lines along a 25-mile (40 km) front north and south of the River Somme in northern France. One purpose of the battle was to draw German forces away from the Battle of Verdun; however, by its end the losses on the Somme had exceeded those at Verdun.
Plans for the joint offensive on the Somme had barely begun to take shape when the Germans launched the Battle of Verdun on 21 February 1916. As the French committed themselves to defending Verdun, their capacity to carry out their role on the Somme disappeared, and the burden shifted to the British. France would end up contributing 3 corps to the opening of the attack (the XX, I Colonial and XXXV Corps of the 6th Army).[1] As the bloodbath at Verdun dragged on, the aim of the Somme offensive changed from delivering a decisive blow against Germany to relieving the pressure on the French army.
The original British regular army, six divisions strong at the start of the war, had been effectively wiped out by the battles of 1914 and 1915. The bulk of the army was now made up of volunteers of the Territorial Force and Lord Kitchener's New Army, which had begun forming in August 1914. The expansion of the army demanded generals for the senior commands, so promotion came at a dizzying pace and did not always reflect competence or ability. Haig himself had started the war as commander of British I Corps before commanding the British First Army and now the BEF, in effect an army group, made up of four armies (soon to be five) of 60 divisions.
By mid-1916, the Fokker Scourge was over, and the Royal Flying Corps had achieved air supremacy over the Somme battlefield. On the Somme front, the RFC fielded 10 squadrons and 185 aircraft against the 129 of the Germans. The British pursued a vigorous offensive policy that enabled them to spot for the artillery, via aircraft or tethered balloons, while denying the Germans the same. It was not until September that the introduction of new aircraft would swing the balance back in favour of the German Air Service once again.
The first day on the Somme
- Main article: First day on the Somme
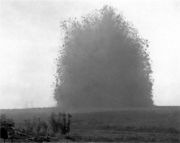
The first day of the battle was preceded by five days of preliminary artillery bombardment in which the British fired over 1.7 million shells. Ten mines had also been dug beneath the German front-line trenches and strongpoints; the three largest mines contained about 21 tons (18 tonnes) of explosives each.
The attack would be made by 13 British divisions (11 from the Fourth Army and two from the Third Army) north of the Somme River and 11 divisions of the French Sixth Army astride and south of the river. They were opposed by the German Second Army of General Fritz von Below. The axis of the advance was centred on the Roman road that ran from Albert in the west to Bapaume 12 miles (19 km) to the northeast.
Zero hour for the Battle of the Somme was 07:30 on 1 July, 1916. Ten minutes prior to this, at 07:20, the mine beneath Hawthorn Ridge Redoubt was detonated by an officer. The reason he detonated the mine earlier than was planned is unknown. At 07:28, the remaining mines were exploded (except for the mine at Kasino Point, which was late). At zero hour there was a brief and unsettling silence as the artillery shifted their aim onto the next line of targets. Then, in the words of poet John Masefield:
- [T]he hand of time rested on the half-hour mark, and all along that old front line of the English there came a whistling and a crying. The men of the first wave climbed up the parapets, in tumult, darkness, and the presence of death, and having done with all pleasant things, advanced across No Man's Land to begin the Battle of the Somme. (The Old Front Line, 1917)
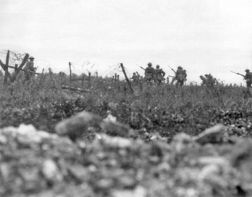
The infantry were burdened with 70 lb (32 kg) of equipment and in some cases had been instructed to form up into uniform waves and advance at a walking pace.[2] Elsewhere units had crawled out into no man's land early so that they could rush the front German trench as soon as the barrage lifted. Despite the heavy bombardment, many of the German defenders had survived, protected in deep dugouts, and they were able to inflict a terrible toll on the vulnerable infantry.
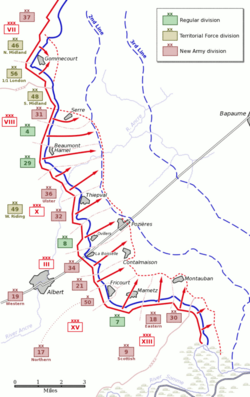
North of the Albert-Bapaume road, the advance was almost a complete failure from the outset. In a few places the attackers got into the German front line trench system or even the support line, but invariably their numbers were too few to withstand the German counter-attacks. As the German defensive barrage descended on no man's land, it became impossible for reinforcements to get through or for reports to get back.
Communications were completely inadequate, and commanders were largely ignorant of the progress of the battle. A mistaken report that the 29th Division had succeeded at Beaumont Hamel led to the reserve brigade being ordered forward in support. The 1st Newfoundland Regiment was unable to reach the forward trenches, so it advanced from the reserve trench. Most of the battalion was wiped out before it crossed the front line, and it suffered 91% casualties, the second worst battalion loss of the day. 801 men from the regiment marched onto the battle field that day, and only 67 made it out unharmed, with over 500 dead. Nearly an entire generation of Newfoundland's future leaders was killed. For their efforts, The 1st Newfoundland Regiment, was given the name "The Royal Newfoundland Regiment" by King George V of England.
British progress astride the Albert-Bapaume road was likewise a failure, despite the explosion of the two mines at La Boisselle. Here another tragic advance was made by the Tyneside Irish Brigade of the 34th Division which started nearly one mile from the German front line, in full view of the defenders' machine guns, and was effectively wiped out before it reached its own friendly forward trench line.
In the sector south of the road, the French divisions had greater success. Here the German defences were relatively weak, and the French artillery, which was superior in numbers and experience to the British, was highly effective. From the town of Montauban to the Somme River, all the first day objectives were reached. Though the French XX Corps was to only act in a supporting role in this sector, in the event they would help lead the way. South of the Somme, French forces fared very well, surpassing their intended objectives. The I Colonial Corps departed their trenches at 9:30 am as part of a feint meant to lure the Germans opposite into a false sense of security. The feint was successful as, like the French divisions to the north, they too advanced easily. In under an hour, they had stormed Fay, Dompierre, Becquincourt and attained a foothold on the Flaucourt plateau. The entire German first line was in French hands. By 1100 hrs, the second line - marked by Assevillers, Herbecourt and Feuillères - was reached without even having to send in reserves. To the right of the Colonial Corps, the XXXV Corps also attacked at 9:30 am but, having only one division in the first line, had made less progress. Nevertheless, all first-day objectives were met. The Germans trenches had been completely pulverized. The enemy had been completely surprised by the infantry attack. On the north bank, the French had advanced 1,600 yards (1.5 km) and on the south, 2,200 yards (2 km).
Some British divisions managed to perform extremely well; according to Middlebrook:
- The leading battalions (of the 36th (Ulster) Division) had been ordered out from the wood just before 7.30 A.M. and laid down near the German trenches... At zero hour the British barrage lifted. Bugles blew the "Advance". Up sprang the Ulstermen and, without forming up in the waves adopted by other divisions, they rushed the German front line... By a combination of sensible tactics and Ulster dash, the prize that eluded so many, the capture of a long section of the German front line, had been accomplished.
And in another sector, according to Middlebrook:
- At Gommecourt...Attacking from the south, the 56th (London) Division had performed brilliantly. Making use of the new trench they had dug in No Man's Land and a smoke-screen, four battalions had captured the whole of the German front-line system.
Overall, however, the first day on the Somme was a failure. The British had suffered 19,240 dead, 35,493 wounded, 2,152 missing and 585 prisoners for a total loss of 57,470. Initial casualties were especially heavy among officers, who still dressed differently from non-commissioned officers and other ranks, and whose uniforms the Germans had been trained to recognize.
An exact count of German casualties for 1 July is difficult to make, because German units only submitted casualty returns every 10 days. It is estimated that the Germans suffered 8,000 casualties on the British front of which 2,200 were prisoners of war. The disparity between British and German casualties was highest at Ovillers, where the British 8th Division suffered 5,121 casualties while the defending German 180th Regiment had only 280 casualties — a ratio of 18 to 1.
Aftermath of the first day
At 22:00 on 1 July, the commander of the British Fourth Army, Lieutenant-General Henry Rawlinson, had issued orders for the attack to be resumed. Confusion and poor communications through the extended chain of command meant it was some days before the British leaders realised the scale of the disaster. Haig appointed Lieutenant-General Hubert Gough to take over the northern sector while the Fourth Army dealt with the southern sector. Gough recognised the fiasco on his sector and prevented an immediate resumption of the offensive — operations would not resume until 3 July.
The British were also ignorant of opportunities that existed south of the Albert-Bapaume road where they had achieved partial success. It is now known that there existed for a time a large gap in the German defences between Ovillers (on the road) and Longueval. On 3 July a reconnaissance patrol from the 18th (Eastern) Division ranged two miles into German territory without encountering an established defensive position. However, the opportunity was missed or the British lacked the resources to exploit it, and the Germans were able to fill the gap in time.
Mametz Wood was still vacant on July 3 but was reoccupied by the Germans the following day and would not be captured until July 10 after two costly attempts. Places such as High Wood and Delville Wood, there for the taking in the aftermath of the first day, would require an enormous expenditure of lives before they were eventually captured in August and September. In August Rawlinson wrote of the period 1–July 4:
- These four days would in all probability have enabled us to gain full possession of the hostile third line of defence, which was at that time less than half finished... It makes me sick to think of the "might have beens".
As the British struggled to jump-start their offensive, the French continued their rapid advance south of the Somme. 3 July - 4 July was the critical point in the offensive when the possibility of a breakthrough actually seemed achievable. But just as quickly as it appeared, it began to slip away. When the XX Corps was forced to halt its advance on the north bank in order to wait for the British to catch up, a simmering hostility toward the British rose up among the rank and file of the French army. Elsewhere, the I Colonial Corps pressed on and by the end of 3 July Frise, Méréaucourt Wood, Herbécourt, Buscourt, Chapitre Wood, Flaucourt, and Asseviller were all in French hands. In so doing, 8,000 Germans had been made prisoner, while the taking of the Flaucourt plateau would allow Foch to move heavy artillery up to support the XX Corps on the north bank. The French continued their advance on July 5 as Hem was taken. On 8 July Hardecourt-aux-Bois and Monacu Farm (a veritable fortress, surrounded by hidden machine-gun nests in the nearby marsh) both fell. On 9 July -10 July, Biaches, Maisonnette and Fortress Biaches.
Thus, in ten days of fighting, on nearly a 12.5 mile (20 km) front, the French 6th Army had progressed as far as 6 miles (10 km) at points. It had occupied the entire Flaucourt plateau (which constituted the principal defense of Péronne) while taking 12,000 prisoners, 85 canons, 26 minenwerfers, 100 machine-guns, and other assorted materials, all with relatively minimal losses.
For the British, the first two weeks of the battle had descended into a series of disjointed, small-scale actions, ostensibly in preparation for making a major push. Between July 3 and 13 July Rawlinson's Fourth Army carried out 46 "actions" resulting in 25,000 casualties but no significant advance. This demonstrated a difference in strategy between Haig and his French counterparts and was a source of friction. Haig's purpose was to maintain continual pressure on the enemy while Joffre and Foch preferred to conserve their strength in preparation for a single, heavy blow.
In one significant respect, the Battle of the Somme was a major strategic success for the British as on 12 July, in response to the Somme fighting and the situation in the east, Falkenhayn called off the German offensive at Verdun. While the fighting would continue there until December, it would be the French who dictated the course of the battle.
On the Somme, von Below's Second Army would not be able to endure the continued British and French pressure alone. Each front line German division was being attacked by three or four Allied divisions. On 19 July, the German forces were reorganised with von Below taking command of the German First Army, responsible for the northern sector, and General Max von Gallwitz taking over the Second Army which covered the southern sector. In addition, von Gallwitz was made army group commander responsible for both German armies on the Somme.
As early as 2 July, seven German divisions were on their way to the Somme as reinforcements, and seven more were on their way within another week. In July and August the Germans poured in 35 extra divisions on the British sectors and a further seven divisions on the French sector. The combined pressure on Germany meant that Oberste Heeresleitung (OHL, army high command) had only one division left in reserve by August.
The British had hoped to stem this flow of German reinforcements to the Somme from other sectors of the front. To do this a series of raids and demonstrations were carried out with the aim of "pinning" the German divisions to the front. The largest and most infamous of these was the Battle of Fromelles, 19 July - 20 July, opposite Aubers Ridge in Artois. For the cost of 7,080 Australian and British casualties, no ground was captured and no halt was made to the withdrawal of German divisions from Artois to the Somme.
Battle of Bazentin Ridge
- Main article: Battle of Bazentin Ridge
On 14 July (Bastille Day) the Fourth Army was finally ready to resume the offensive in the southern sector. The attack, known as the Battle of Bazentin Ridge, was aimed at capturing the German second defensive position which ran along the crest of the ridge from Pozières, on the Albert–Bapaume road, southeast towards the villages of Guillemont and Ginchy. The objectives were the villages of Bazentin le Petit, Bazentin le Grand and Longueval, which was adjacent to Delville Wood. Beyond this line, on the reverse slope of the ridge, lay High Wood.
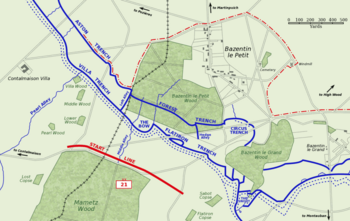
There is considerable contrast between the preparation and execution of this attack and that of 1 July. The attack on Bazentin Ridge was made by four divisions on a front of 6,000 yards (5.5 km) with the troops going over before dawn at 03:25 after a surprise five minute artillery bombardment. The artillery laid down a creeping barrage, and the attacking waves pushed up close behind it in no man's land, leaving them only a short distance to cross when the barrage lifted from the Germans' front trench.
By mid-morning, the first phase of the attack was a success with nearly all objectives taken, and as on 1 July, a gap was made in the German defences. However, again as on 1 July, the British were unable to successfully exploit it. Their attempt to do so created the most famous cavalry action of the Battle of the Somme when the 7th Dragoon Guards and the 2nd Deccan Horse attempted to capture High Wood. It is likely that the wood could have been captured by the infantry in the morning, but by the time the cavalry were in position to attack, the Germans had begun to recover. Though the cavalry held on in the wood through the night of 14 July, they had to withdraw the following day.
The British had a foothold in High Wood and would continue to fight over it as well as Delville Wood, neighbouring Longueval, for many days. Unfortunately for them, the successful opening of the 14 July attack did not mean they had learnt how to conduct trench battles. On the night of 22–23 July, Rawlinson launched an attack using six divisions along the length of the Fourth Army front which failed completely. The Germans were learning; they had begun to move away from the trench-based defences and towards a flexible defence in depth system of strongpoints that was difficult for the supporting artillery to suppress.
Pozières and Mouquet Farm
- Main articles: Battle of Pozières – Battle of Mouquet Farm
No significant progress was made in the northern sector in the first few weeks of July. Ovillers, just north of the Albert-Bapaume road, was not captured until 16 July. Its capture, and the foothold the British had obtained in the German second position on 14 July, meant that the chance now existed for the German northern defences to be taken in the flank. The key to this was Pozières.
The village of Pozières lay on the Albert-Bapaume road at the crest of the ridge. Just behind (east) the village ran the trenches of the German second position. The Fourth Army made three attempts to seize the village between 14 July and 17 July before Haig relieved Rawlinson's army of responsibility for its northern flank. The capture of Pozières became a task for Gough's Reserve Army, and the tool he would use was the three Australian divisions of I Anzac Corps.

Gough wanted the Australian 1st Division to attack immediately, but the division's British commander, Major General Harold Walker, refused to send his men in without adequate preparation. The attack was scheduled for the night of 23 July to coincide with the Fourth Army attack of 22 – 23 July.
Going in shortly after midnight, the attack on Pozières was a success, largely thanks to Walker's insistence on careful preparation and an overwhelming supporting bombardment; however, an attempt to capture the neighbouring German second position failed, though two Australians were awarded the Victoria Cross in the attempt. The Germans, recognising the critical importance of the village to their defensive network, made three unsuccessful counter-attacks before beginning a prolonged and methodical bombardment of the village. The final German effort to reclaim Pozières came before dawn on 7 August following a particularly heavy bombardment. The Germans overran the forward Australian defences, and a wild mêlée developed from which the Australians emerged victorious.
Gough planned to drive north along the ridge towards Mouquet Farm, allowing him to threaten the German bastion of Thiepval from the rear. However, the further the Australians advanced, the deeper was the salient they created such that the German artillery could concentrate on them from three directions.

On 8 August the Australians began pushing north along the ridge with the British II Corps advancing from Ovillers on their left. By 10 August a line had been established just south of the farm, which the Germans had turned into a fortress with deep dugouts and tunnels connecting to distant redoubts. The Australians made numerous attempts to capture the farm between 12 August and 3 September, inching closer with each attempt; however, the German garrison held out. The Australians were relieved by the Canadian Corps, who would briefly capture Mouquet Farm on 16 September, the day after the next major British offensive. The farm was finally overrun on 26 September, and the garrison surrendered the following day.
In the fighting at Pozières and Mouquet Farm, the three Australian divisions suffered over 23,000 casualties. If the losses from Fromelles on 19 July are included, Australia had sustained more casualties in six weeks in France than they had in the eight months of the Battle of Gallipoli.
Attrition: August and September
- Main articles: Battle of Guillemont – Battle of Ginchy
By the start of August, Haig had accepted that the prospect of achieving a breakthrough was now unlikely; the Germans had "recovered to a great extent from the disorganisation" of July. For the next six weeks, the British would engage in a series of small-scale actions in preparation for the next major push. On 29 August the German Chief of the General Staff, Erich Falkenhayn, was replaced by General Paul von Hindenburg, with General Erich Ludendorff as his deputy, but in effect the operational commander. The immediate effect of this change was the introduction of a new defensive doctrine. On 23 September the Germans began constructing the Siegfried Stellung, called the Hindenburg Line by the British.
On the Fourth Army's front, the struggle for High Wood, Delville Wood and the Switch Line dragged on. The boundary between the British and French armies lay southeast of Delville Wood, beyond the villages of Guillemont and Ginchy. Here the British line had not progressed significantly since the first day of the battle, and the two armies were in echelon, making progress impossible until the villages were captured. The first British effort to seize Guillemont on 8 August was a debacle. On 18 August, a larger effort began, involving three British corps as well as the French, but it took until 3 September before Guillemont was in British hands. Attention now turned to Ginchy, which was captured by the 16th (Irish) Division on 9 September. The French had also made progress, and once Ginchy fell, the two armies were linked near Combles.
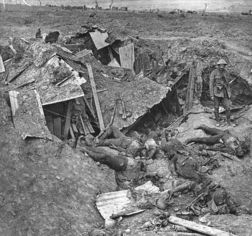
The British now had an almost straight front line from near Mouquet Farm in the northwest to Combles in the southeast, providing a suitable jumping-off position for another large scale attack. In 1916, a straight front was considered necessary to enable the supporting artillery to lay down an effective creeping barrage behind which the infantry could advance.
This intermediate phase of the Battle of the Somme had been costly for the Fourth Army, despite there being no major offensive. Between 15 July and 14 September (the eve of the next battle), the Fourth Army made around 90 attacks of battalion strength or more with only four being general attacks across the length of the army's 5 miles (8 km) of front. The result was 82,000 casualties and an advance of approximately 1,000 yards (915 m)—a performance even worse than 1 July.
Debut of the Tank
- Main articles: Battle of Flers-Courcelette – Battle of Morval
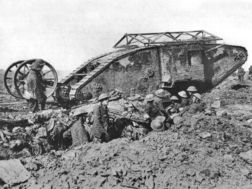
The last great Allied effort to achieve a breakthrough came on 15 September in the Battle of Flers-Courcelette with the initial advance made by 11 British divisions (nine from Fourth Army, two Canadian divisions on the Reserve Army sector) and a later attack by four French corps.
The battle is chiefly remembered today as the debut of the tank. The British had high hopes that this secret weapon would break the deadlock of the trenches. Early tanks were not weapons of mobile warfare — with a top speed of 2 mph (3.2 km/h), they were easily outpaced by the infantry — but were designed for trench warfare. They were untroubled by barbed wire obstacles and impervious to rifle and machine gun fire, though highly vulnerable to artillery. Additionally, the tanks were notoriously unreliable; of the 49 tanks available on 15 September, only 32 made it to the start line, and of these, only 21 made it into action. Mechanical breakdowns were common, and many others became bogged or ditched in the shell holes and trenches of the churned battlefield.
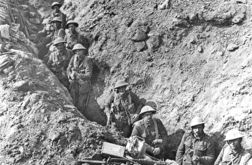
The British made gains across the length of their front, the greatest being in the centre at Flers with an advance of 3,500 yards (3.2 km), a feat achieved by the newest British division in France, the 41st Division, in their first action. They were later joined by the tank D-17, giving rise to the optimistic press report: "A tank is walking up the High Street of Flers with the British Army cheering behind."
It was also the first major Western Front battle for the New Zealand Division, at the time part of the British XV Corps, which captured part of the Switch Line west of Flers. On the left flank, the Canadian 2nd Division captured the village of Courcelette after heavy fighting, with some assistance from tanks. And finally after two months of fighting, the British captured all of High Wood, though not without another costly struggle. The plan was to use tanks in support of infantry from the 47th (1/2nd London) Division, but the wood was an impassable landscape of shattered stumps and shell holes, and only one tank managed to penetrate any distance. The German defenders were forced to abandon High Wood once British progress on the flanks threatened to encircle them.
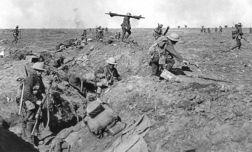
The British had managed to advance during Flers-Courcelette, capturing 4,500 yards (4.1 km) of the German third position, but fell short of all their objectives, and once again the breakthrough eluded them. The tank had shown promise, but its lack of reliability limited its impact, and the tactics of tank warfare were obviously in their infancy.
The least successful sector on 15 September had been east of Ginchy where the Quadrilateral redoubt had held up the advance towards Morval — the Quadrilateral was not captured until 18 September. Another attack was planned for 25 September with the objectives of the villages of Gueudecourt, Lesbœufs and Morval. Like the 14 July Battle of Bazentin Ridge, the limited objectives, concentrated artillery and weak German defences resulted in a successful attack. On this occasion the tanks remained in reserve.
The final phase
- Main articles: Battle of Thiepval Ridge – Battle of Le Transloy – Battle of the Ancre Heights – Battle of the Ancre
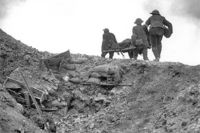
On 26 September Gough's Reserve Army launched its first major offensive since the opening day of the battle in an attempt to capture the German fortress of Thiepval. The 18th (Eastern) Division, which had excelled on 1 July, once more demonstrated by capturing most of Thiepval on the first day that careful training, preparation and leadership could overcome the obstacles of trench warfare. Mouquet Farm finally fell to the 11th (Northern) Division, and the Canadians advanced 1,000 yards (915 m) from Courcelette.
There followed a period from 1 October to 11 November, known as the Battle of the Ancre Heights, of grinding attritional fighting for little gain. At the end of October, Gough's army was renamed the British Fifth Army.
Meanwhile on the Fourth Army's front, Haig was still under the illusion that a breakthrough was imminent. On 29 September he had outlined plans for Allenby's Third Army to rejoin the battle in the north around Gommecourt and for the Fourth Army to attack towards Cambrai. The first step required the capture of the German Transloy Line, effectively the German fourth defensive position that ran from the village of Le Transloy in the east to Le Sars on the Albert-Bapaume road.
Opening on 1 October, the Battle of Le Transloy became bogged down as the weather broke, and heavy rain turned the churned battlefield into a quagmire. Le Sars was captured on 7 October, but elsewhere there was little progress and a continual flow of casualties. The final throe came on 5 November with a failed attack on the Butte de Warlencourt. On the Fourth Army's front, major operations in the Battle of the Somme had now ceased.
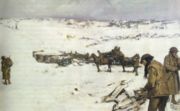
The final act of the Battle of the Somme was played out between 13–18 November along the Ancre River, north of Thiepval. Haig's purpose for the attack was more political than military — with winter setting in, there was no longer any prospect of a breakthrough. Instead, with another conference at Chantilly starting on 15 November, he hoped to be able to report of success to his French counterparts.
The opening moves were almost a replay of 1 July, even down to another mine being detonated beneath Hawthorn Ridge Redoubt west of Beaumont Hamel. The 31st Division had attacked Serre on 1 July and four and a half months later was called on to do it again; the results were similar. South of Serre the British, with the benefit of their hard-earned experience, succeeded in capturing most of their objectives. The 51st (Highland) Division took Beaumont Hamel while on their right the 63rd (Royal Naval) Division captured Beaucourt, Lieutenant Colonel Bernard Freyberg winning the Victoria Cross in the process. South of the Ancre II Corps had also made progress.
Haig was satisfied with the result, but Gough argued for a final effort which was made on 18 November with an attack on the Munich and Frankfurt Trenches and a push towards Grandcourt. Ninety men of the 16th Battalion, Highland Light Infantry (the "Glasgow Boys Brigade" Pals battalion) were cut-off in Frankfurt Trench where they held out until 21 November when the 45 survivors — 30 of them wounded — surrendered. So ended the Battle of the Ancre and with it the Battle of the Somme.
The Conclusion
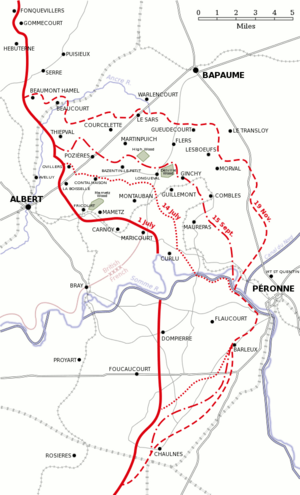
It is difficult to declare the Battle of the Somme a victory for either side. The British and French did succeed in capturing ground but little more than 5 miles (8 km) at the deepest point of penetration, well short of their original objectives. The British themselves had gained approximately only 2 miles and lost about 420,000 soldiers in the process, meaning that a centimetre cost about 2 men. Taking a long-term view, the Battle of the Somme delivered more benefits for the British than it did for the Germans. As British historian Gary Sheffield said, "The battle of the Somme was not a victory in itself, but without it the Entente would not have emerged victorious in 1918."
Strategic effects
Prior to the battle, Germany had regarded Britain as a naval power and discounted her as a military force to be reckoned with, believing Germany's major enemies were France and Russia. Starting with the Somme, Britain began to gain influence in the coalition, especially following the mutinies in the French army in 1917. In recognition of the growing threat Britain posed, on 31 January Germany adopted the policy of unrestricted submarine warfare in an attempt to starve the island nation of supplies, an act that would ultimately bring the United States into the war.
At the start of 1916, the British army had been a largely inexperienced mass of volunteers. The Somme was the first real test of this newly raised "citizens army" that had come into being following Lord Kitchener's call for recruits at the start of the war. It is brutal but accurate to observe that many of the British soldiers killed on the Somme lacked experience, and therefore their loss was of little military significance. However, they had been the first to volunteer and so were often the fittest, most enthusiastic and best educated of the citizen soldiers. For Germany, which had entered the war with a trained force of regulars and reservists, each casualty was sapping the experience and effectiveness of the German army. The senior German commander Crown Prince Rupprecht of Bavaria stated, "What remained of the old first-class peace-trained German infantry had been expended on the battlefield."
The Battle of the Somme damaged the German Army beyond repair, after which it was never able to adequately replace its casualties with the same calibre of soldier that doggedly held its ground during most of the battle. By the end of the battle, the British and German armies were closer to being equally matched; effectively militias.
German commanders did not believe the army could endure continual battles of attrition like the Somme. On 24 February 1917, the German army made a strategic scorched earth withdrawal from the Somme battlefield to the prepared fortifications of the Hindenburg Line, thereby shortening the front line they had to occupy. In the grey area of gains and losses, it is therefore possible to claim that the Entente's territorial gain from the battle was greater than that which existed at the battle's close.
The strategic effects of the Battle of the Somme cannot obscure the fact that it was one of the costliest battles of the First World War. A German officer, Friedrich Steinbrecher, wrote:
- Somme. The whole history of the world cannot contain a more ghastly word.
Casualties
| Nationality | Total casualties |
Killed & missing |
Prisoners |
|---|---|---|---|
| United Kingdom | 360,000+ | - | - |
| Canada | 25,000 | - | - |
| Australia | 23,000 | < 200 | |
| New Zealand | 7,408 | - | - |
| South Africa | 3,000+ | - | - |
| Newfoundland | 2,000+ | - | - |
| Total British Empire | 419,654 | 95,675 | - |
| French | 204,253 | 50,756 | - |
| Total Allied | 623,907 | 146,431 | - |
| Germany | 465,000 – 600,000 | 164,055 | 31,000 |
The original Allied estimate of casualties on the Somme, made at the Chantilly conference on 15 November, was 485,000 British and French casualties versus 630,000 German. These figures were used to support the argument that the Somme was a successful battle of attrition for the Allies. However, there was considerable scepticism at the time of the accuracy of the counts. After the war, a final tally showed that 419,654 British and 204,253 French were killed, wounded, or taken prisoner; of the 623,907 total casualties, 146,431 were either killed or missing.
The British official historian Sir James Edmonds maintained that German losses were 680,000, but this figure has been discredited. A separate statistical report by the British War Office concluded that German casualties on the British sector could be as low as 180,000 during the battle. Today commonly accepted figures for all German losses on the Somme are between 465,000 and 600,000. In compiling his biography of General Rawlinson, Major-General Sir Frederick Maurice was supplied by the Reichsarchiv with a figure of 164,055 for the German killed or missing.
The average casualties per division (consisting of circa 10,000 soldiers) on the British sector up until 19 November was 8,026 — 6,329 for the four Canadian divisions, 7,408 for the New Zealand Division, 8,133 for the 43 British divisions and 8,960 for the three Australian divisions. The British daily loss rate during the Battle of the Somme was 2,943 men, which exceeded the loss rate during the Third Battle of Ypres but was not as severe as the two months of the Battle of Arras (1917) (4,076 per day) or the final Hundred Days offensive in 1918 (3,685 per day).
The Royal Flying Corps lost 782 aircraft and 576 pilots during the battle.
Notes
- ↑ Doughty, Robert A. Pyrrhic Victory: French Strategy and Operation in the Great War. Cambridge, MA: The Belknap Press of Harvard University, 2005. p.291
- ↑ Despite the concerns of some critics, there was military necessity for these orders. According to Mud, Blood and Poppycock by Gordon Corrigan (p.274):
- Critics of the Somme make much of what they see as insistence on parade ground precision, with men being ordered to walk and keep in line. This had nothing to do with ceremonial parades, but was a perfectly sensible rule to ensure that control was not lost, that men were not shot by their own side, and that they all arrived on the objective together and in a fit state to engage the enemy. Scorn is also poured on the need for the attacking infantry to carry packs weighing sixty pounds. This is one of the enduring myths of the First World War, and derives from an imperfect reading of Field Service Regulations. In fact, it was everything that the man carried and wore that weighed sixty pounds: the uniform he stood up in, the boots on his feet, his weapon and its ammunition. In the attack large packs were left behind, and the small pack contained only the essentials for the operation. That said, each man still had to carry his entrenching tool, extra rations, two gas helmets, wire cutters, 220 rounds of ammunition, two grenades and two sandbags, while ten picks and fifty shovels were taken by each leading company." This was no light burden, and the follow up troops, coming immediately after those who carried out the actual assault, carried a great deal more. It is one thing to capture ground, quite another to hold it. Once into a German position the objective had to be consolidated and held against the inevitable counter attack. This meant that the existing defence works had to be turned round to face the other way, wire obstacles had to be constructed and communications had to be established. Ammunition, grenades and digging implements had to be there, to say nothing of signals cable, water and food, and there was no other way of making all this immediately available to the infantry than by having them carry it with them.
References
- The First Day on the Somme, Martin Middlebrook, 1971, Penguin Books, ISBN 0-14-139071-9
- Somme 1916, Lyn MacDonald, 1983, Penguin Books, ISBN 0-14-017867-8
- The 1916 Battle of the Somme, Peter Liddle, 1992, Pen & Sword, ISBN 1-84022-240-9
- The Somme, Gary Sheffield, 2003, Cassell, ISBN 0-304-36649-8
- The Face of Battle: A Study of Agincourt, Waterloo and the Somme, John Keegan, 1976, Penguin Books, ISBN 0-14-004897-9
- The Somme, Robin Prior and Trevor Wilson, 2005, UNSW Press, ISBN 0-86840-977-4